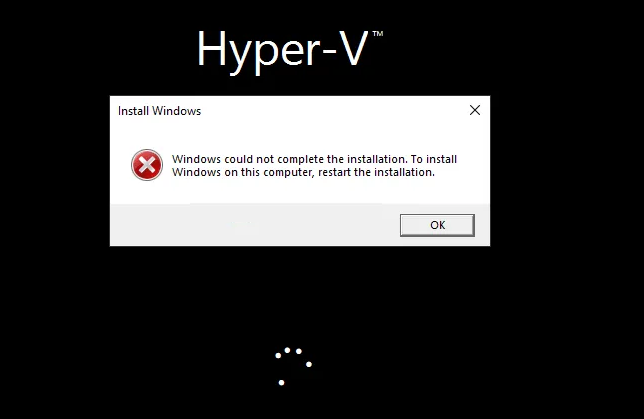
Many users reported about hyper-v windows could not complete the installation problem. When they try to install Windows 10/11 on Hyper-V, they get an error message that says “Windows could not complete the installation. To install Windows on this computer, restart the installation.”
You must know that the same error message might appear during a fresh installation. Here, in this article, we will discuss the different fixes that you should try to get the problem fix if occurs on Hyper-V. There are different solutions listed and you have to choose the one based on your situation:
Possible fixes for hyper-v windows could not complete the installation issue
Fix 1: Do not interrupt the installation process
Many a time, it is found that when Hyper-V takes much longer time than usual to go to the next screen while installing Windows 11/10, people click on the Shutdown or Turn off button in quick. This may be the reason for the issue under discussion appears on screen. Therefore, it is highly not recommended to you to stop the installation process and won’t click on the shutdown or turn off button while it is installing the OS.
Fix 2: Check if the ISO is intact
Hpyer-V might not fetch the file and continue with the installation because the selected ISO file is not intact with the same location. As a result, you receive hyper-v windows could not complete the installation error message on the screen. Therefore, it is recommended not to change the ISO or delete it before the installation process completed.
Fix 3: Re-download ISO
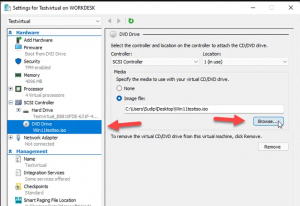
There could be a case that the ISO file is corrupted due to which the windows could not complete the installation error occurs. If that is so, you should re-download the ISO and restart the installation. Here is how you can replace the ISO path:
- Open Hyper-V Manager,
- Right-click on the virtual machine and select Settings,
- Under the SCSI controller, select DVD drive,
- Click the Browse button,
- Finally, choose the new location for you ISO.
Fix 4: Reduce RAM
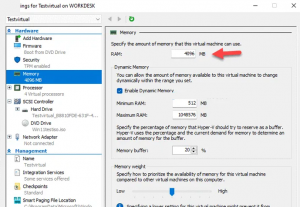
We recommend you not to assign more than 50% of the virtual machine when your system does not have the good quality of RAM. You can reduce the amount of your virtual machine by the steps below:
- Right-click on Virtual Machine and select Settings,
- Go to the Memory tab and set a reduced amount,
- Click Ok to confirm,
- Then, re-start the installation.
Fix 5: Re-create virtual machine
If none of the methods work, the last option you left with is to re-create the virtual machine. This is the way how you can get the fix for Hyper-V. However, if the same problem with Windows, you should use Automatic Startup Repair, turn on the Administrator account, Start creation Wizard and etc.
Conclusion
That’s all! We have provided all possible fixes for hyper-v windows could not complete the installation. Hopefully, these methods help you in getting the required fix. There should be an automatic tool available to you through which you can get rid of Windows based issues occur time to time.
For that, we have a recommendation for you to use PC Repair Tool –a professional tested and highly recommended tool to deal with any windows related issues such as BSODs, registry, problems with EXEs and DLL files and even malware attacks. Here is its direct download link.


