What is ‘Fatal error occurred while creating a TLS Client Credential’ error in Windows 10/11?
If you are facing ‘Fatal error occurred while creating a TLS Client Credential’ error in Windows 10/11 computer when you launch a program, browse the web, or connect to a network, then you are in right-place for the solution. Here, you are provided with easy ways to resolve the issue. Let’s starts the discussion.
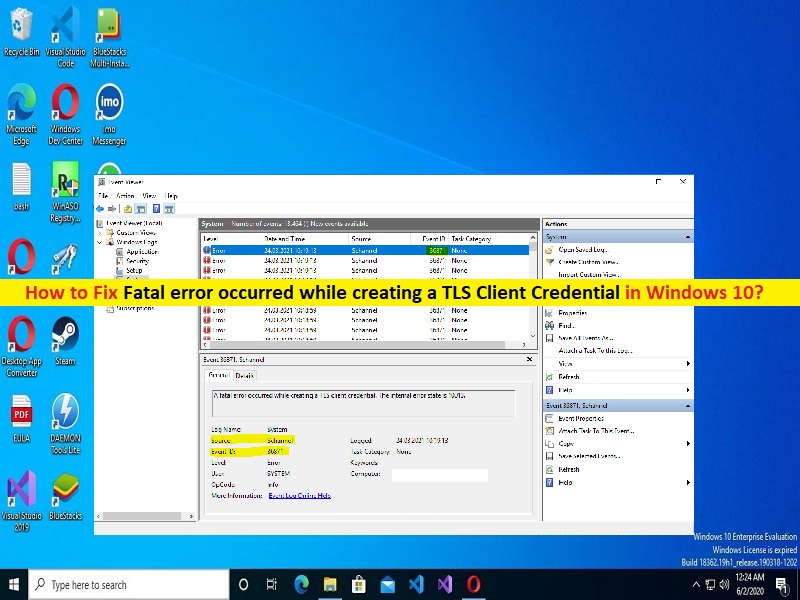
‘Fatal error occurred while creating a TLS Client Credential’ error: It is common Windows Problem considered Windows Event Viewer error. This error is usually appeared when you launch and run a application, browse the web, or connect to a network. This issue indicates there is disarrangement between client and server on a mutual chipper to use establishes a secure connection. The error is appeared with some error codes like Internal Error State is 10013. Let’s take a look at error message.
“A fatal error occurred while creating a TLS client credential. The internal error state is 10013”
The possible reasons behind the issue can be incorrect network settings, disabled depreciated TLS protocol, disarrangement between client and server on mutual chipper to use to establish a secure connection, and other issues. It is possible to resolve the issue with our instructions. Let’s go for the solution.
How to fix Fatal error occurred while creating a TLS Client Credential error in Windows 10/11?
Method 1: Fix ‘Fatal error occurred while creating a TLS Client Credential’ error with ‘PC Repair Tool’
‘PC Repair Tool’ is easy & quick way to find and fix BSOD errors, DLL errors, EXE errors, problems with programs/applications, malware or viruses infections in computer, system files or registry issues, and other system issues with just few clicks.
Method 2: Enable TLS 1.0 and 1.1 protocols
One possible way to fix the issue is to enable TLS 1.0 and TLS 1.1 protocols in network settings in computer.
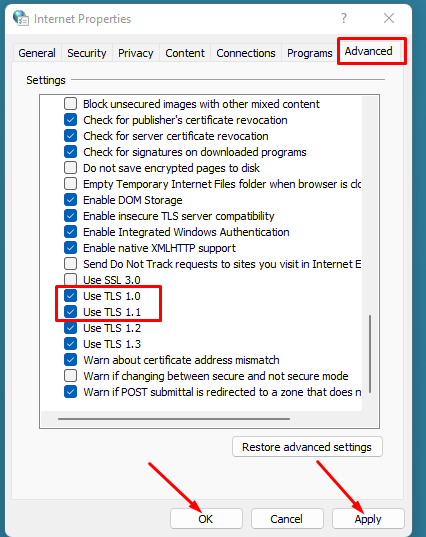
Step 1: Press ‘Windows + R’ keys on keyboard, type ‘ncpa.cpl’ in ‘Run’ window and hit ‘Ok’ button to open ‘Internet Properties’
Step 2: Click ‘Advanced’ tab, check ‘Use TLS 1.0’ and ‘Use TLS 1.1’ checkbox, and then hit ‘Apply > Ok’ button to save the changes. Once done, restart your computer and check if the issue is resolved.
Method 3: Fix Fatal error occurred while creating a TLS Client Credential error using Registry Editor
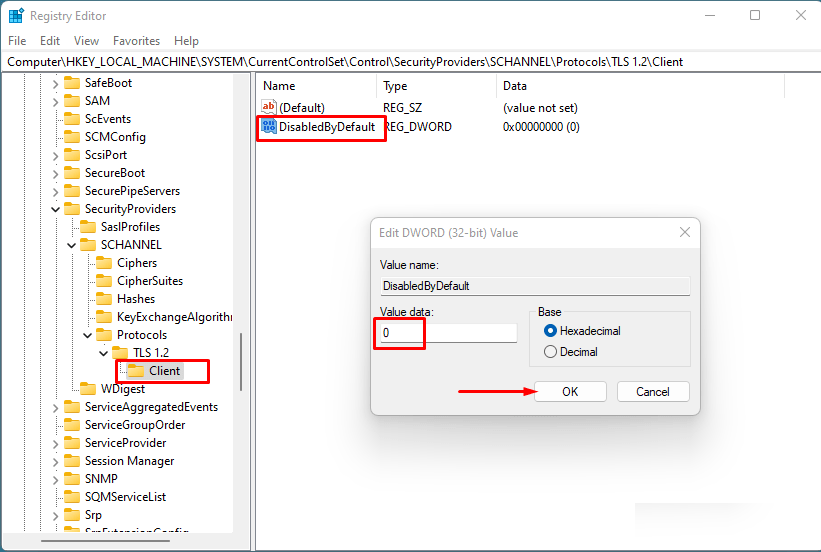
Step 1: Open ‘Registry Editor’ app in Windows PC via Windows Search Box and navigate to following path in left pane.
HKEY_LOCAL_MACHINE\SYSTEM\CurrentControlSet\Control\SecurityProviders\SCHANNEL\Protocols\TLS 1.2\Client
Step 2: In right-pane, right-click on empty space and select ‘New > DWORD (32/64 Bit) Value’ and name the value to ‘DisabledByDefault’
Step 3: Double-click on newly created registry value to edit, set its value data to ‘0’, and hit ‘Ok’ button to save the changes.
Step 4: Similarly, create one more value named ‘Enabled’ and put value data to ‘1’ for this and then close Registry Editor. Once done, restart your computer and check if the issue is resolved.
Method 4: Enable Deprecated TLS protocols
You can also try to fix the issue by enabling deprecated TLS protocol in computer.
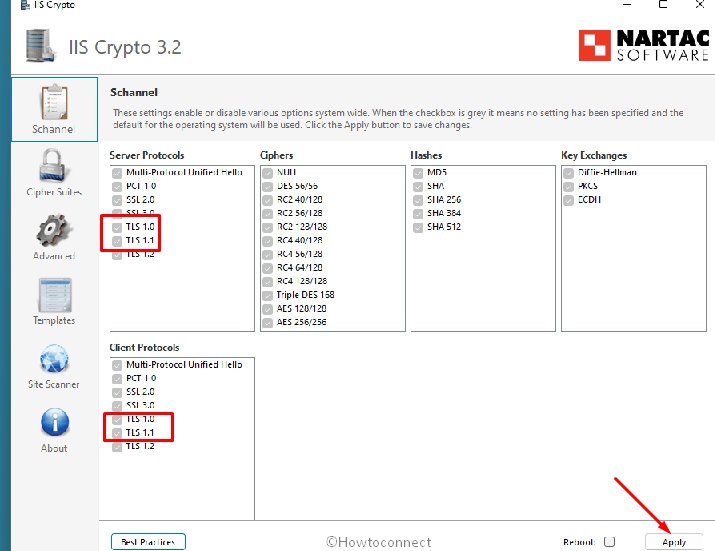
Step 1: Open ‘https://www.nartac.com/Products/IISCrypto/Download’ page in your browser to download IIS Crypto GUI tool
Step 2: Once downloaded, double-click on downloaded ‘IISCrypto.exe’ setup file and launch it.
Step 3: By default, it opens with ‘Schannel’ tab, check ‘TLS 1.0’ and ‘TLS 1.1’ in both Server Protocols and Client Protocols section, and then hit ‘Apply’. These are deprecated protocols. Once done, check if it works for you.
Method 5: Create TLS Client Credential by running PowerShell script to fix Fatal error occurred while creating a TLS Client Credential error
Step 1: Open ‘https://www.howto-connect.com/wp-content/uploads/TLS1.2_enable.zip’ page to download TLS1.2_Enable.
Step 2: Unpack the file by extracting the file, right-click on TLS1.2_enable.ps1 and select ‘Run with PowerShell’
Step 3: Alternatively, launch PowerShell ISE, and copy & paste the following script in PowerShell ISE
New-Item ‘HKLM:\SOFTWARE\WOW6432Node\Microsoft\.NETFramework\v4.0.30319’ -Force | Out-Null
New-ItemProperty -path ‘HKLM:\SOFTWARE\WOW6432Node\Microsoft\.NETFramework\v4.0.30319’ -name ‘SystemDefaultTlsVersions’ -value ‘1’ -PropertyType ‘DWord’ -Force | Out-Null
New-ItemProperty -path ‘HKLM:\SOFTWARE\WOW6432Node\Microsoft\.NETFramework\v4.0.30319’ -name ‘SchUseStrongCrypto’ -value ‘1’ -PropertyType ‘DWord’ -Force | Out-Null
New-Item ‘HKLM:\SOFTWARE\Microsoft\.NETFramework\v4.0.30319’ -Force | Out-Null
New-ItemProperty -path ‘HKLM:\SOFTWARE\Microsoft\.NETFramework\v4.0.30319’ -name ‘SystemDefaultTlsVersions’ -value ‘1’ -PropertyType ‘DWord’ -Force | Out-Null
New-ItemProperty -path ‘HKLM:\SOFTWARE\Microsoft\.NETFramework\v4.0.30319’ -name ‘SchUseStrongCrypto’ -value ‘1’ -PropertyType ‘DWord’ -Force | Out-Null
New-Item ‘HKLM:\SYSTEM\CurrentControlSet\Control\SecurityProviders\SCHANNEL\Protocols\TLS 1.2\Server’ -Force | Out-Null
New-ItemProperty -path ‘HKLM:\SYSTEM\CurrentControlSet\Control\SecurityProviders\SCHANNEL\Protocols\TLS 1.2\Server’ -name ‘Enabled’ -value ‘1’ -PropertyType ‘DWord’ -Force | Out-Null
New-ItemProperty -path ‘HKLM:\SYSTEM\CurrentControlSet\Control\SecurityProviders\SCHANNEL\Protocols\TLS 1.2\Server’ -name ‘DisabledByDefault’ -value 0 -PropertyType ‘DWord’ -Force | Out-Null
New-Item ‘HKLM:\SYSTEM\CurrentControlSet\Control\SecurityProviders\SCHANNEL\Protocols\TLS 1.2\Client’ -Force | Out-Null
New-ItemProperty -path ‘HKLM:\SYSTEM\CurrentControlSet\Control\SecurityProviders\SCHANNEL\Protocols\TLS 1.2\Client’ -name ‘Enabled’ -value ‘1’ -PropertyType ‘DWord’ -Force | Out-Null
New-ItemProperty -path ‘HKLM:\SYSTEM\CurrentControlSet\Control\SecurityProviders\SCHANNEL\Protocols\TLS 1.2\Client’ -name ‘DisabledByDefault’ -value 0 -PropertyType ‘DWord’ -Force | Out-Null
Write-Host ‘TLS 1.2 has been enabled.’
Step 4: Once executed, restart Windows Server.
Step 5: Now, open ‘Event Viewer’ app in Windows PC via Windows Search Box and go to ‘Windows Logs > System’ and check if the error is resolved.
Conclusion
I hope this article helped you on How to fix Fatal error occurred while creating a TLS Client Credential – The Internal Error State is 10013 in Windows 10/11 with easy ways. You can read & follow our instructions to do so. That’s all. For any suggestions or queries, please write on comment box below.


