
What is ‘Excel filter not working properly’ – Excel issue on Windows 10?
In this article, we are going to discuss on How to fix Excel filter not working properly issue in Windows 10. You will be guided with easy steps/methods to resolve the issue. Let’s starts the discussion.
‘Excel filter not working properly’ issue:
It is common problem associated with MS Excel or Excel indicates you are unable to use ‘Filter’ feature/function in Microsoft Excel or Excel app in your Windows 10 computer. If you are not aware, Filter feature/function in Excel is used in Excel file like to prepare your data to meet some basic layout standards before you use the filter and then use the filter feature filter your data in various different ways.
There could be several reasons behind the issue including blanks rows, improper selection of data, issue with column headings, due to merged cells, errors in cell or cell range, due to some hidden rows in excel sheet, and other issues. If you are facing the same issues and searching for ways to fix, then you are in right-place for the solution. Let’s go for the solution.
How to fix Excel filter not working properly issue in Windows 10?
Method 1: Check for blank rows
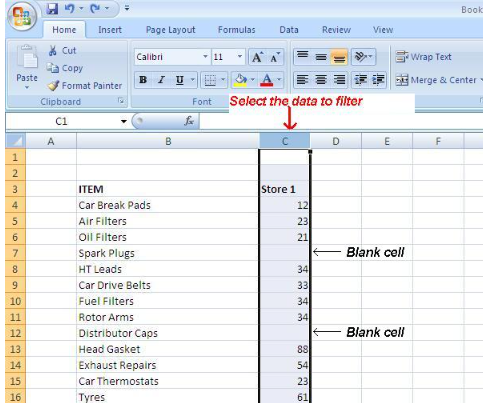
If you are not aware, Excel filter doesn’t apply to blank rows in Excel file and it doesn’t count the cells with first blank spaces. To fix the issue, you need to select the range right before using filter function. For example:
Step 1: If you want to use filter function in ‘C’ column, from ‘Data’ tab, select ‘Filter’ option, and now all items become visible in filter checkbox list or filter list.
Step 2: Also, you can choose all cell ranges or multiple columns before the app of filter function
Method 2: Make proper selection of data
You should make sure to make proper selected of data and if the sheet contains empty rows or columns or if you only want to filter out only specific range, then choose the section which you want to filter prior to turning on filter.
Step 1: At first, turn ON the filter and then click the dropdown arrow present in any columns to show the filter list
Step 2: Reeve and check sign across ‘Select all’, and shift right on column of filter list, and choose ‘Blanks’ option, and tap ‘Ok’
Step 3: The blank rows will clearly appear on screen and for easy identification, the row number of each blank row appears in blue color
Step 4: Select the rows you want to delete, and make right click over any one of blue color row number, and choose ‘Delete’ to delete the selected blank rows. By turning off filter, you can see the rows that are now been removed.
Method 3: Check the column headings
Step 1: Check the data which has only one row of column headings
Step 2: To get multiple headings into cell, you need to type the first line and then press ‘ALT + Enter’ option for typing in new line of cell
Step 3: The Wrap Text function also works great in formatting the cells correctly
Method 4: Check for merged cells
This issue can also be occurred due to merged cells in the range of selected cells for filtering. Excel doesn’t count the merged row data. In such case, you can fix the issue by removing merged cells to make separate cell, or remove merged cell from filter operation and check if works for you.
Step 1: Click ‘Home’ tab and go to ‘Alignment’ group
Step 2: Hit the dropdown next to ‘Merge & Center’, and choose ‘Unmerge Cells’, and then check if it works for you.
Method 5: Check for errors
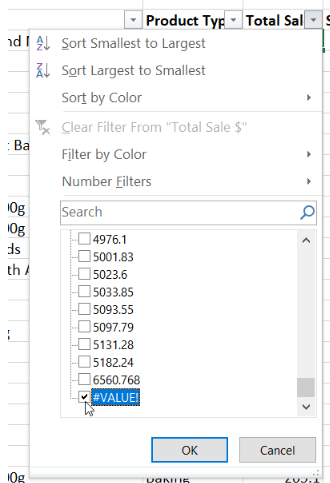
This issue can be occurred if the error contains on the cells on which you are trying to apply filter.
Step 1: To remove up the errors use the filter to fetch them they get listed at lists bottom so scroll down
Step 2: Choose the error and tap ‘Ok’ option, and delete it and then only clear up the filter
Method 6: Check for hidden rows
Step 1: For unhidding the rows firstly, you need to choose the area having the hidden rows.
Step 2: After that, you can make right-click over the rows header area or choose Unhide option
Method 7: Check for other filters
Check if the your filter is not been left on any other column. You can clear all filters by tapping ‘Clear’ button on ribbon next to filter button and this will leave filter turned ON, and then you can apply filter and check if the issue is resolved.
Method 8: Check if filter button is greyed out
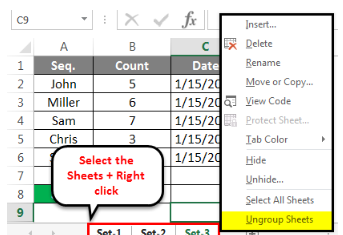
This issue can be occurred if filter button is greyed out.
Step 1: You can identify it by streaming out the title bar where generally the filename appears at the screen top
Step 2: If ‘Your filename’ – group is appearing, it means your worksheet is grouped
Step 3: Upgoing the worksheet can fix filter function working issue.
Step 4: Right-click on Sheet tab and choose ‘Ungroup sheets’, and after making these changes again, filter option starts appearing
Method 9: The ‘Equals’ filter not working
While using the Equals filter, number filter or date filter, if your Excel file is not showing the correct data, check whether the format of your data is same or not. For example, if the two different cells have different types of data like one is of currency format and other is number format, and you applied for number and equal filters, the Excel will only fetch the matches in which you have typed the number format also, and the same rule is applied to Date filter.
Conclusion
I hope this post helped you on How to fix Excel filter not working properly issue in Windows 10 with easy ways. You can read & follow our instructions to do so. That’s all. For any suggestions or queries, please write on comment box below.


