
Tips to fix dxgmms2.sys error blue screen error in Windows 10/11:
If you are facing ‘dxgmms2.sys error blue screen’ error in your Windows 10/11 computer in the middle of your work on computer or when you start/restart Windows computer, then you are in right-place for the solution. Here, you are provided with easy steps/methods to resolve the issue. Let’s starts the discussion.
‘dxgmms2.sys error blue screen’ error in Windows 10/11:
dxgmms2.sys is impotent Windows System file or Windows System Driver file that is associated with the Graphics Rendering capabilities of computer. However, several users reported they faced dxgmms2.sys error blue screen error on their Windows 10/11 computer in the middle of your work on computer or when you start/restart your Windows computer. This issue indicates you are unable to work Windows PC normally due to Blue Screen error.
The BSOD error is appeared with message saying ‘Your PC ran into a problem and needs to restart. We’re just collecting some error info, and then we’ll restart for you’ along with some Windows Stop Codes like SYSTEM_THREAD_EXCEPTION_NOT_HANDLED, SYSTEM_SERVICE_EXCEPTION, KMODE EXCEPTION NOT HANDLED, PAGE FAULT IN A NONPAGED AREA, IRQL NOT LESS OR EQUAL and others, with dxgmms2.sys error.
There could be several reasons behind the issue including corrupted/outdated graphics card driver, issue with DirectX software, incorrect BIOS configuration, corruption in system files or registry, and other issues. It is possible to resolve the issue with our instructions. Let’s go for the solution.
How to fix dxgmms2.sys error blue screen error in Windows 10/11?
Method 1: Fix dxgmms2.sys error blue screen error with ‘PC Repair Tool’
‘PC Repair Tool’ is easy & quick way to find and fix BSOD errors, DLL errors, EXE errors, problems with programs/applications, malware or viruses infections in computer, system files or registry issues and other system issues with just few clicks.
Method 2: Update graphics card driver
Updating graphics card driver to latest & compatible version can resolve the issue.
Step 1: Open ‘Device Manager’ in Windows PC via Windows Search Box and expand ‘Display Adapters’ category
Step 2: Right-click on your graphics card driver and select ‘Update Driver’ and follow on-screen instructions to finish update. Once updated, restart your computer and check if the issue is resolved.
Download or reinstall graphics card driver update in Windows PC [Automatically]
You can also try to update all Windows drivers including graphics card driver update using Automatic Driver Update Tool. You can get this tool through button/link below.
Method 3: Disable hardware acceleration
Another possible way to fix the issue is to disable Hardware acceleration in computer.
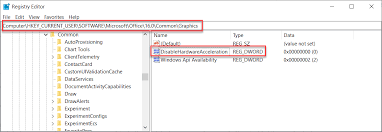
Step 1: Open ‘Registry Editor’ app in Windows PC via Windows Search Box and navigate to following path
HKEY_CURRENT_USER > Software > Microsoft > Avalon.Graphics
Step 2: Right-click on empty space in right-pane and select ‘New > DWORD (32/64 bit) value’, and name it to ‘DisableHWAcceleration’
Step 3: Double-click on newly created entry and under ‘Value Data’ to edit, set its value data to ‘1’, and then hit ‘Ok’ button to save the changes. Once done, exit the Registry Editor and restart your computer and check if the issue is resolved.
Method 4: Run DirectX Diagnostic Tool
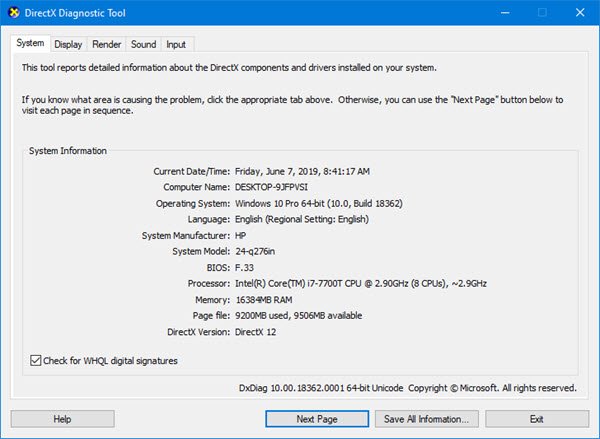
You can run DirectX Diagnostic Tool in computer to detect and fix the issue.
Step 1: Press ‘Windows + R’ keys on keyboard, type ‘dxdiag.exe’ in ‘Run’ window and hit ‘Ok’ button to open ‘DirectX Diagnostic Tool’
Step 2: Click ‘Display’ tab and check the Notes section for any errors or conflicts. If you see an error, download DirectX Web installer to reinstall the required components and once done, restart your computer and check if the issue is resolved.
Method 5: Run Windows Memory Diagnostic Utility
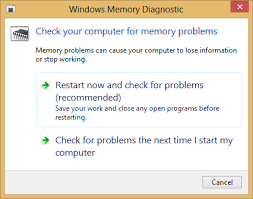
This issue can be occurred due to faculty RAM or memory. You can run Windows Memory Diagnostic Tool in computer in order to fix.
Step 1: Open ‘Windows Memory Diagnostic’ Tool via Windows Search Box in computer
Step 2: Click ‘Restart Now and check for problems’ option the opened window. Once scanning and repairing RAM or memory for issue is finished, check if the issue is resolved.
Method 6: Update BIOS
Updating BIOS to latest & compatible version in computer can resolve the issue. You should download and install BIOS update in computer using your PC/laptop’s motherboard manufacturer official guidelines, and once updated, check if the issue is resolved.
Conclusion
I am sure this article helped you on How to fix dxgmms2.sys error blue screen error in Windows 10/11 with easy steps/methods. You can read & follow our instructions to do so. That’s all. For any suggestions or queries, please write on comment box below.


