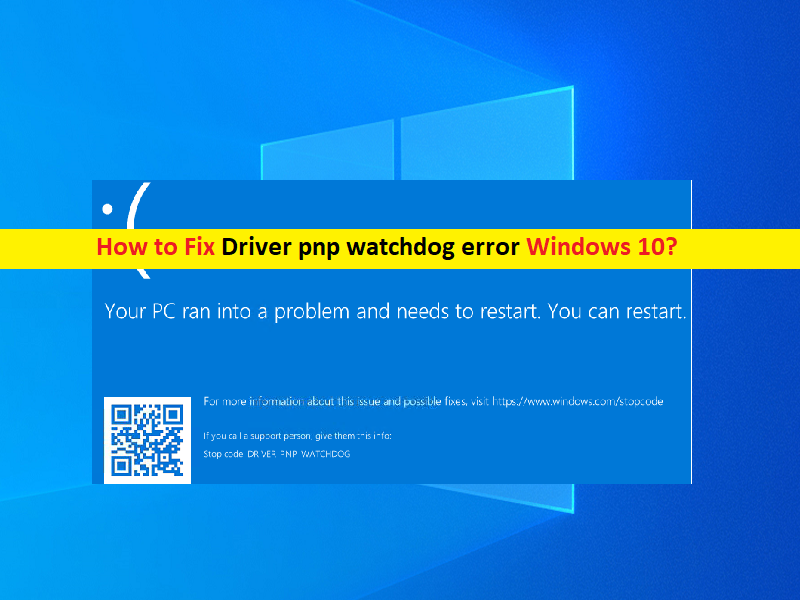
What is ‘Driver pnp watchdog error’ in Windows 10?
If you are facing ‘Driver pnp watchdog error Windows 10’ or ‘DRIVER PNP WATCHDOG BSOD error’ error in your Windows 10 computer while working on Windows computer or when start/restart computer, then you are in right-place for the solution. Let’s starts the discussion.
‘DRIVER PNP WATCHDOG BSOD error’: It is common Windows Problem considered as Blue Screen of Death (BSOD) error. This BSOD error is appeared with message saying ‘Your PC ran into a problem and needs to restart. We’re just collecting some error info, and then we’ll restart for you’ along with Windows Stop Code DRIVER PNP WATCHDOG error.
This BSOD error is usually occurred due to wrong SATA Controller settings in BIOS, broken registry settings, volume shadow services issues, malware or viruses infections, corrupted system files or registry and others. This problem can be occurred if SATA controller mode is wrongly configured in BIOS. You can re-configure SATA controller settings in order to fix the issue.
Another possible reason behind the issue can be the faculty system services, corrupted system files and hard disk system image. You can run SFC scan and DISM scan in computer in order to repair the corruption in system files or registry and resolve this error. This issue can be occurred due to outdated Window OS and Windows Device Drivers. You can update device drivers and Windows OS in order to fix the issue. Let’s go for the solution.
How to fix Driver pnp watchdog error Windows 10?
Method 1: Fix DRIVER PNP WATCHDOG BSOD error with PC Repair Tool
‘PC Repair Tool’ is easy & quick way to find and fix BSOD errors, DLL errors, EXE errors, problems with programs/applications, malware or viruses issues, system files or registry issues, and other system issues with just few clicks.
Method 2: Change SATA Controller settings in BIOS
One possible way to fix the issue is to change SATA Controller settings in BIOS in computer.
Step 1: Restart your computer and when booting process initiate, press ‘F2’ or BIOS key to open BIOS menu
Step 2: Once BIOS setting page appeared, go to ‘Advanced’ or ‘Main’ menu and find ‘IDE Configuration, Storage Configuration, or ‘Drive Configuration’, and then hit ‘Enter’ key
Step 3: Now, find ‘Configure SATA, SATA Mode’ or ‘SATA Configuration’ or similar
Step 4: Change the particular option to ‘ATA, IDE or Compatible’, and save the changes and exit BIOS’, restart your computer and check if it works.
Method 3: Check Volume Shadow Copy Service
Step 1: Open ‘Services’ app in Windows PC via Windows Search Box
Step 2: Find and double-click on ‘Volume Shadow Copy’ to open its ‘Properties’
Step 3: In ‘Properties’ window, select ‘Automatic’ option from ‘Startup’ dropdown, and hit ‘Start’ option under ‘Service Status’ section, and then hit ‘Apply’ and ‘Ok’ button to save the changes, and restart your computer and check if the issue is resolved.
Method 4: Changes with some required services
Step 1: Type ‘cmd’ in Windows Search Box and press ‘SHIFT + ENTER’ keys on keyboard to open ‘Command Prompt as Administrator’
Step 2: Type the following commands one-by-one and hit ‘Enter’ key after each to execute
net stop wuauserv
net stop cryptSvc
net stop bits
net stop appIDSvc
Step 3: Once executed, now go to ‘c:\Windows\’ path, find and ‘SoftwareDistribution’ folder and rename it to ‘SoftwareDistribution.old’
Step 4: Now, go to ‘c:\WIndows\System32\’ folder, find ‘Catroot2’ and rename to ‘catroo2.old’
Step 5: Now, execute the following commands in Command Prompt window
net start wuauserv
net start cryptSvc
net start bits
net start msiserver
net start appIDsvc
Step 6: Once executed, close Command Prompt. Now, type ‘PowerShell’ in Windows Search Box, right-click on Windows PowerShell and select ‘Run as Administrator’
Step 7: Execute ‘wuauclt.exe /updatenow’ command in Windows Powershell and then restart your computer, and check if it works for you.
Method 5: Run Windows Update troubleshooter

You can run Windows built-in Windows Update troubleshooter in order to fix the issue.
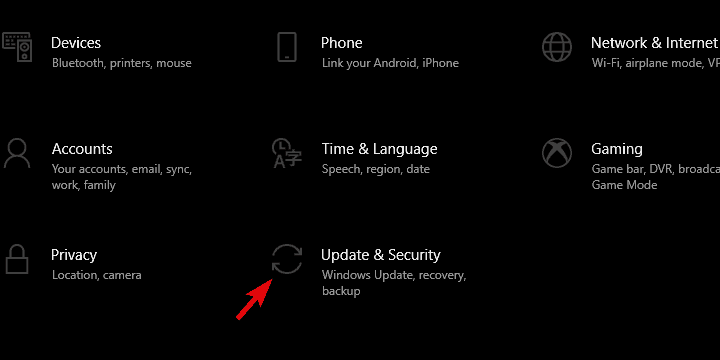
Step 1: Open ‘Settings’ App in Windows PC via Windows Search Box and go to ‘Update & Security > Troubleshoot > Additional Troubleshooter’
Step 2: Find and select ‘Windows Update’ troubleshooter, and click ‘Run the troubleshooter’ button. Once troubleshooting finished, please check if the issue is resolved.
Method 6: Reset Windows PC to its default settings
If the issue is still persist, then you can perform Windows 10 reset to its default settings in order to fix the issue.
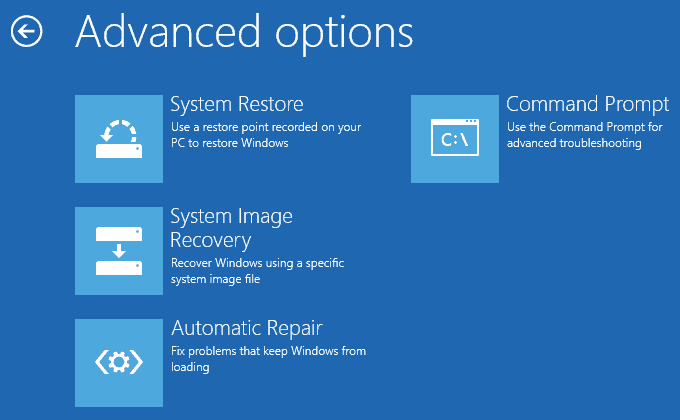
Step 1: Restart your computer several times until Windows Automatic Repair screen is appeared. Once appeared, select ‘Advanced Options > Troubleshoot’ in Windows Recovery Environment
Step 2: Now, select ‘Reset this PC’, select if you want to keep your files or ‘Delete’ them and click ‘Reset’ option and proceed with resetting process. Once finished, check if the issue is resolved.
Method 7: Update Device Drivers
Updating Device drivers in computer can resolve the issue.
Step 1: Open ‘Device Manager’ in Windows PC via Windows Search Box and look for device driver that is outdated/corrupted
Step 2: Right-click on device driver that is causing issue, and select ‘Update Driver’, and follow on-screen instructions to finish update process.
Step 3: Repeat the same step to update all other necessary drivers. Once updated, restart your computer and check if the issue is resolved.
Download or reinstall Device Drivers in Windows PC [Automatically]
You can also try to update all Windows drivers using Automatic Driver Update Tool. You can get this tool through button/link below.
Method 8: Update Windows 10 OS
Updating Windows OS to latest update version can resolve the issue.
Step 1: Open ‘Settings’ App in Windows PC and go to ‘Update & Security > Windows Update’ and click ‘Check for updates’ button
Step 2: Download and install all available updates in computer, and once updated, restart your computer and check if it works for you.
Conclusion
I am sure this post helped you on How to fix Driver pnp watchdog error Windows 10 with several easy steps/methods. You can read & follow our instructions to do so. That’s all. For any suggestions or queries, please write on comment box below.


