What is ‘DNS_PROBE_FINISHED_NXDOMAIN error’ on Chrome in Windows 10?
If you are facing DNS_PROBE_FINISHED_NXDOMAIN error in Google Chrome browser on Windows 10 computer when you try to access certain or specific websites, then you are in right-place for the solution. Here, you will be guided with easy steps/methods to resolve the error. Let’s start the discussion.
‘DNS_PROBE_FINISHED_NXDOMAIN’ error: It is common Windows Problem considered as browser error. This error is usually appeared when you try to access specific website in your Google Chrome browser on Windows 10 computer. This error indicates a non-existence domain and you are unable to access the website because DNS server or website couldn’t be found. This error is also appeare3d on Mozilla Firefox, Safari, MS Edge browser. Let’s take a look at error message.
“This site can’t be reached
www.specific-domain.com’s server DNS address could not be found.
Try running Windows Diagnostics.
DNS_PROBE_FINISHED_NXDOMAIN”
Or
“This webpage is not available
DNS_PROBE_FINISHED_NXDOMAIN”
There could be several reasons behind the issue including the issue with website or website server itself, issue in your browser issue, and the issue in your Windows computer and the issue with internet connection. You should make sure you have stable internet connection and speed, and make sure your internet connection is not blocking the site from accessing which you are trying to access in browser.
This issue can be occurred due to interference of third-party antivirus/firewall program installed in your computer, corrupted DNS cache, issue with DNS server, and other issues in your Windows computer. It is possible to fix the issue with our instructions. Let’s go for the solution.
How to fix DNS_PROBE_FINISHED_NXDOMAIN error in Chrome on Windows 10?
Method 1: Fix DNS_PROBE_FINISHED_NXDOMAIN error with PC Repair Tool
‘PC Repair Tool’ is easy & quick way to find and fix BSOD errors, DLL errors, EXE errors, problems with programs/applications, malware or viruses issues, system files or registry issues, and other system issues with just few clicks.
Method 2: Change TCP/IP proxy settings
Step 1: Open ‘Network and Sharing Centre’ in Windows PC via Windows Search Box
Step 2: Click ‘Change Adapter Settings’ option, right-click on your network adapter and select ‘Properties’
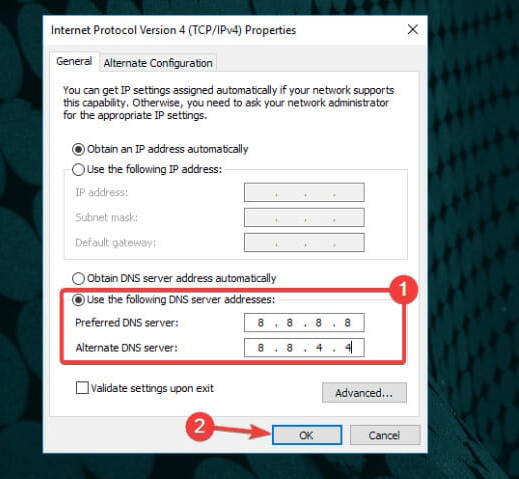
Step 2: Select ‘Internet Protocol Version 4 (TCP/IPv4)’ and click ‘Properties’. In the properties window, select ‘Use the following DNS server addresses’ option, type ‘8.8.8.8’ and ‘8.8.4.4’ in preferred and alternate DNS server address field and hit ‘Apply’ and ‘Ok’ button to save the changes. Once done, check if the error is resolved.
Method 3: Reset Winsock program
Step 1: Press ‘cmd’ in Windows Search Box and press ‘Shift + Enter’ key to open ‘Command Prompt as Administrator’
Step 2: Type ‘netsh winsock reset’ common and hit ‘Enter’ key to execute and once executed, restart your computer and check if the error is resolved.
Method 4: Execute the following commands in Command Prompt to fix
You can also try to fix the issue by executing following commands in Command Prompt.
Step 1: Open ‘Command Prompt as Administrator’ in Windows PC using above method
Step 2: Type the following commands one-by-one and hit ‘Enter’ key after each to execute
ipconfig /release
ipconfig /all
ipconfig /flushdns
ipconfig /renew
netsh int ip set dns
netsh winsock reset
Step 3: Once executed, restart your computer and check if the error is resolved.
Method 5: Clear Google Chrome cache, cookies, browser history
You can clear browser cache, cookies and browser history in order to fix the issue.
Step 1: Open Google Chrome in Windows PC and click ‘Three-Dots’ icon at top-right corner and select ‘More Settings > Privacy and Security > Clear browsing data’
Step 2: Select ‘All Time’ under ‘Time Range’ dropdown, select all checkboxes relating to browsing history, cookies and other site data, and cached images and files, and hit ‘Clear Data’ option and confirm clearing data. Once done, restart your browser and check if the error is resolved.
Method 6: Disable problematic browser extension
This issue can be occurred due to interference of some problematic extensions installed in your browser. You can disable or remove problematic browser extensions in order to fix the issue.
Step 1: Open Google Chrome and click ‘Three-Dots’ icon at top-right corner and select ‘Extensions’
Step 2: Disable all extensions by toggling the ON/OFF switch to disable them. Once disabled, check if the error is resolved.
Method 7: Update your browser
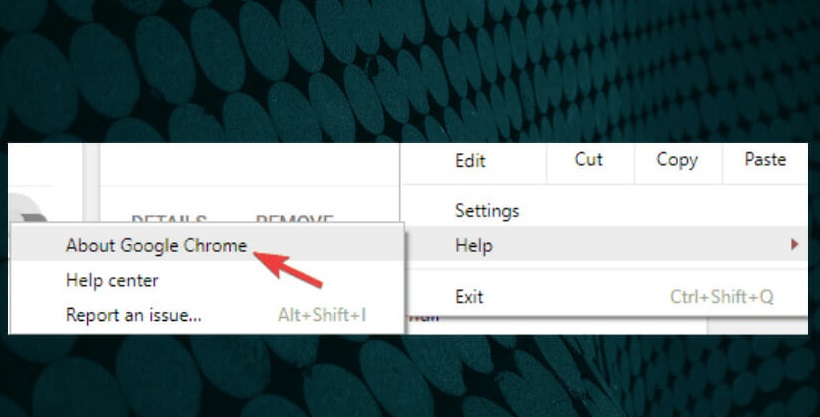
Step 1: Open ‘Google Chrome’ and click ‘Three-Dots’ icon at top-right corner
Step 2: Select ‘Help > About Google Chrome’. This will automatically update Google Chrome to latest & compatible version. Once updated, restart your computer and check if the error is resolved.
Conclusion
I am sure this post helped you on How to fix DNS_PROBE_FINISHED_NXDOMAIN error on Chrome in Windows 10 with several easy steps/methods. You can read & follow our instructions to do so. That’s all. For any suggestions or queries, please write on comment box below.


