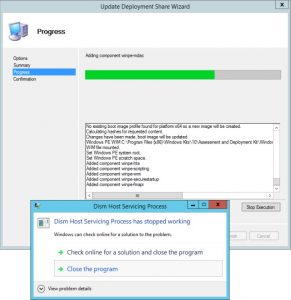
What is ‘DISM Host Servicing process high CPU Usage’ issue in Windows 10?
If you are experiencing ‘DISM Host Servicing process high CPU Usage’ issue in Windows 10 and DISM Host Servicing process is causing immediate system shutdown due to performance slowdown issue, then you are in right place for the solution. Here, you will be guided with easy steps/methods to resolve the issue. Let’s starts the discussion.
‘DISMHost.exe’ or ‘DISM Host Servicing process’: DISM stands for Deployment Image Servicing and Management. It is command-line tool offers you to repair your hard disk system image. It is Windows build-in tool offers to mount and you can get information about Windows Image files or virtual hard disks. DISM tool offers you to install, uninstall, configure, and update Windows features, packages, drivers, and international settings in Windows Image files.
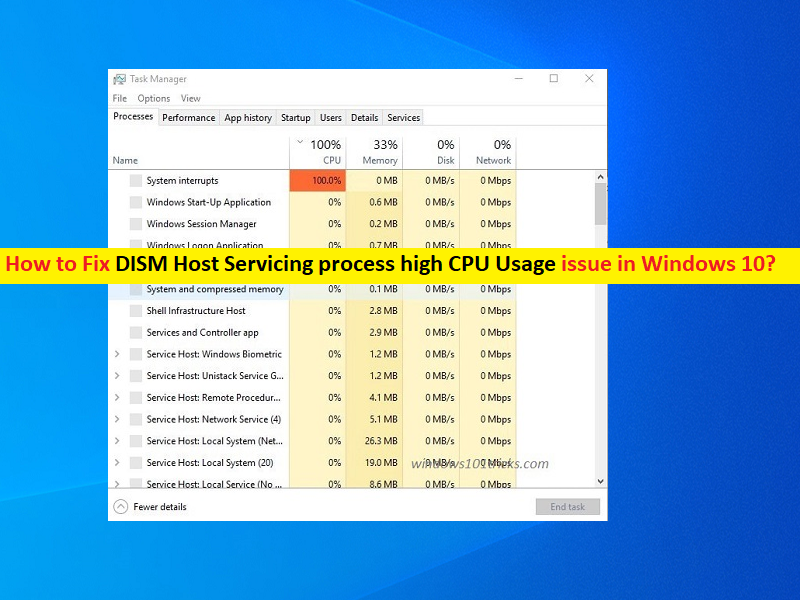
However, several users/Windows 10 users reported that they faced ‘DISM Host Servicing process high CPU Usage’ issue in their Windows 10 and explained they are unable to perform further actions properly in computer due to system slowdown issue triggered by DISM Host Servicing process in Windows 10 computer. It is quite simple to check that status of DISM Host Servicing process or ‘DISMHost.exe’ process via Task Manager.
Users explained that when they open ‘Task Manager’ in order to check CPU usage of computer or tried to check which programming is causing system slowdown issue, they noticed higher percentage of CPU usage about 27 – 34 % under DISM Host Servicing process in Task Manager. According to expert, based on location where DISM is stored it can be dangerous. If this process is using 27-34% of CPU, it is risky.
The possible reason behind this issue can be malware or viruses infections in computer, problem with system files or registry, interference of some other programs/services, issue with programs/applications, exe has encountered a problems and need to close, exe not found, faculty DISM Host Servicing process or DISMHost path, and others. Let’s go for the solution.
How to fix DISM Host Servicing process high CPU Usage issue in Windows 10?
Method 1: Fix DISM Host Servicing process high CPU Usage with ‘PC Repair Tool’
‘PC Repair Tool’ is easy & quick way to find and fix BSOD errors, DLL errors, EXE errors, problems with programs/applications, malware or viruses issues, system files or registry, or other system issues with just few clicks. You can get this tool through button/link below.
Method 2: Disable Superfetch Service in Windows 10
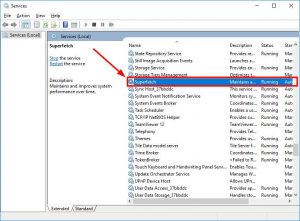
One possible way to fix the issue is to disable Superfetch service in Windows 10.
Step 1: Press ‘Windows + R’ keys on keyboard, type ‘services.msc’ in the opened ‘Run’ window and hit ‘Ok’ button to open ‘Services’ window
Step 2: Find and double-click on ‘Superfetch’ service to open ‘Properties’. In ‘Properties’ window, select ‘Disabled’ option from ‘Startup type’ dropdown, and hit ‘Stop’ button under ‘Service Status’ section
Step 3: Finally, click ‘Apply’ and ‘Ok’ button to save the changes and restart your computer and check if the issue is resolved.
Method 3: Stop BITS Service in Windows 10
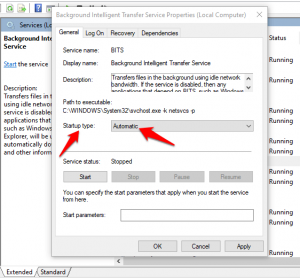
You can also try to fix the issue by stopping BIT service from running in Windows computer.
Step 1: Open ‘Services’ window using above method, find and double-click on ‘BITS (Background Intelligent Transfer service)’ to open ‘Properties’
Step 2: In ‘Properties’ window, select ‘Disabled’ option from ‘Startup type’ dropdown and hit ‘Stop’ button under ‘Service Status’ section, and then hit ‘Apply’ and ‘Ok’ button to save the changes. Once done, restart your computer and check if the issue is resolved.
Method 4: Run System scan for malware or viruses in Windows 10
Malware or viruses infections could be another possible reason behind this issue. You can run system scan for malware or viruses with some powerful antivirus software in computer in order to fix the issue. You can try third-party powerful antivirus software or Windows 1- build in Windows Defender antivirus. After System scan, please if you can use your Windows 10 computer without any issue like DISM Host Servicing process high CPU Usage.
Method 5: Uninstall DISMHost.exe program in Windows 10
If the issue is still persist, you can uninstall DISMHost.exe program in computer in order to fix the issue.
Step 1: Open ‘Control Panel’ in Windows 10 via Windows Search Box and go to ‘Uninstall a Program > Program and Features’
Step 2: Find and right-click on DISMHost.exe program, and select ‘Uninstall’. Follow on-screen instructions to uninstall
Step 3: Now, open ‘C:/Program Files’ folder, find the folder with ‘DISM Host Servicing process’ name. If you are unable find, means this file has been deleted.
Step 4: Now, open ‘Registry Editor’ via Windows search and navigate to ‘HKEY_LOCAL_MACHINE> Software’ path. If you find DISM Host Servicing process there, remove it again
Step 5: Once done, restart your computer and check if the issue is resolved.
Method 6: Update Windows 10 OS

Updating Windows 10 OS to latest update version can resolve any issue in Windows computer. Let’s try.
Step 1: Open ‘Settings’ App in Windows 10 via Windows Search and go to ‘Update & Security > Windows Update’ and click on ‘Check for updates’ button
Step 2: Download and install the available and pending updates in computer, and once done, restart your computer to see the changes.
Conclusion
I am sure this post helped you on How to fix DISM Host Servicing process high CPU Usage in Windows 10 with several easy steps/methods. You can read & follow our instructions to do so. That’s all. For any suggestions or queries, please write on comment box below.


