If you are currently dealing with dam watchdog timeout error in windows 11 and are looking its immediate fix, you are on the right page. In this article, we have provided different possible troubleshoot solutions that would surely help you in getting the required fix for the issue.
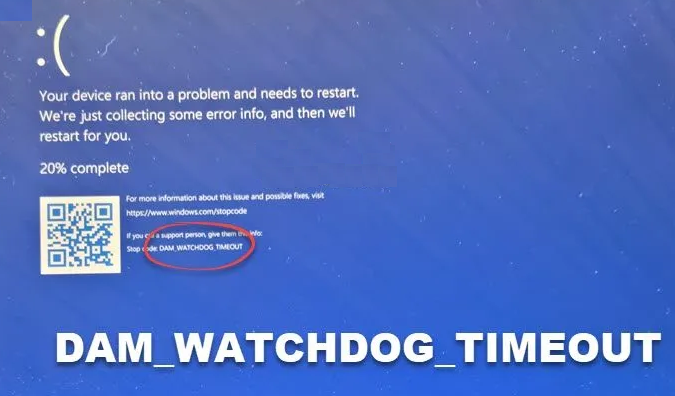
The DAM WATCHDOG TIMEOUT error is a Blue Screen error. BSOD appears when there is some issue within system. Typically, it occurs due to system files corruption, EXEs or DLL File errors, issues with registry editor and incompatible drivers, hardware related issues and so on.
BSOD occurs to prevent further damages to the system. In many of the cases, the problem automatically goes away just with a simple restart. This happens when the normal restart itself is enough to fix the issue causing it.
However, if the error continues, the users would have to manually find and fix the issue. Talking about dam watchdog timeout BSOD error, it usually occurs because of corrupted drivers and the incompatible RAM.
To get its fix, you should follow the below provided solutions. Alternately, employ PC Repair Tool – an automatic tool that can find and fix the issue. All that you need to do is to download the tool from the provided link below and scan the system scan using it. It will find and fix the issue for you.
Possible fixes for dam watchdog timeout error in windows 11
Fix 1: Uninstall recently installed drivers
As stated, the issue often appears when you have issues with the installed drivers or RAM. Therefore, you should require start the troubleshooting process by checking the drivers. If you have installed or updated a driver recently, it is recommended to remove it. Incompatible version of the driver could cause the issue. Follow the below guide how to uninstall and remove device drivers in Windows 11:
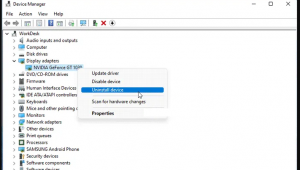
- Open WinX menu and select Device Manager to open it,
- Locate the driver, right-click on it and you will be given three options namely Update Driver Software, Uninstall Driver Software and Install Drivers,
- To uninstall the driver, click on Uninstall,
- Reboot the device and the Windows will automatically download the latest driver,
- If not, you may visit the manufacturer’s site and download the driver manually.
You can roll back the driver, if you wish to, to the earlier compatible version. To do that, right-click on the context menu and that will open the Driver’s properties. Click on the properties box, select Driver tab, and here you will find option to Roll Back Driver.
This could be the case that outdated driver is causing the update and in that case you need an urgent driver update. If you wish to check for updates and update the driver, click on the Update Driver and you will see two options:
- To search online automatically,
- To browse to the driver software on your computer.
Select and click on any of the two options provided to proceed further. Alternatively, employ automatic driver updating tool and this tool will download and install the compatible driver version for you without you need of doing anything than to one or two mouse clicks.
Fix 2: Check RAM Speed
Suppose you had RAM of 2400 MHz and you’ve recently installed another RAM which comes with a speed of 3200 MHz. if this is the case, you can expect the aforementioned BSOD issue. If that is the case, you must have to install a RAM with the same speed as the older one. To check the RAM speed of Windows 11, you have three options:
- To check the sticker of your RAM,
- Using Task Manager,
- Using Command Prompt.
If you haven’t installed RAM yet, this is the best method to check the speed. Every manufacturer puts a sticker on the RAM so that buyers can purchase the correct RAM. The sticker says something like this:
8GB DDR4-2400
8 GB denotes that it is an 8 GB Memory. DDR4 means Double Date Rate or that it is a type or version of RAM. The 2400 and 3200 there is the speed of the RAM. To know the same using Task Manager, press Win+ X and select Task Manager, switch to the Performance tab and go to the speed label and there you will find the sped of the installed RAM. For doing the same using Command Prompt, use the below steps:
- Press Win+ R to open Run,
- Type in the below command and hit Enter:
wmic memorychip get speed
- There you will find the speed of the RAM.
Fix 3: Use Windows Memory Diagnostic
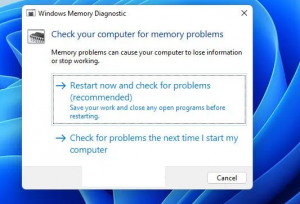
Windows Memory Diagnostic tool is a tool to detect and fix common RAM related issues. If there is some minor problems with the installed RAM, you can get rid of it using it. Follow the below steps how to use the tool:
- Firstly, click on the magnifying glass icon on the taskbar,
- Type Windows Memory Diagnostic within the search tool’s text box,
- Click on Windows Memory Diagnostic to open its Window,
- Select Restart now and check for problems,
- Wait now, the tool with do its stuff,
- Windows restart would take place and the tool should resolve the issue,
- If it does not, right-click on Start and select Event Viewer,
- Select Windows logo and System on the Event Viewer window,
- On the right, click on Find option,
- Type MemoryDiagnostic within the provided Find What box,
- Click on Find next,
- Thereafter, you can see the MemoryDiagnostic result on the General tab at the Event Viewer tab.
Fix 4: Use Driver Verifier Manager
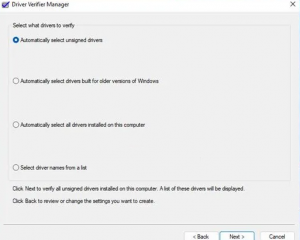
Driver Verifier Manager is yet another tool like Windows Memory Diagnostic Tool. You can use this tool to find corrupt drivers on your PC. Also, this tool will allow you to select all drivers or choose a specific driver to find issues. To use the tool, follow the below steps:
- Type verifier in the search box and hit Enter,
- In the opened Driver Verifier Manager window, select Create Standard Settings,
- Click Next,
- Select ‘Automatically select unsigned drivers’,
- Click Next,
- You will see the next a dialogue box saying ‘Loading driver information presented a list of to you with the list of the unsigned drivers.
Conclusion
That’s all! We have provided all possible solutions for dam watchdog timeout error in windows 11. Hope so, these methods are really helpful in getting the fix for the issue. Comment down below in case of any doubts with any of the steps provided.


