
What is ‘Color Management Not Working’ issue in Windows 11?
In this article, we are going to discuss on How to fix Color Management Not Working Windows 11. You are provided with easy steps/methods to resolve the issue. Let’s starts the discussion.
‘Color Management Not Working’ issue:
Color Management is Windows built-in feature utility used to assign different color profiles to different display devices, creating a uniform color experience across all of your devices. It is quite simple & easy to install and assign a custom color profile in your Windows 10/11 computer using Color Management. It allows you to configure color accuracy. However, several users reported they faced Color Management Not Working Windows 11 issue while working on Color Management in Windows computer.
This issue indicates you are experiencing Color Management stuck issue or not working in your Windows computer for some reasons. There could be several reasons behind the issue including the corrupted/outdated graphics card driver, outdated Windows OS, issue with application that is causing issue, corrupted color profile competent, corruption in system files or registry, usage of Color Management scheme is not compatible, and other issues. It is possible to fix the issue with our instructions. Let’s go for the solution.
How to fix Color Management Not Working Windows 11?
Method 1: Fix ‘Color Management Not Working’ issue with ‘PC Repair Tool’
‘PC Repair Tool’ is quick & easy ways to find and fix BSOD errors, EXE errors, DLL errors, problems with programs/applications, malware or viruses infections in computer, and other system issues with just few clicks.
Method 2: Update Windows OS
Updating Windows OS to latest version can resolve the issue.
Step 1: Open ‘Settings’ app in Windows PC via Windows Search Box and go to ‘Windows Updates’ and click ‘Check for updates’ button
Step 2: Download and install all available updates and once updated, restart your computer and check if the issue is resolved.
Method 3: Update graphics card driver
Updating graphics card driver to latest & compatible version can resolve the issue.
Step 1: Open ‘Device Manager’ app in Windows PC via Windows search box and expand ‘Display Adapters’ category
Step 2: Right-click on your graphics card driver and select ‘Update Driver’, and follow on-screen instructions to finish update. Once updated, restart your computer and then check if it works for you.
Download or reinstall graphics card driver update in Windows PC [Automatically]
You can also try to update all Windows drivers including graphics card driver using Automatic Driver update Tool. You can get this tool through button/link below.
Method 4: Reinstall Color profile
Another way to fix the issue is to reinstall color profile in your Windows 11 computer.
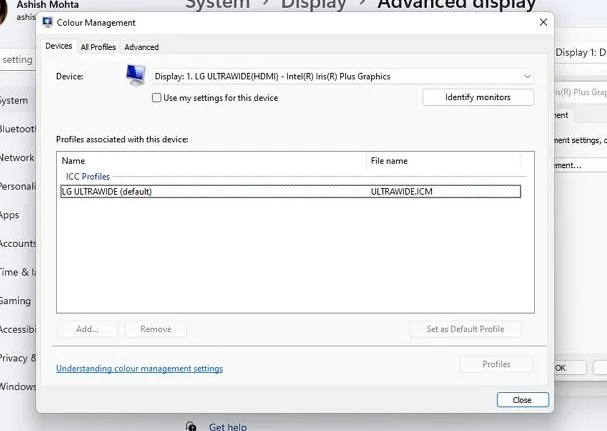
Step 1: Open ‘Settings’ app in Windows PC and go to ‘System > Display > Advanced Display’
Step 3: You will be taken to a new window, and from them, click Properties window of ‘Display Adapter properties for the display’, and change to ‘Color Management’ from the next menu in the graphics properties panel
Step 4: From all available options, select ‘Color Management’ from dropdown and choose the monitor and click ‘Add’ button
Step 5: Apply the color profile or ICC file that you have choosen, and then check if the issue is resolved.
Method 5: Reset the application that is causing the issue
You can also try to fix the issue by resetting the application in your Windows computer that is unable to access color profile in Windows 11 compu1er.
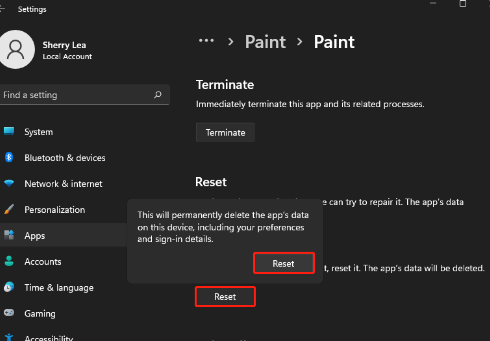
Step 1: Open ‘Settings’ app in Windows PC via Windows Search Box and go to ‘Apps > Apps & Features’
Step 2: Find and select the app that is causing ‘Color Management Not Working Windows 11’ issue, and click ‘Three-Dots’ icon next to it, and click ‘Advanced Options’ and click ‘Reset’ option, and confirm resetting.
Step 3: Once resetting finished, check if the issue is resolved.
Method 6: Perform System Restore
If the issue is still persist, you can try to fix the issue by perform system restore in computer.
Step 1: Press ‘Windows + R’ keys on keyboard, type ‘rstrui’ in ‘Run’ window and hit ‘Ok’ button to open ‘system restore’ app
Step 2: Click ‘Next’, select a valid restore point according to date & time when there was no issue at all in computer, and then click ‘Next > Finish’ to start restoring process, and once finished, check if the issue is resolved.
Method 7: Perform Clean Windows 11 installation
If you are unable to fix the issue with above methods, you can try to fix the issue by performing clean Windows OS installation. To do so, you need to insert a bootable Windows 11 OS installation media USB into your computer and boot your computer with it, and run Windows OS setup to finish installation, and once installed, check if it works for you toward resolving the issue.
Conclusion
I hope this post helped you on How to fix Color Management Not Working Windows 11 with easy ways. You can read & follow our instructions to do so. That’s all. For any suggestions or queries, please write on comment box below.


