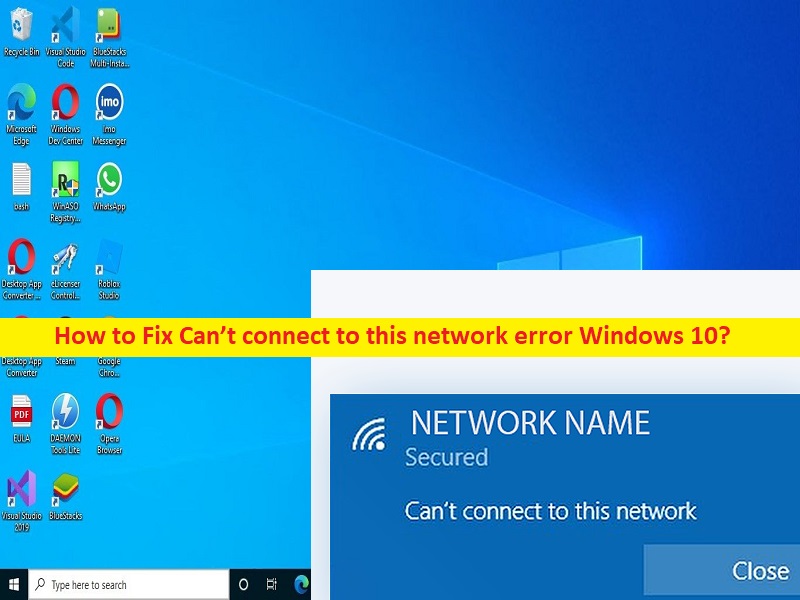
What is ‘Can’t connect to this network’ error in Windows 10?
If you are facing Can’t connect to this network error Windows 10 or ‘Can’t connect to this network’ error while trying to connect to network/internet, and looking for ways to fix, then you are in right-place for the solution. Here, you are provided with easy steps/methods to resolve the issue. Let’s starts the discussion.
‘Can’t connect to this network’ error:
It is common Windows Problem considered as Network/Internet connections problem. This error is usually appeared when you try to connect your Windows 10 computer to a network/WiFi name from available WFI network. This issue indicates when you try to connect your Windows computer to a network/WiFi, you experience ‘Can’t connect to this network’ error that states your computer is unable to connect to this network for some reasons. Sometimes, this type of issue is occurred due to some temporary issues in computer.
You can fix temporary issues just by restarting your computer and after restart, retry connecting to network/internet and check if it works for you toward resolving the issue. This issue can be occurred if you are entering wrong password to access network/WIFI that is causing issue, or WiFi name/password has been changed. In such case, you can forget the network and then reconnect to it using correct password, and check if it works.
Another possible reason the issue can be the corrupted/outdated network adapter driver, corrupted or bad configured network settings, interference of other conflicting software, malware or viruses infections, corruption in Windows computer, and other issues. One possible way to fix the issue is to update network adapter driver to latest & compatible version in computer, but there is also some other possible solutions to fix the issue as mentioned in the post. Let’s go for the solution.
How to fix Can’t connect to this network error Windows 10?
Method 1: Fix Can’t connect to this network error with ‘PC Repair Tool’
‘PC Repair Tool’ is quick & easy ways to find and fix BSOD errors, DLL errors, EXE errors, problems with programs/applications, malware or viruses infections in computer, system files or registry issues, and other system issues with just few clicks.
Method 2: Update network adapter driver
Updating network adapter driver to latest & compatible version can resolve the issue.
Step 1: Open ‘Device Manager’ app in Windows PC via Windows Search Box and expand ‘Network Adapters’ category
Step 2: Right-click on your network adapter and select ‘Update Driver’, and follow on-screen instructions to finish update. Once done, restart your computer and check if the issue is resolved.
Download or reinstall network adapter driver update in Windows PC [Automatically]
You can also try to update all Windows drivers including network adapter driver using Automatic Driver Update Tool. You can get this tool through button/link below.
Method 3: Forget network
One possible way to fix the issue is to forget the network and reconnect to it.
Step 1: Open ‘Settings’ app in Windows PC via Windows Search Box and go to ‘Network and Internet > WiFi > Manage Known Networks’
Step 2: Click on your network provider and click ‘Forget’, and once done, retry connecting to available network and then check if the issue is resolved.
Method 4: Enable and disable Airplane mode
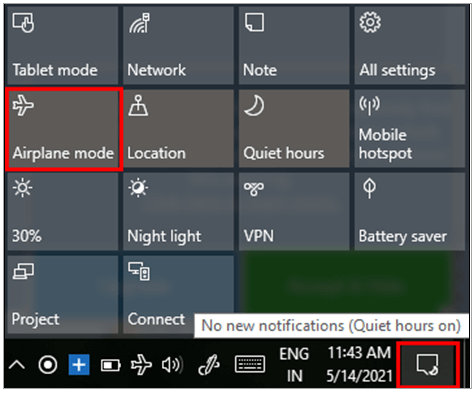
Another way to fix the issue is to enable and disable Airplane mode in computer.
Step 1: Click on bottom screen in taskbar and find and click ‘Airplane mode’ to enable it
Step 2: After few seconds, disable Airplane mode and check if the issue is resolved.
Method 5: Reset network settings
Step 1: Open ‘Settings’ app and go to ‘Network and Internet > Status’
Step 2: Find and click ‘Network Reset’ and confirm it. Once done, restart your computer and check if the issue is resolved.
Method 6: Run Network troubleshooter
Windows built-in Network troubleshooter can resolve the issue.
Step 1: Open ‘Settings’ app and go to ‘Network & Internet > Status’
Step 2: Click ‘Network troubleshooter’ and follow on-screen instructions to finish troubleshooting and once done, check if the issue is resolved.
Method 7: Run Network Adapter troubleshooter
Step 1: Open ‘Settings’ app in Windows PC and go to ‘Update & Security > Troubleshoot’
Step 2: Find and select ‘Network Adapter’ troubleshooter, and click ‘Run the troubleshooter’ button and follow on-screen instructions to finish troubleshooting and once finished, check if it works for you.
Method 8: Add a connection manually

Step 1: Open ‘Control Panel’ app in Windows PC via Windows Search Box and go to ‘Network and Internet > Network and sharing center’ and click ‘Set up a connection or network’
Step 2: Click ‘Manually connect to a wireless network’ and hit ‘Next’, enter the necessary credentials and hit ‘Next’
Step 3: Once done, check if it works for you.
Method 9: Disable IPv6
Step 1: Open ‘Network Connections’ control panel via Windows Search Box and then go to ‘Change adapter settings’
Step 2: Right-click on your network adapter and select ‘Properties’. Deselect ‘Internet Protocol version 6 (TCP/IPv6)’ option and hit ‘Apply > Ok’ button to save the changes. Once done, restart your computer and check if the issue is resolved.
Method 10: Make sure adapter and Windows are using same security type
Step 1: Open ‘Network and Sharing Center’ via Windows Search Box and click ‘WiFi’ and click ‘Wireless Properties’
Step 2: Click ‘Security’ tab and verify the security type, and hit ‘Ok’ button
Method 11: Change wireless network mode
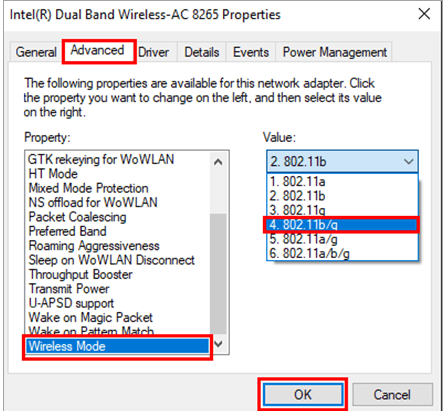
Step 1: Open ‘Network and Sharing Center’ and click ‘Change adapter settings’
Step 2: Right-click on your network and select ‘Properties’. Click ‘Configure’ and in next window, click ‘Advanced’ tab
Step 3: Click ‘Wireless mode’ and finally, click ‘802.11b/g’, and then hit ‘Ok’ button to save the changes, and check if the issue is resolved.
Method 12: Disable/enable NIC
Step 1: Press ‘Windows + R’ keys on keyboard, type ‘ncpa.cpl’ in ‘Run’ window and hit ‘Ok’ button
Step 2: Right-click on the network and click ‘Disable’ and enable it. Once done, restart your computer and check if it works.
Method 13: Change channel width for your network adapter
Step 1: Right-click on WiFi option and click ‘Open Network and sharing center’
Step 2: Click ‘Change Adapter settings’, right-click on your network and select ‘Properties’
Step 3: Click ‘Configure’ and click “Advanced”>”802.11n Channel Width for 2.4GHz”>”20MHz only”, then click on “OK” to save the changes, and then check if it works for you.
Method 14: Change power options
Another way to fix the issue is to change power options in computer.
Step 1: Open ‘Power and sleep settings’ via Windows Search Box and click ‘Additional power settings’
Step 2: Click ‘Change plan settings’ and click ‘Advanced power settings’
Step 3: In next window, go to ‘Wireless adapter settings > Power Saving Mode’, and click the dropdown, and select ‘Maximum Performance’ and then hit ‘Apply > Ok’ button to save the changes.
Step 4: Once done, restart your computer and check if the issue is resolved.
Conclusion
I am sure this post helped you on How to fix Can’t connect to this network error Windows 10 with easy ways. You can read & follow our instructions to do so. That’s all. For any suggestions or queries, please write on comment box below.


