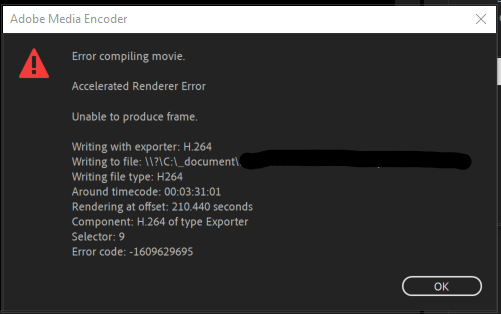
Many an Adobe Premier Pro video editing software users recently reported about Accelerated Renderer Error. This is an intensive program that requires raw CPU and GPU power. Receiving this type of issue is often caused by overload GPU and CPU utilization.
If you are also dealing with this program and are looking for its fix, you are at the right place. Here, you will find the different possible troubleshooting solutions that should help you in resolving this error. So, without doing any further delay, let’s get started.
Adobe Inc. developed, Adobe Premiere Pro is a timeline based and non-linear video editing software. it can be used for all common video editing tasks necessary to produce broadcast-quality, high definition video.
Also, it is used in importing videos, audios, graphics and creating new, edited versions of video that can be exported to the format necessary for the distribution. To run the app without any issue, you must make ensure that your systems fulfill its minimum system requirements:
Operating System: Windows 10 (64 bit) version 1909 or later
RAM: 8 GB
Storage: 8 GB of available hard-disk space for installation; additional free space required during installation (will not install on removable flash storage)
GPU: Nvidia Geforce™ GTX 970/ AMD Radeon™ Pro 5500M
Processor: Intel® 6th Generation or newer CPU/ AMD Ryzen
Display: 1920 x 1080
Network Storage Connection: 1 Gigabit Ethernet (HD only)
Additional high-speed drive(s) for media
If you ensure that your system fulfill the above minimum system requirements for smooth running of Adobe Premiere Pro and still encounter Accelerated Renderer Error, below the are the possible reasons what could cause the problem:
- Graphics card Power Management problem,
- Hardware rendering issue,
- Outdated Graphics card driver,
- Outdated Adobe Premiere Pro,
- Corrupted media files,
- Video format codec issue,
- Custom Preset issue, H.364 and HVEC audio decoder issue.
We have discussed below the every possible aspect what could cause the problem and their possible fixes. Make sure you apply those fixes in proper manner so to fix the issue under discussion and run the video editing app without any trouble.
Possible fixes for Accelerated Renderer Error
Fix 1: Perform Graphics Drive Update
Graphics Card manufacturers release graphic driver update to address issues related to games, software and issues with performance. It is advised you update your Graphics Cards driver and see if this helps you to resolve the problem:
- Press Win+ R, type in devmgmt.msc and hit Enter,
- Expand Display adapters,
- Right-click on your Graphics Cards and select Update Driver,
- Click on Search automatically for updated driver software,
- If any update is found, window will install it automatically.
You can direct jump to the manufacturer official page and download the latest driver version for the software compatible with your system. if you don’t know your system specs and do not want to take risk of driver incompatibility, we recommend you use automatic driver updating tool.
This tool will download the latest driver version for your Graphics Card software and other program you are looking for match with the compatible system. Make sure you take advantage of this tool. Here is its direct downloading link.
Fix 2: Update Adobe Premiere Pro
Since Accelerated Renderer Error is associated with this particular app, you should check if this program is running good. It is possible that the program version you are using it outdated which has so many bugs/ errors. To fix these errors, you should update your Adobe Premiere Prop to its latest version:
- Double-click on the app’s icon to launch it,
- Select Help and pick Updates…,
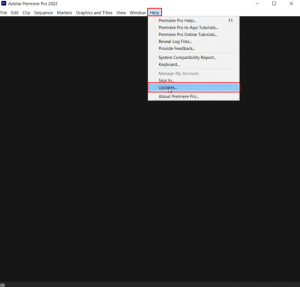
- This will check for the update and download and install it automatically.
Fix 3: Create a new Project
Many users reported about this issue managed to resolve it just by creating a new project. Here are the required steps to perform the operation:
- Open the app,
- Click on the File on the top, select New and pick Project… option,
- Give a name to the project as per your choice,
- Click OK and done. The new project is created,
- Simply import the previous file using drag and drop option and see the next if the problem is now resolved.
Fix 4: Change location of your video file
If the problem continues to occur, you should consider exporting the video file to some other location and see if this helps you in resolving the problem:
- Launch Adobe Premiere Pro,
- Click on the File option on the left top corner and select Save As to save the edited object,
- A dialogue box will appear asking you to Save Project,
- There, you can give a name to the Project,
- Next, select the save destination to desktop and click on Save button,
- Go to the Export Settings,
- Under the Output tab, click Export.
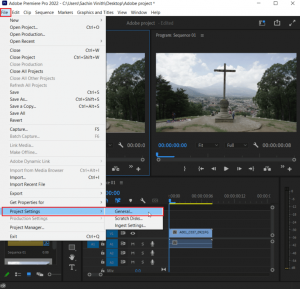
Fix 5: Change rendering to software mode
If Accelerated Renderer Error is still there, you should make sure you set Adobe Premiere to software rendering instead of hardware rendering, which is set by default:
- Open the project, on which you encounter the problem,
- Click on File and pick Project Settings,
- In the General tab, click on Renderer dropdown and select Mercury Playback Engine Software only,
- Click Ok to save the changes and check the next if the problem is now resolved.

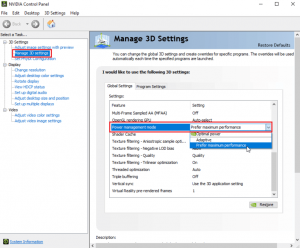
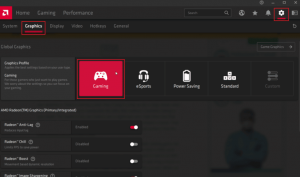
Fix 6: Change to maximum Performance mode
GPU offers an excellent power management feature to save battery, provide maximum performance and balance mode. The Adobe Premiere Pro should be used at maximum performance mode as power saving mode can degrade the output quality resulting in Accelerated Renderer Error:
- for Nvidia Control Panel, search by this name on the Windows Search box and open it,
- Go to the Manage 3D Settings and select Power Management Mode in Settings,
- Set the Power Management mode to prefer maximum performance,
- On AMD Radeon Software, firstly search by this name on the Search bar after clicking Press Q, and then click Run as Administrator,
- Check for the cog present on the top-right, click on it,
- Now, under the Graphic section, click on Gaming option to set the Global Graphics to maximum performance.
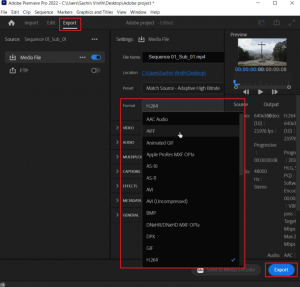
Fix 7: Use Different file format or codec
People reported that the issue is often caused due to H.264 and H.265 audio codec. These formats are good for exporting but for editing purposes, they may cause issues like Accelerated Renderer Error. You should try a different codec and extort it:
- Open Adobe Premiere Pro,
- Click on File on the top and click on Export,
- Navigate to Media,
- Finally, click on the Format dropdown and select another format.
Fix 8: Disable hardware decoding of H.264 and HVED media
Sometimes, the problem occurs as there is hardware bottleneck when codec rendering is enabled. Make sure you disable this option:
- Launch the app, click on File> Preferences and navigate to Media,
- Disable the below two checkboxes:
H264/HEVC hardware accelerated decoding (requires restart)
H264/HEVC hardware accelerated encoding (requires restart)
- Click OK to save the changes,
- Finally, restart and see if the error is resolved.
Conclusion
That’s all! We have provided all possible fixes for Accelerated Renderer Error. Hope so, these fixes are valuable for you and you will be able to get the required fix. if the problem continues, make sure you employ PC Repair Tool and check for possible Windows related issue possibly causing the problem and get their automatic repair to fix it.


