
What is ‘Browser slow after Windows 11 update’ issue?
In this article, we are going to discuss on How to fix Browser slow after Windows 11 update. You will be guided with easy steps/methods to resolve the issue. Let’s starts the discussion.
‘Browser slow after Windows 11 update’: It is common Windows Problem considered Browser Performance issue. This issue indicates when you launch and use your browser like Google Chrome in Windows 11 computer after Windows 11 update, you experience slow browser performance issue in your computer. For example, when you use certain things like YouTube or Google Maps in Google Chrome browser on Windows 11 computer after OS update, you face the browser becomes slower than usual on Windows 11 computer.
There could be several reasons behind the issue including corrupted/outdated cache of browser, outdated browser itself, incorrect or bad configured browser’s settings, incorrect network settings/DNS settings/IP settings, issue with your network adapter, issue with your internet connection and speed, and other issues. You should make sure you have stable internet connection and speed, and there is no issue with internet connection at all in computer.
You can restart/reset your network device like router or WiFi device in order to fix network/internet connection issue. This issue can be occurred due to interference of background apps or services running in computer. You can close or kill background apps and services in order to fix. It is possible to fix the issue with our instructions. Let’s go for the solution.
How to fix Browser slow after Windows 11 update? [Google Chrome]
Method 1: Fix ‘Browser slow after Windows 11 update’ with ‘PC Repair Tool’
‘PC Repair Tool’ is easy & quick way to find and fix BSOD errors, DLL errors, EXE errors, problems with programs/applications, malware or viruses infections in computer, system files or registry issues, and other system issues with just few clicks. You can get this tool through button/link below.
Method 2: Clear browser cache
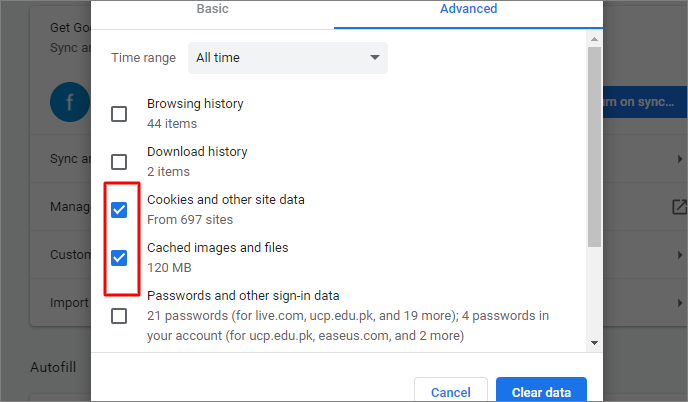
Step 1: Open your browser like Google Chrome and press ‘CTRL + SHIFT + DELETE’ keys on keyboard to open ‘Clear Browsing Data’ tab/page
Step 2: Select ‘All Time’ from ‘Time Range’ dropdown, select all checkboxes relating to cache and cookies, and hit ‘Clear Data’ button and confirm clearing data. Once finished, restart your browser and check if the issue is resolved.
Method 3: Configure browser cookies
Step 1: Open your browser like Google Chrome and click ‘Three-Dots’ icon at top-right corner and select ‘Settings’
Step 2: Under ‘Privacy and security’ section, select ‘Cookies and other site data’
Step 3: Scroll down and under ‘Customized behaviours‘ menu, click ‘Add’ tab next to ‘Sites that can always use cookies’
Step 4: Enter the website address that is giving you trouble, and click ‘Add’. Once done, check if the issue is resolved.
Method 4: Turn Sync OFF in Windows PC
Step 1: Type ‘Sync Settings’ in Windows Search Box and select ‘Sync your settings’
Step 2: Under ‘Sync Settings’ option, click on toggle button to turn it OFF
Method 5: Change performance options in Windows 11
Step 1: Type ‘Adjust the appearance and performance of Windows’ in Windows Search Box and open it from search results
Step 2: Under ‘Visual Effects’ tab, select ‘Adjust for best performance’ and then hit ‘Apply > Ok’ button to save the changes. Once done, check if the issue is resolved.
Method 6: Turn OFF or kill background apps and services
This issue can be occurred due to interference of background apps and services so you can disable or kill them in order to fix.
Step 1: Type ‘Background apps’ in Windows Search Box and open it from results appear
Step 2: Under ‘Lets apps run in the background’ section, click on toggle button to turn OFF
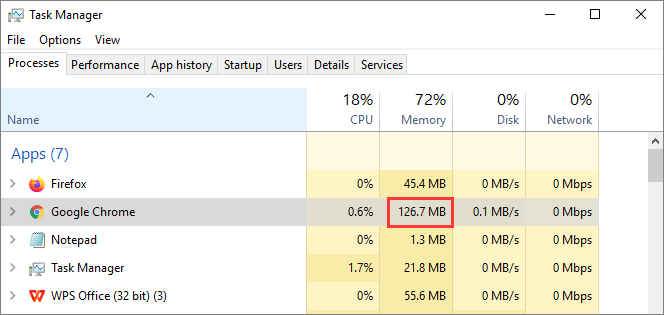
Step 3: Now, press ‘CTRL + SHIFT + ESC’ keys on keyboard to open ‘Task Manager’ app
Step 4: Under ‘Processes’ tab, click ‘Network Column’ to sort by usage. Select the unwanted app that you want to kill and click ‘End Task’. Repeat the same step to kill other background apps. Once done, check if it works.
Method 7: Change Power Options in Windows 11
Step 1: Type ‘Power Plan’ in Windows Search Box and choose ‘Choose a power plan’ from results
Step 2: On the list of power plans, choose ‘High-performance’ option and save the changes, and check if the issue is resolved.
Method 8: Restart Network adapter
One possible way to fix the issue is to is to restart your network adapter in order to restart network configuration in computer.
Step 1: Open ‘Network Connections’ settings via Windows Search Box and go to ‘Change Adapter Settings’
Step 2: Right-click on your network adapter and select ‘Disable’ to disable it
Step 3: After few seconds, right-click on it again and select ‘Enable’ to enable it and once done, check if the issue is resolved.
Method 9: Change DNS server settings
Step 1: Open ‘Network Connections’ settings via Windows Search Box and go to ‘Change adapter settings’
Step 2: Right-click on your current active network adapter and select ‘Properties’. Select ‘Internet Protocol Version 4 (TCP/IPv4)’ option and hit ‘Properties’
Step 3: Make sure ‘Obtain IP address automatically’ and ‘Obtain DNS server address automatically’a option is selected and then hit ‘Apply > Ok’ button to save the changes. Once done, check if it works for you.
Method 10: Update Network adapter drivers
Updating Network adapter driver to latest & compatible version can resolve the issue. Let’s try.
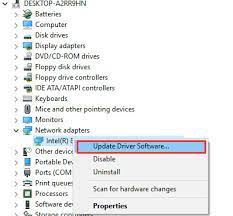
Step 1: Open ‘Device Manager’ in Windows PC via Windows Search Box and expand ‘Network Adapters’ category
Step 2: Right-click on your network adapter and select ‘Update Driver’ and follow on-screen instructions to finish update and once updated, restart your computer and check if the issue is resolved.
Download or reinstall network adapter driver update in Windows PC [Automatically]
You can also try to update all Windows drivers including network adapter driver using Automatic Driver Update Tool. You can get this tool through button/link below.
Method 11: Disable IPv6
Another possible way to fix the issue is to disable IPv6 feature in Windows computer.
Step 1: Open ‘Control Panel’ in Windows PC via Windows Search Box and go to ‘network and Internet > network and Sharing Center’, right—click on your current active network adapter and select ‘Properties’
Step 2: Deselect ‘Internet Protocol Version 6 (TCP/IPv6)’ option and hit ‘Ok>Apply > Ok’ button to save the changes. Once done, check if the issue is resolved.
Conclusion
I am sure this post helped you on How to fix Browser slow after Windows 11 update with several easy steps/methods. You can read & follow our instructions to do so. That’s all. For any suggestions or queries, please write on comment box below.


