
Tips to fix 100% disk usage after upgrading to Windows 11:
In this post, we are going to discuss on How to fix 100% disk usage after upgrading to Windows 11. You will be guided with easy steps/methods to resolve the issue. Let’s starts the discussion.
‘100% disk usage after upgrading to Windows 11’: It is common Windows problem considered as disk usage issue. When you open Task Manager app in Windows 11 computer in order to check the performance of computer, you may experience higher percentage to 100% under ‘Disk Usage’ section. Several users reported about this issue and explained the issue is occurred after upgrading to Windows 11 OS.
There could be several reasons behind the issue including interference of some problematic startup items, services, or apps/processes, corruption in system files or registry or in system image, malware or viruses infections in computer and other issues. It is possible to fix the issue with our instructions. Let’s go for the solution.
How to fix 100% disk usage after upgrading to Windows 11?
Method 1: Fix 100% disk usage after upgrading to Windows 11 with ‘PC Repair Tool’
‘PC Repair Tool’ is easy & quick way to find and fix BSOD errors, DLL errors, EXE errors, problems with programs/applications, malware or viruses infections in computer, system files or registry issues, and other system issues with just few clicks.
Method 2: Disable SysMain (Superfetch) service, Connected User Experiences and Telemetry and Windows Search
This issue can be occurred due to enabled SysMain (Superfetch) service, Connected User Experiences and Telemetry and Windows Search service in computer. You can disable this service in order to fix.
Step 1: Open ‘Services’ app in Windows PC via Windows Search Box
Step 2: Find and double-click ‘SysMain’ or ‘Superfetch’ service to open its Properties. Select ‘Disabled’ option from ‘Startup Type’ dropdown and hit ‘Stop’ under ‘Services Status’ section
Step 3: Finally, click ‘Apply > Ok’ button to save the changes. Repeat the same steps for Connected User Experiences and Telemetry and Windows Search services. And once done, check if the issue is resolved.
Method 3: Disable Scheduled Defragmentation
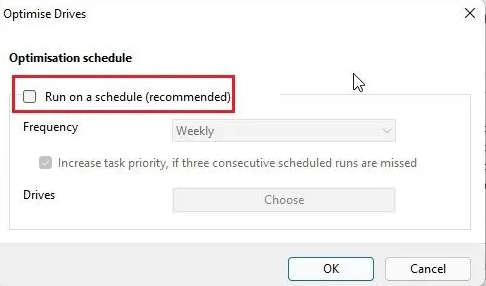
Windows 11 periodically conducts defragmentation of hard disk to enhance performance. However, enabled scheduled defragmentation can cause this type of issue so you can disable it in order to fix.
Step 1: Open ‘Disk Defragmentation’ app in Windows PC via Windows Search Box and click ‘Change Settings’
Step 2: Uncheck ‘Run on a schedule (recommended)’ checkbox and click ‘Ok’ to save the changes. This will disable scheduled defragmentation on computer and the check if the issue is resolved.
Method 4: Disable startup apps
This issue can be occurred due to interference of startup apps/items running in computer you can disable startup apps in order to fix.
Step 1: Press ‘CTRL + SHIFT + ESC’ keys on keyboard to open ‘Task Manager’ app
Step 2: Click ‘Startup’ tab, right-click on each startup items and select ‘Disable’ to disable them. And once done, close Task Manager and restart your computer, and check if the issue is resolved.
Method 5: Disable MSI Mode

Step 1: Open ‘Device Manager’ in Windows PC via Windows Search Box and expand ‘IDE ATA/ATAPI Controllers’ category
Step 2: Right-click on the entry and select ‘Properties’. Click ‘Driver’ tab, and click ‘Driver Details’. If you find ‘StorAHCI.sys’ under the path, proceed to next step and if you find different driver name appears, you don’t need to proceed ahead.
Step 3: Go to ‘Details’ tab and change the property to ‘Device Instance path’ from dropdown, right-click ‘Value’ here and copy it
Step 4: Paste the Value into ‘Notepad’ file and we will need it ahead.
Step 5: Close Device Manger and open ‘Registry Editor’ app in Windows PC via Windows Search Bpx and go to following path
Computer\HKEY_LOCAL_MACHINE\System\CurrentControlSet\Enum\PCI\
Step 6: Match the enter with one you pasted in Notepad file and expand it. Now, go to following path
Device Parameters -> Interrupt Management -> MessageSignaledInterruptProperties.
Step 7: Look for ‘MSISupported’, open it and change the value data to ‘0’ and hit ‘Ok’ button to save the changes and once done, restart your computer and check if the issue is resolved.
Method 6: Reset Virtual Memory
Step 1: Open ‘System Properties’ window via Windows Search Box and go to ‘Advanced’ tab and click ‘Settings’ under ‘Performance’
Step 2: Go to ‘Advanced’ tab and click ‘Change’, uncheck ‘Automatically manage paging file size for all drives’ checkbox and choose ‘Custom Size’
Step 3: Enter ‘Recommended’ size into initial size field and in minimum size, enter the amount 1.5X times your RAM, and hit ‘Set >Ok’ to save the changes and restart your computer.
Method 7: Disable background apps
Step 1: Open ‘Settings’ app in Windows PC via Windows Search Box and go to ‘Accounts > Sign-in Options’ and disable ‘Automatically save my restartable apps and restart them when I sign back in’
Step 2: Go to ‘Apps > Apps & features’, click ‘Three-dots’ menu next to apps you want to disable from running in background, select ‘Advanced’, scroll down to ‘Background apps permissions’ and select ‘Never’ from dropdown. Once done, check if it works.
Method 8: Run CHKDSK scan
You can run CHKDSK scan in computer to fix the issue.
Step 1: Type ‘cmd’ in Windows Search Box and press ‘SHIFT + ENTER’ keys on keyboard to open ‘Command Prompt as Administrator’
Step 2: Type ‘chkdsk /r c:’ command and hit ‘Enter’ key to execute. Once executed, restart your computer and check if the issue is resolved.
Method 9: Use storage drivers
Step 1: Open ‘Device Manager’ in Windows PC via Windows Search Box and expand ‘Disk Drives’ and right-click on your disk
Step 2: Select ‘Update Driver’ and update it. Once updated, restart your computer and check if the issue is resolved.
Download or reinstall device driver update in Windows PC [Automatically]
You can also try to update all Windows drivers using Automatic Driver Update Tool. You can get this tool through button/link below.
Method 10: Update Windows 11
Updating Windows 11 to latest version can resolve the issue.
Step 1: Open ‘Settings’ app in Windows PC via Windows Search Box and go to ‘Windows Update’ and click ‘Check for updates’ button
Step 2: Download and install all available updates in computer and once updated, restart your computer and check if the issue is resolved.
Conclusion
I am sure this post helped you on How to fix 100% disk usage after upgrading to Windows 11 with easy ways. You can read & follow our instructions to do so. That’s all. For any suggestions or queries, please write on comment box below.


