What is ‘0x800f0830-0x20003 safe_os install updates’ issue in Windows 11?
In this post, we are going to discuss on “How to Fix 0x800f0830-0x20003 safe_os install updates Windows 11”. You will be guided with easy steps/methods to resolve the issue. Let’s starts the discussion.
‘0x800f0830-0x20003 safe_os install updates’ error Windows 11: It is common Windows Problem usually occurred while installing Windows 11 OS or upgrading Windows 10 PC to Windows 11 OS. This issue indicates you are unable to upgrade your PC/laptop to Windows 11 OS or unable to upgrade Windows 10 Home PC to Windows 11 Home for some reasons.
Several users reported about this Windows 11 upgrade error and explained the upgrade process fails with ‘Undoing changes made to your computer’ error which reverts the Windows 11 installation and recovers your system as it as was before. When they restart their Windows PC after getting ‘Undoing changes made to your computer’ error, they experienced 0x800f0830-0x20003 safe_os install updates error after Windows 10 login. Let’s take a look at error message.
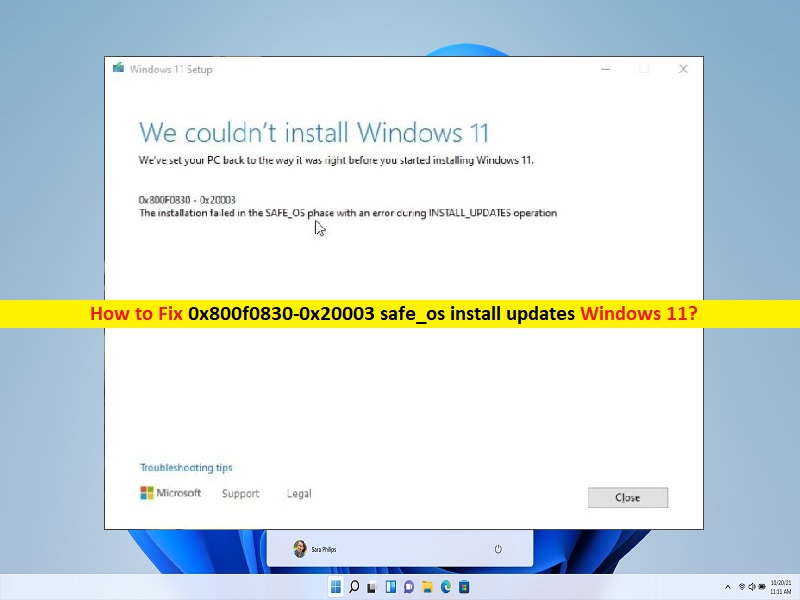
“We couldn’t install Windows 11
“We couldn’t install Windows 11” We’ve set your PC back to the way it was right before you started installing Windows 11. 0x800F0830 – 0x2003 The Installation failed in the SAFE_OS phase with an error during INSTALL_UPDATES operation.”
The possible reason behind this Windows 11 upgrade error can be the minimum system requirements for Windows 11 that is not met by your computer. Before troubleshooting the issue, you should make sure your PC is eligible to run Windows 11 OS version. To do so, you need to check system requirements for Windows 11 before installing or upgrade to Windows 11. Compare your system configuration/architecture with system requirements for Windows 11, and check if your PC can run Windows 11 or not.
Microsoft offers ‘PC Health Check’ App designed to check if your PC is meeting all the requirements for Window 11 installation. If you investigate your PC are meeting all requirements that’s great, you can start upgrading process and check if it works. For example, TMP 2.0 and Secure Boot features are two important features requirement for Windows 11. You should make sure these essential features are properly enabled in your computer and updated/upgraded to correct version. Let’s take a look at steps to update your TPM level from TPM 1.2 to TPM 2.0 and enable secure boot., and go for the solution.
How to fix 0x800f0830-0x20003 safe_os install updates Windows 11?
Method 1: Upgrade TPM level from TPM 1.2 to TPM 2.0
You should make sure TPM is enabled in your device and upgrade to TPM 2.0 version. If not, you can change BIOS security settings from TPM 1.2 to TPM 2.0 to upgrade.
Step 1: Restart your computer and press ‘F1’, ‘F2’ or ‘F12’ to enter into BIOS Mode in your computer
Step 2: Once you are inside BIOS Mode, go to ‘Security’ tab using arrow key and select ‘Security Chip’ and hit ‘Enter’ key
Step 3: Check ‘Security Chip Type’ to see if you have TPM level from TPM 1.2 to TPM 2.0.Once done, save the changes and exit BIOS setting, restart your computer to see the changes
Method 2: Enable Secure Boot
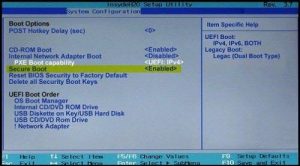
Enabling Secure Boot feature in your computer is another major requirements for Windows 11 to function and install in your computer.
Step 1: Open BIOS Setting page using above method
Step 2: Go to ‘Security’ tab and select ‘Secure Boot’ and hit ‘Enter’ key. Make sure ‘Secure Boot’ is enabled. Once done, restart your computer and check if you can upgrade your Windows 10 PC to Windows 11 without any error.
Method 3: Fix 0x800f0830-0x20003 safe_os install updates error using Registry Editor
Another possible way to fix the issue is to make certain changes in your system registry. Let’s try.
Step 1: Press ‘Windows + R’ keys on keyboard, type ‘regedit’ in ‘Run’ window and hit ‘Ok’ button to open ‘Registry Editor’, and navigate to following path
HKEY_LOCAL_MACHINE\SYSTEM\Setup\MoSetup
Step 2: Once you are in correct path, right-click in empty area in right pane, and select ‘New > DWORD (32-bit) value’ and name the key to ‘AllowUpgradesWithUnsupportedTPMOrCPU’
Step 3: Double-click on created key to edit, set its value to ‘1’ and hit ‘Ok’ button to save the changes. Once done, restart your computer and check if the issue is resolved.
Method 4: Disable ‘Developer Mode’
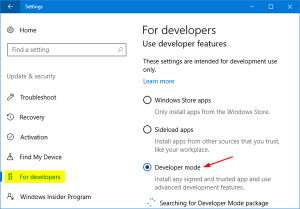
Another possible way to fix the issue is to disable Developer Mode in your computer.
Step 1: Open ‘Settings’ App in Windows 10 via Windows Search Box and go to ‘Update & Security > For Developers’
Step 2: In the opened window, in right-pane, slide the toggle switch ‘Developer Mode’ to left to turn OFF. Once done, restart your computer and check if it works for you.
Method 5: Perform Clean Boot in Windows PC
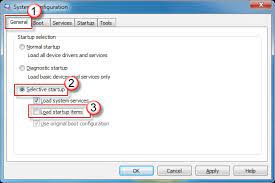
If the issue is still persist, you can try to fix the issue by performing clean boot in computer in order to close all background services/third-party services that might be causing error.
Step 1: Press ‘Windows + R’ keys on keyboard, type ‘msconfig’ in ‘Run’ window and hit ‘Ok’ button to ‘System Configuration’
Step 2: In the opened window, click ‘Services’ tab, select ‘Hide all Microsoft Services’ checkbox and hit ‘Disable all’ button
Step 3: Click on ‘Boot’ tab and check ‘Safe Boot’ checkbox to enable, and then hit ‘Apply’ and ‘Ok’ button to save the changes and restart your computer, and check if it works for you.
Method 6: Run Windows Update troubleshooter
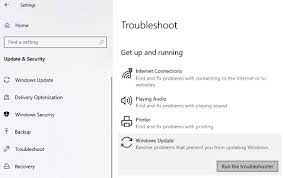
Windows 10 built-in ‘Windows Update’ troubleshooter can resolve this issue. Let’s try.
Step 1: Open ‘Settings’ App in Windows 10 and go to ‘Update & Security > Troubleshoot’, select ‘Additional troubleshooters’
Step 2: Select ‘Windows Update’ troubleshooter and click ‘Run the troubleshooter’ button, follow on-screen instructions to finish troubleshooting process, and once done, restart your computer and check if it works for you.
Method 7: Run SFC scan and DISM scan in Windows PC
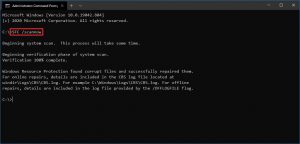
Step 1: Type ‘cmd’ in Windows Search Box and press ‘SHIFT + ENTER’ keys on keyboard to open ‘Command Prompt as Administrator’
Step 2: Type the following commands one-by-one and hit ‘Enter’ key after each to execute
sfc /scannow
Dism /Online /cleanup-image /RestoreHealth
Step 3: Once executed, restart your computer and check if it works
Method 8: Reset Windows Update Components
Step 1: Type ‘cmd’ in Windows Search Box and press ‘SHIFT + ENTER’ keys on keyboard to open ‘Command Prompt as Administrator’
Step 2: Type the following commands one-by-one and hit ‘Enter’ key after each to execute
net stop bits
net stop wuauserv
net stop appidsvc
net stop cryptsvc
Del “%ALLUSERSPROFILE%\Application Data\Microsoft\Network\Downloader\*.*”
rmdir %systemroot%\SoftwareDistribution /S /Q
rmdir %systemroot%\system32\catroot2 /S /Q
netsh winsock reset
netsh winsock reset proxy
net start bits
net start wuauserv
net start appidsvc
net start cryptsvc
Step 3: Once executed, restart your computer and check if it works
Fix Windows PC Issues with ‘PC Repair Tool’ [Recommended Solution]
‘PC Repair Tool’ is easy & quick way to find and fix BSOD errors, DLL errors, EXE errors, problems with programs/applications, malware or viruses issues, system files or registry issues and other system issues with just few clicks.
Conclusion
I am sure this post helped you on How to fix 0x800f0830-0x20003 safe_os install updates Windows 11 with several easy steps/methods. You can read & follow our instructions to do so. That’s all. For any suggestions or queries, please write on comment box below.


