Tips to enable Screen Savers on Windows 11:
In this post, we are going to discuss on “How to enable Windows 11 Screen Savers”. You will be guided here with easy steps/methods to do so. Let’s starts the discussion.
‘Screen Sever’ in Windows 11: Screen Saver or Screensaver is computer program that blanks the screen or fills it with moving images, or patterns when the computer has been idle for long time. The original purpose of screensavers was to prevent phosphor burn-in CRT, plasma and OLED computer monitors. Though the most the modern monitors are not susceptible to the issue, screensaver are still used for other purposes. Screensavers are setup to offer a basic layer of security, by requiring a password to re-access the device.
Screen Saver or Screensaver feature is also available in Windows 11 – the latest Microsoft Windows Operating System. Screensaver feature is disabled by default in Windows 11 OS computer. So if you want to use Screensaver feature in Windows 11 computer, then you need to turn ON or enable Screensaver feature manually. If you are unaware, Screensaver feature in Windows computer displays an animation or image when the computer has been idle for certain period of time.
Enabling Screensaver feature helps your system’s screen locking or prevent from going into sleep mode/hibernate mode. For example, if you enable Screensaver feature and set it to activate it automatically after 10 minutes computer leave time or when you are not activate on computer for 10 minutes or long, then your system screen will automatically be changed into screensaver mode instead of showing display.
In such case, if you want to de-activate screensaver and re-enter into Windows system’s screen for work, then you will need to just press any keys on keyboard or ‘Enter’ key to de-activate Screensaver. You may also need to enter password to re-access to the device if the device is left along for too long. As mentioned, Screen Saver feature is disabled by default in your Windows 11 computer. It means you need to manually enable or turn ON screensaver in Windows 11 computer if you want to use this feature. Let’s go for the steps.
How to enable Windows 11 Screen Savers?
Step 1: Type ‘Screen Saver Settings’ in Windows Search Box and open ‘Change Screen Saver’ or ‘Turn Screen saver ON or OFF’ from results appear. Both open the same screen settings window.
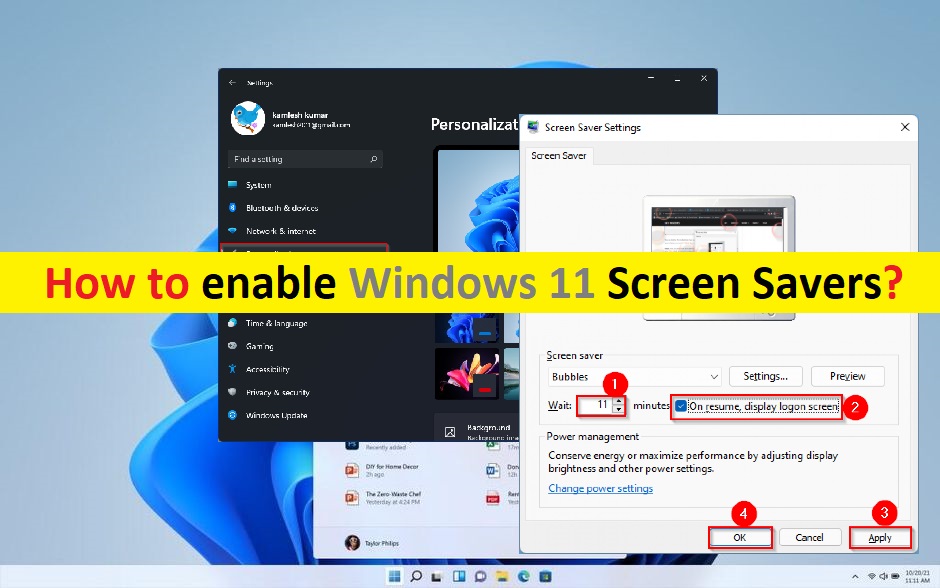
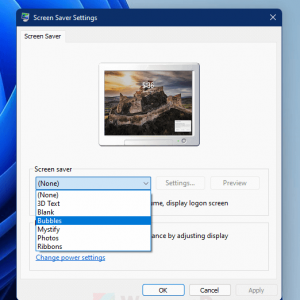
Step 2: In the opened window, under ‘Screen Saver’ tab, click on dropdown under ‘Screen Saver’ which shows ‘None’ by default, and select a screen saver of your choice
Step 3: Once selected, go to ‘Wait’ section and enter the ‘Number of minutes’ for how long Windows should wait from the moment your PC is detected to be inactive until it shows the screen saver.
Step 4: Tick ‘On resume, display Logon screen’ checkbox to check to set the screen saver to display logon screen on résumé
Step 5: Finally, click on ‘Apply’ and ‘OK’ button to save the changes. Before clicking ‘Apply’ or ‘Ok’ button, you can click ‘Preview’ button to preview how the screen saver have selected would look like when it is active.
How to change screensaver settings in Windows 11?
For 3D Text Screensaver:
Step 1: In the opened ‘Screensaver’ window (you can open Screensaver window using method), click on ‘Settings’ button next to 3D Text screensaver which you selected from dropdown
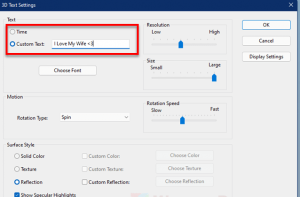
Step 2: In the opened window, enter a custom text you want to show as 3D text in ‘Custom Text’ field. You can also select ‘Time’ option if you want to show current time instead of custom text.
Step 3: To choose a specific font for 3D Text, click ‘Choose font’. You can also adjust the motion, how it should rotate or spin, rotation speed, size, surface style and more. Once done, save the changes and settings.
How to disable screensaver in Windows 11?
If you want to disable screensaver feature entirely, follow the steps below.
Step 1: Open ‘Screensaver’ settings window using above method
Step 2: Select ‘None’ from dropdown under ‘Screensaver’ and hit ‘Apply’ and ‘Ok’ button to save the changes.
Conclusion
I am sure this post helped you on How to enable Windows 11 Screen Savers with several easy steps/methods. You can read & follow our instructions to do so. That’s all. For any suggestions or quires, please write on comment box below.


