Host files on Windows are for mapping a connection between the IP address and domain names before reaching to the domain name servers. It converts the hostname to numerical protocol address that locates a host in an IP network.
These host files are plain text files whose work is just to map the hostnames to IP address before the DNS development. The function of the host files is bit useless once after the process is automated through the domain name systems.
People are searching for the steps how to edit host files so as to override the DNS settings for a domain on their system. For example, if they want to block access to a specific website from the system or when they just need to transfer a website to a new host provider.
Very first, you need to do in this case is to move the files to the new servers and thereafter shift the domain to a new IP address. Sometimes, there is not configured DNS server, people look for the option to translate an IP address to a computer name. Using hostname is bit easy than using a sequence of IP numbers.
Whatever the reason, if you are looking for the guide for the same, here we are providing you different methods how to edit your host file Windows 10. The steps are provided in simplest manner and so you can perform it on your own without any trouble.
Methods how to edit your host file Windows 10
Method 1: Edit host file using Notepad
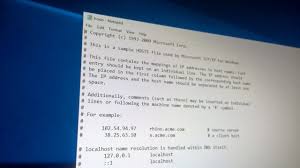
- Open Start menu, type in notepad,
- Right-click on it and select Run as Administrator,
- Select the File from the menu and open it,
- You will see hosts.txt file in that location.
C:\Windows\System32\Drivers\etc
(Here you need to click on ‘All files’ on the droop-down menu to see the hosts.txt file)
- Select the file the then and hit Open,
- Perform necessary changes to the file. Write only one entry per line,
- Once done, click the file again and then on Save option,
- Close the Notepad now.
Method 2: Edit hosts file using Command Prompt
- On the Start menu, type cmd,
- Right-click on Command Prompt and select Run as Administrator,
- In the opened window, ping the website you have blocked, for example: use the below command:
- Ping www.techsgizmo.com
- If you changed you mind, in future, you can just open the hosts file again and edit or delete the lines.
Method 3: Create a Shortcut for hosts file
- On the Start menu, type notepad,
- Right-click on it and choose Pin to Start,
- Right-click on the shortcut on the start menu and choose More and then Open file location,
- Right-click on the shortcut and go to its properties,
- You will see the targeted box is filled with the default Notepad path. Replace it with the following:
C:\Windows\system32\drivers\etc\hosts
- Click Apply and confirm with OK.
The hosts.txt file can be affected with malware. Through the host files, the malicious malware can corrupt your system and redirect you to various malware laden pages. Thus, when you are cleaning your system, it is best to check your system for affected hosts file. You can use PC Repair Tool for the purpose. It is a reliable tool and will do the job perfectly.
Conclusion
That’s all! We are now ending up our article how to edit your host file Windows 10. Hope so, the methods provided in this article are useful for you and you are now able to perform the steps by your own. Comment down below to rate and review this post.


