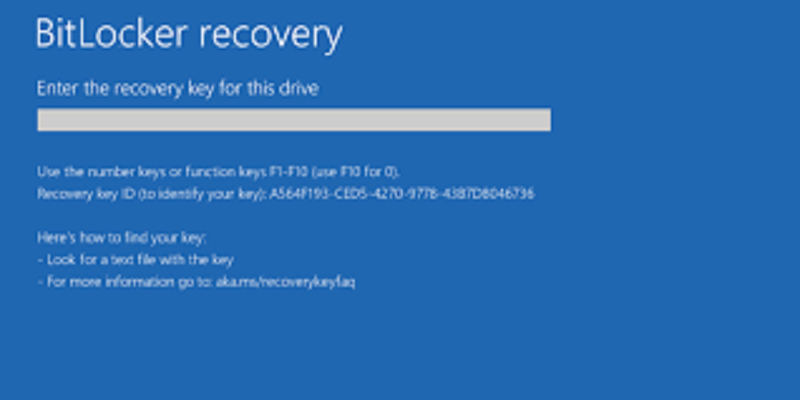
Bitlocker is a feature from Microsoft to protect data by providing encryption for entire volumes. It is a built in feature for Windows Pro and Enterprise version starting with Windows Vista. Some users don’t like this and want to turn off the Bltlocker Windows 10. In this page, we will demonstrate how to disable bitlocker in Windows 10.
Different possible ways to disable bitlocker in Windows 10
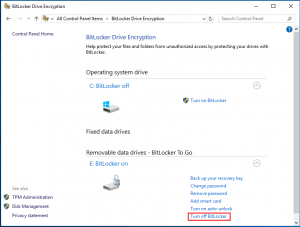
#1: Using Control Panel
- Open Control Panel and go to the BitLocker Drive Encryption,
- Expand the BitLocker-protected drive and choose Unlock drive option,
- Enter your password and click on the Turn off BitLocker option the then.
#2: Through Settings option
- Press Windows + I to open Settings,
- Choose System in the pop-up appears,
- In the next pop-up window, select About and locate Device encryption section and choose Turn off button,
- Click on the Turn off again on the confirmation page.
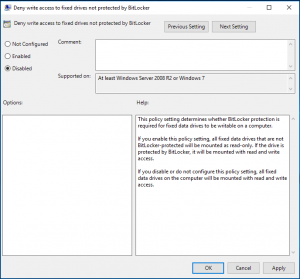
#3: Use Local Group Policy Editor to disable BitLocker
- Press Windows + R to open Run,
- In the dialog box, type in gpedit.msc and click OK,
- In the new pop-up window, navigate to the path: Computer Configuration -> Administrative Templates -> Windows Components – > BitLocker Drive Encryption -> Fixed Data Drives,
- Select Deny write access to fixed drives not protected by BitLocker the then,
- Choose Not Configure or Disabled in the opened window and click Apply and OK to confirm the changes.
#4: Disable BitLocker using CMD
- Open Command Prompt as admin,
- In the pop-up window, type in manage-bde – off X: and hit Enter,
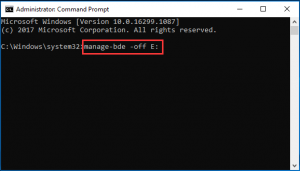
Here, replace X with the actual hard drive letter. The decryption process begins after this. The entire process takes time, so wait. When it is finished, you have finished the process of disabling BitLocker through CMD.
#5: PowerShell as option to disable BitLocker
- Type PowerShell in the search box of the Windows and select the matched result,
- Right-click on it and choose Run as administrator,
- In the pop-up window appears, type the command Disable-BitLocker –MountPoint ”X:” and hit Enter.
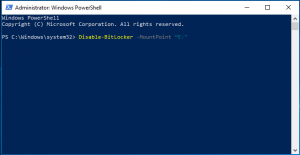
Here, replace the X with the local encrypted hard drive letter.
You can here disable BitLocker for all volumes. Input the following commands for the purpose:
$BLV = Get-BitLockerVolume
Disable-BitLocker -MountPoint $BLV
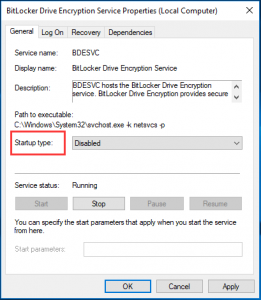
#6: Disable BitLocker Service
This is another way how to disable bitlocker in windows 10. You can choose to disable BitLocker service. Here is the tutorial:
- Press Windows + R to open Run,
- In the dialogue box, enter services.msc and click Ok,
- In the services window, find BitLocker Drive Encryption Service and double click on it,
- Then change its Startup type to Disable,
- Click on Apply and Ok to confirm these changes.
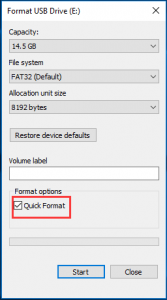
#7: Format Encrypted Hard Drive
If there is no important file on your hard drive, you can consider of completely formatting it and removing the BitLocker Windows 10:
- Right-click on the encrypted hard drive and choose Format,
- In the pop-up window, set the file systems an check Quick format option,
- Click on Start to continue.
Conclusion
We have provided here different ways how to disable bitlocker in windows 10. If you want to disable BitLocker, you should try these. If you have any better way of turning the BitLocker Windows 10 off, you can share it with us through the comment section below.


