Tips to Change regional settings on Windows 11:
In this post, we are going to discuss on How to Change regional settings Windows 11, Change regional settings on Windows 11. You are provided here with easy steps/methods to do so. Let’s starts the discussion.
‘Regional settings Windows 11’:
Regional Settings define local values for month names and abbreviations, date format, system language, and default system currency. In Windows 11 OS based computer, the regional settings make it easy to ensure that the system and apps can show content based on your location. For example, Microsoft Store uses the region information to display the apps, games, and videos available in your territory.
Windows 11 provides an easy way to setup and change region settings with Settings app and you can perform various operations like to show the date, time, numbers or currency in a different format using with this app. If you are looking to ways to Change regional settings on Windows 11, then you are in right –place for this. You can perform this operation using built-in Settings app. Let’s go for the steps.
How to Change regional settings Windows 11?
Method 1: Change region settings on Windows 11
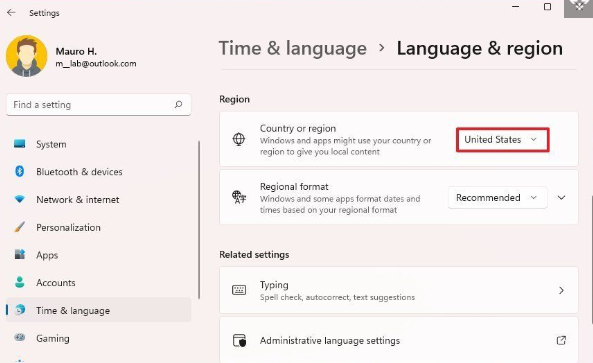
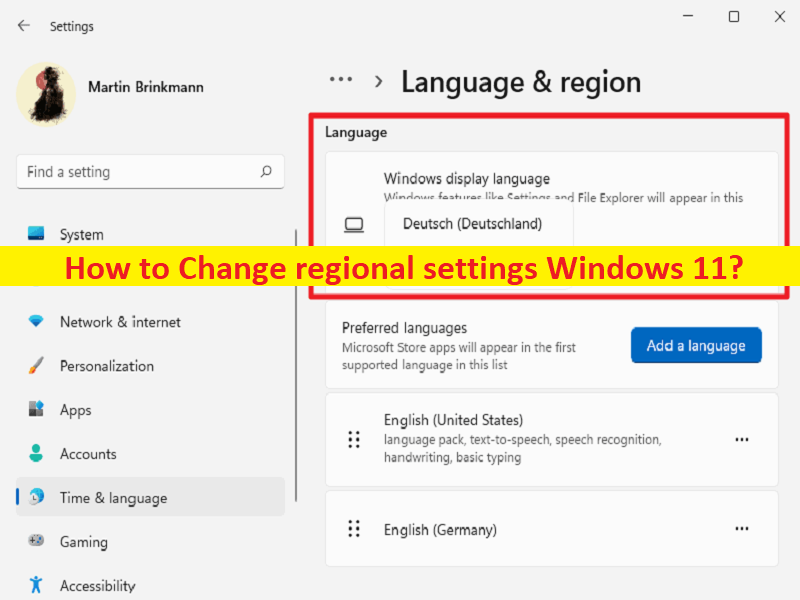
Step 1: Open ‘Settings’ app in Windows PC via Windows Search Box and go to ‘Time & Language > Language & Region’
Step 2: Under ‘Region’ section, choose the new location in ‘Country or Region’ setting like ‘United States’
Step 3: Select the regional format to use on Windows 11 in ‘Regional Format’ settings. Usually ‘Recommended’ option offers the optional configuration. Once completed, then system will apply the new region settings, affecting Windows and apps, including Microsoft Store.
Method 2: How to Change regional format settings Windows 11?
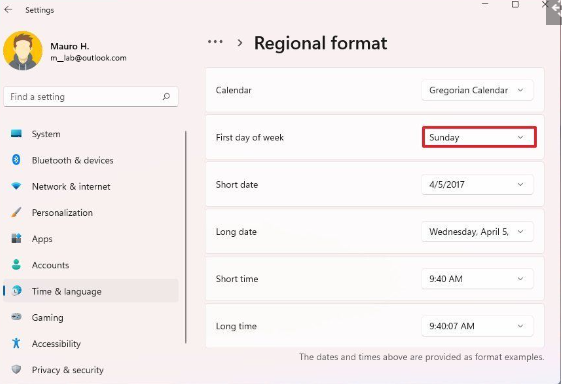
Step 1: Open ‘Settings’ app in Windows PC via Windows Search Box and go to ‘Time & Language > Language & Region > Regional Format > Change Formats’
Step 2: Select when your week starts in ‘First Day of Week’ setting, and choose:
- Choose the date format in the “Short date” setting.Choose the date format in the “Long date” setting.
- Select the time format in the “Short time” setting.
- Select the time format in the “Long date” setting.
Step 3: Once completed, updated format settings will be reflected across the desktop and apps.
Method 3: How to Change Advanced Region settings Windows 11?
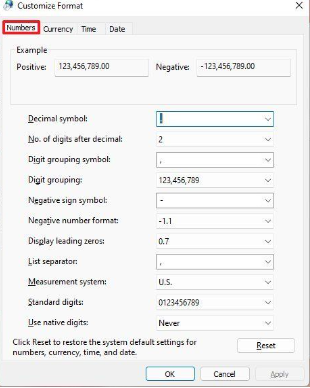
This way, you can customise numbers, currency, time and date in Windows 11.
Step 1: Open ‘Settings’ app in Windows PC via Windows Search Box and go to ‘Time & Language > Language & Region’
Step 2: Under ‘Related Settings’ section, click ‘Administrative Language Settings’ option
Step 3: Under ‘Formats’ tab, click ‘Additional Settings’ button and in the newly opened window ‘Customize format’ window, click ‘Numbers’ tab and customize the regional formats for numbers and symbols and then click ‘Currency’ tab
Step 4: Customize the currency formats on Windows 11 and then click ‘Time’ tab, and customize the time format more granularly,
Step 5: Now, click ‘Date’ tab, and customize the date format more granularly. Once done, the new format for currency, time, numbers and date will be reflected across the desktop and apps.
Fix Windows PC issues with ‘PC Repair Tool’:
‘PC Repair Tool’ is easy & quick way to find and fix BSOD errors, DLL errors, EXE errors, problems with programs/applications, malware or viruses infections in computer, system files or registry issues, and other issues with just few clicks.
Conclusion
I am sure this post helped you on How to Change regional settings Windows 11, Change regional settings on Windows 11 with way ways. You can read & follow our instructions to do so. That’s all. For any suggestions or queries, please write on comment box below.


