Tips to restrict access to local drives in Windows 10:
In this article, we are going to discuss on How do i restrict access to local drives in Windows 10. You are provided with easy ways to do so. Let’s starts the discussion.
‘Restrict access to local drives’ in Windows 10:
In Windows 10 computer, it is quite simple & easy to access your personal files in any local drives in your PC/Laptop’s storage even if you create a new user account or multiple user account on Windows 10 computer. You can easily access your all personal files with any Windows 10’s user account logged-in. In sort, when you create a new user account in Windows 10 computer, then you are also allowed to access your personal files with newly user account logged-in.
It is also quite simple & easy to restrict access to local drives/hard drives to local accounts in Windows 10 computer. However, restricting drives is not same as restricting files & folders on Windows 10 computer. There are specific settings for restricting drives on computer and that will prevents users from accessing your personal data on other drives. If you are looking for ways to restrict access to local drives in Windows 10, you are in right-place for this. Let’s go for the steps.
How do i restrict access to local drives in Windows 10?
Method 1: Restrict access to local drives in Windows 10 using Local Group Policy Editor
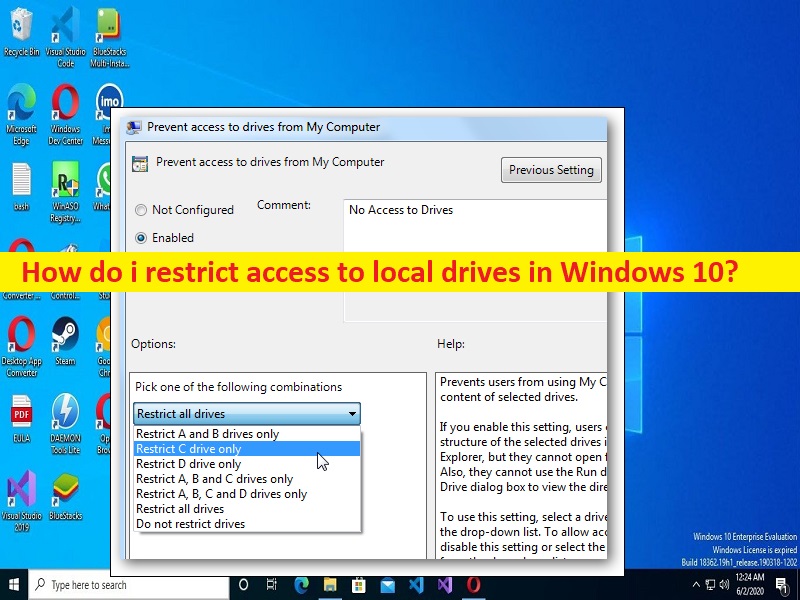
Step 1: Press ‘Windows + R’ keys on keyboard, type ‘gpedit.msc’ in ‘Run’ window and hit ‘Ok’ button to open ‘Local Group Policy Editor’ app, and go to following path
User Configuration\ Administrative Templates\ Windows Components\ File Explorer\
Step 2: Find and double-click ‘Prevent access to drives from My Computer’ settings and it will open in new window.
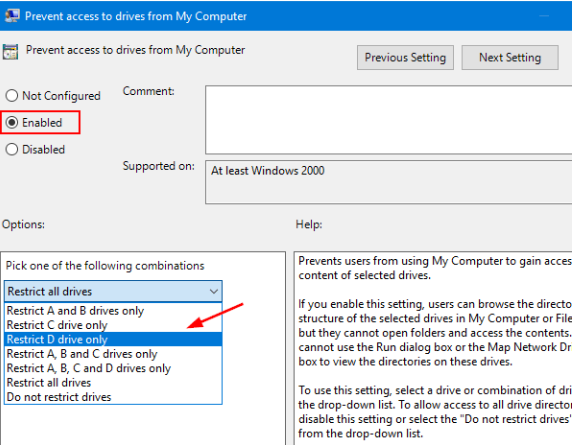
Step 3: Change the toggle from ‘Not Configured’ to ‘Enable’ option, and choose one of following combinations for the drives that you want to restrict, and then hit ‘Apply > Ok’ button to save the changes. This will restrict access to drives that you are selected.
Step 4: To remove the restrictions, you can change the toggle back to ‘Not Configured’ or ‘Disabled’ in ‘Step 3’.
Method 2: Restrict access to local drives in Windows 10 using Registry Editor
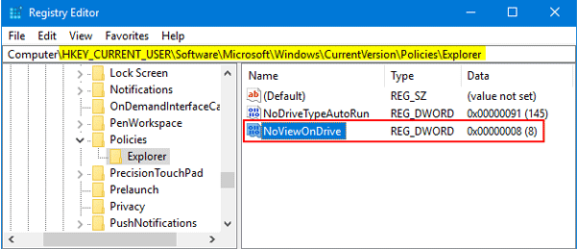
Step 1: Press ‘Windows + R’ keys on keyboard, type ‘regedit’ in ‘Run’ window and hit ‘Ok’ button to open ‘Registry Editor’ app and go to following path
HKEY_CURRENT_USER\Software\Microsoft\Windows\CurrentVersion\Policies\Explorer
Step 2: Right-click ‘Explorer’ key in right-pane, and select ‘New > DWORD (32-bit) Value’ and name the value to ‘NoViewOnDrive’, and hit ‘Enter’ key to save it
Step 3: Double-click on newly created value to edit, change the Value Data and Base of value to ‘Decimal’.
Step 4: For the value data, you will need to add the value of decimal numbers of the drives as stated here: A: 1, B: 2, C: 4, D: 8, E: 16, F: 32, G: 64, H: 128, I: 256, J: 512, K: 1024, L: 2048, M: 4096, N: 8192, O: 16384, P: 32768, Q: 65536, R: 131072, S: 262144, T: 524288, U: 1048576, V: 2097152, W: 4194304, X: 8388608, Y: 16777216, Z: 33554432, ALL: 67108863.
Step 5: To add multiple drives in value, you will need to ‘add (sum)’ the value of the drives with each other. Like ‘C’ and ‘D’ will have a decimal value of 12.
Step 6: After all the configurations are made, make sure to restart your computer to save the changes in computer
Step 7: To remove restrictions for the drives, you need to simply change the value data to ‘0’ or remove value from Registry Editor.
Fix Windows PC Issues with ‘PC Repair Tool’:
‘PC Repair Tool’ is easy & quick way to find and fix BSOD errors, DLL errors, EXE errors, problems with programs/applications, malware or viruses infections in computer, system files or registry issues, and other system issues with just few clicks.
Conclusion
I am sure this article helped you on How do i restrict access to local drives in Windows 10 with easy ways. You can read & follow our instructions to do so. That’s all. For any suggestions or queries, please write on comment box below.


