What is ‘You can’t keep Windows Settings personal files and apps unsupported directory’ error in Windows 10/11?
In this post, we are going to discuss on How to fix You can’t keep Windows Settings personal files and apps unsupported directory in Windows 10/11. You will be guided with easy steps/methods to resolve the issue. Let’s starts the discussion.
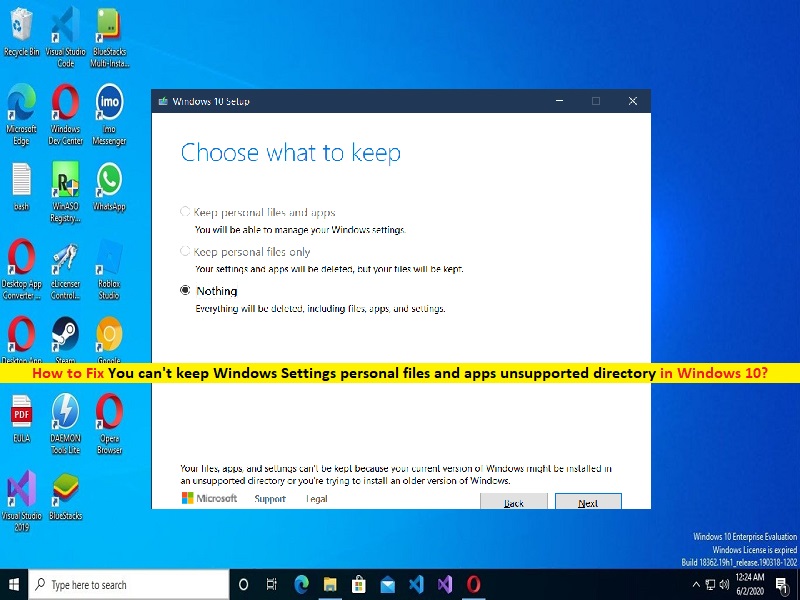
‘You can’t keep Windows Settings personal files and apps unsupported directory’ error:
This error is usually appeared/occurred when you perform an in-place upgrade of Windows 10/11 in computer. This issue indicates you are unable to finish Windows upgrade operation and you are unable to keep your Windows’s settings, personal files, and apps while performing upgrade operation. There could be several reasons behind the issue including you have chosen to install Windows using a different language than you are currently using.
Another possible reason behind the issue can be your current version of Windows that might be installed in unsupported folder or you are trying to install an older version of Windows, and you are installing an edition of Windows that’s different than that one you are currently using. It is possible to fix the issue with our instructions. Let’s go for the solution.
How to fix You can’t keep Windows Settings personal files and apps unsupported directory error in Windows 10/11?
Method 1: Fix ‘You can’t keep Windows Settings personal files and apps unsupported directory’ error with ‘PC Repair Tool’
‘PC Repair Tool’ is easy & quick way to find and fix BSOD errors, DLL errors, EXE errors, problems with programs/applications, malware or viruses infections in computer, and other system issues with just few clicks.
Method 2: Check your system language
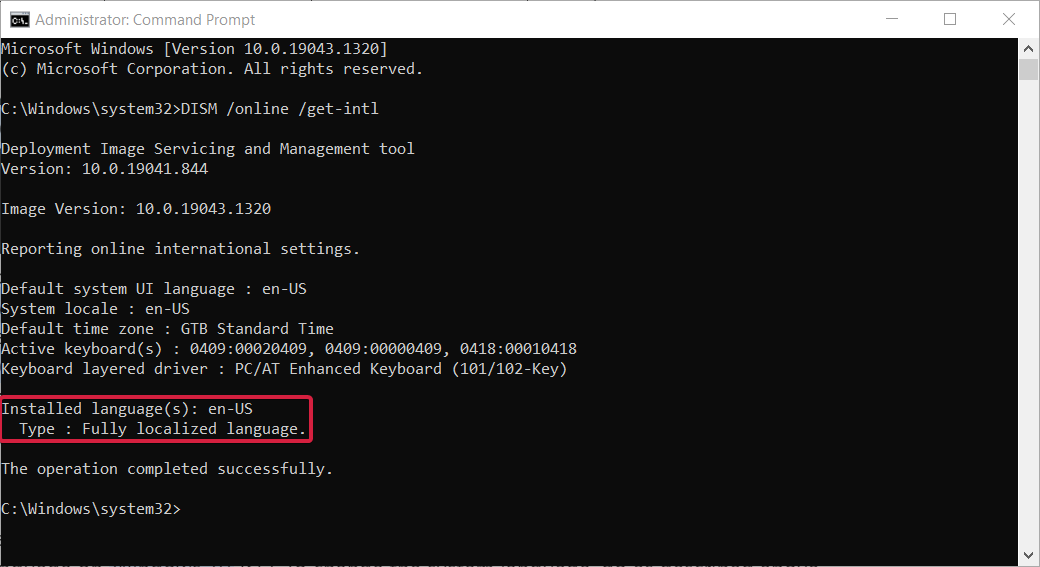
Step 1: Type ‘cmd’ in Windows Search Box and press ‘SHIFT + ENTER’ keys on keyboard to open ‘Command Prompt as administrator’
Step 2: Type the following commands and hit ‘Enter’ key to execute.
DISM /online /get-intl
Step 3: You should see your operating system language in ‘Default System UI language’ section
Step 4: Insert Windows 10 bootable USB drive and boot your computer with it
Step 5: Choose ‘Repair’ option and then select ‘Troubleshoot > Advanced Options > Command Prompt’, type the following command in Command Prompt and hit ‘Enter’ key to execute
DISM /image:C: /set-uilang:en-US
Step 6: Once executed, this will set your system language to en-US and you will be able to keep your files when you upgrade to Windows 10.
Method 3: Update drivers
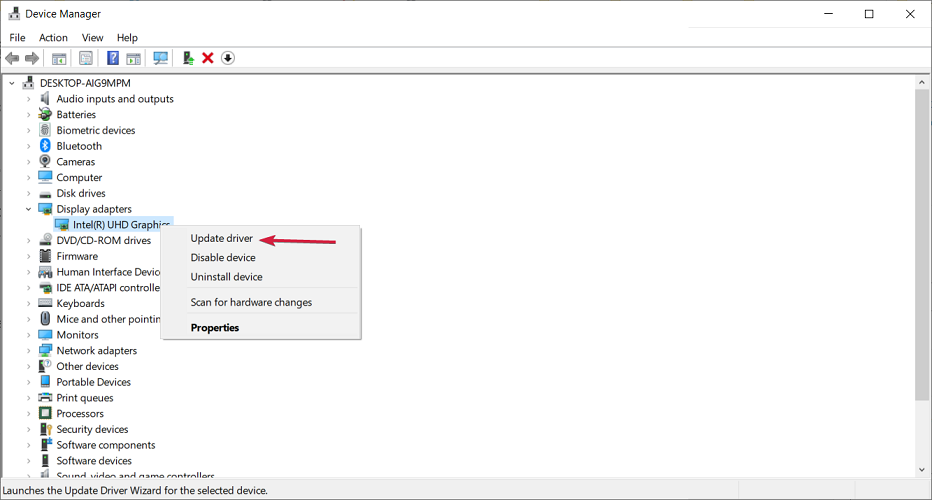
Step 1: Open ‘Device Manager’ in Windows PC via Windows Search Box and expand ‘Display Adapters’ category
Step 2: Find and right-click on your display driver and select ‘Update Driver’, and follow on-screen instructions to finish updates. Repeat the same steps to update all other necessary drivers. Once updated, restart your computer and check if the issue is resolved.
Download or reinstall device drivers update in Windows PC [Automatically]
You can also try to update all Windows drivers to latest & compatible version using Automatic Driver Update Tool. You can get this tool through button/link below.
Method 4: Change System locale from Control Panel
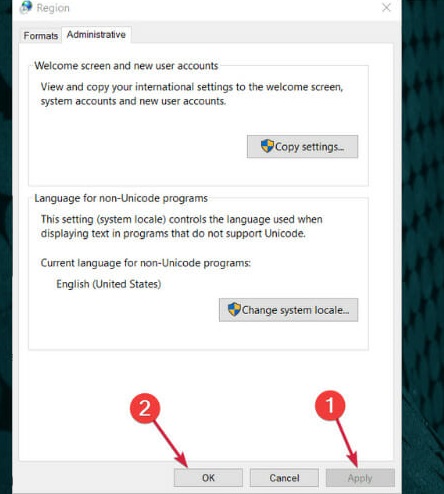
Open ‘Control Panel’ in Windows PC and go to ‘Region’
Step 2: Go to ‘Administrative’ tab and click ‘Change System Locale’, set ‘Current System Locale’ to ‘English (United States)’ and click ‘Ok’ button to save the changes, and then hit ‘Apply > Ok’ button in ‘Region’ window
Step 3: Once done, restart your computer and check if the issue is resolved.
Method 5: Download Windows 10 OS version that matches your System language
One possible way to fix the issue is to download Windows 10 OS version that matches your System language. To do so, you need to download ‘Media Creation Tool’ from Microsoft official site and choose desired language from list of language, and then perform Windows 10 update in computer.
Method 6: Remove problematic applications
This issue can be occurred due to interference of some problematic applications installed in computer. You can uninstall the problematic applications in computer using ‘Control Panel > Uninstall a Program > Programs & Features’, and then check if the issue is resolved.
Method 7: Remove any additional non-English languages
If you can’t keep your files from previous version of Windows, perhaps you should try removing any other installed languages and then try installing Windows 10 again and check if it works.
Method 8: Disable or uninstall antivirus
This issue can be occurred due to interference of antivirus/firewall program in computer to fix the issue. You can uninstall your antivirus software in computer in order to fix the issue and check if it works for you.
Method 9: Fix ‘You can’t keep Windows Settings personal files and apps unsupported directory’ error using REgistry Editor
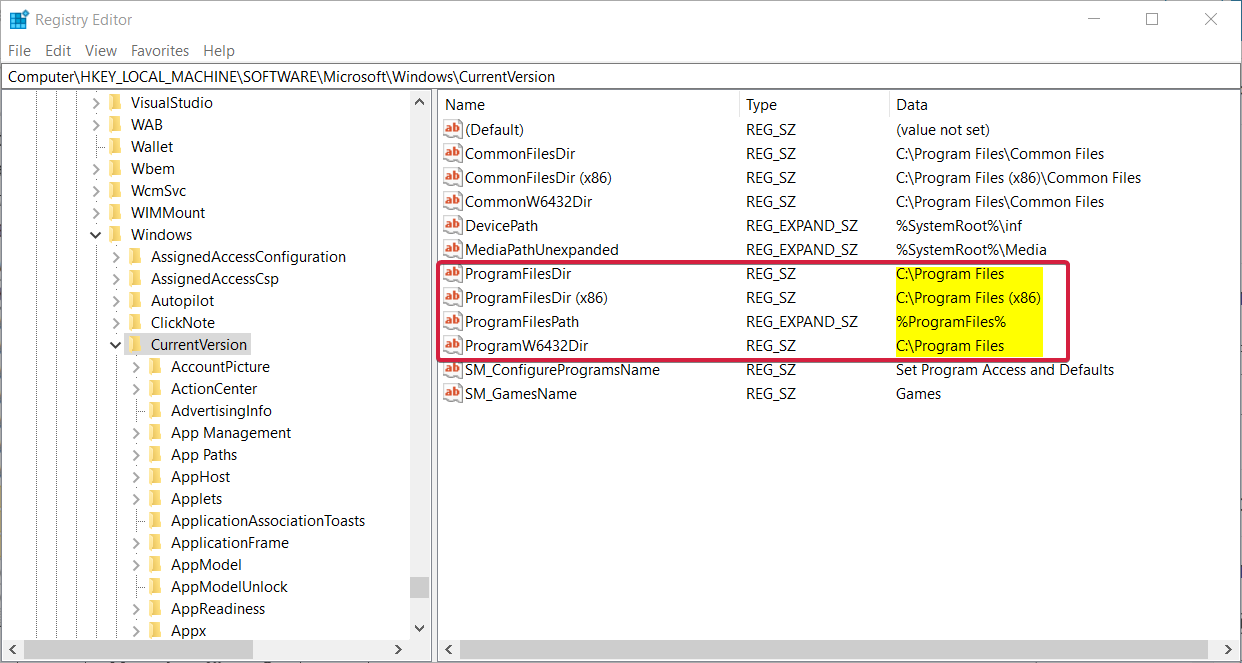
Step 1: Open ‘Registry Editor’ app in Windows PC via Windows Search Box and navigate to following path
Computer\HKEY_LOCAL_MACHINE\SOFTWARE\Microsoft\Windows\CurrentVersion
Step 2: Locate ProgramFilesDir, Program FilesDir (x86), ProgramFilesPath, and ProgramW6432Dir. Check the data values for these strings. If you changed the location of program files folder, the value shield look like ‘X:\Program Files’. To fix the issue, open each of these strings and change the drive letter to ‘C:’ drive.
Method 10: Change the location of user account folder
Another possible way to fix the issue is to change the location of user account folder in your computer. You can move your user account folder to C: users folder of computer, and check if it works for you.
Method 11: Change your product key or edition
Step 1: Open ‘Settings’ App in Windows PC and go to ‘System > About’, select ‘Change product key or upgrade your edition of Windows’
Step 2: Click ‘Change product key’, enter the product key for the version of Windows you are upgrading to, and check if it works.
Conclusion
I am sure this post helped you on How to fix You can’t keep Windows Settings personal files and apps unsupported directory in Windows 10/11 with easy steps/methods. You can read & follow our instructions to do so. That’s all. For any suggestions or queries, please write on comment box below.


