What is ‘Windows update error 0x800f0988′ in Windows 10?
In this article, we are going to discuss on How to fix Windows update error 0x800f0988 in Windows 10. You are provided with easy steps/methods to resolve the issue. Let’s starts the discussion.
‘Windows update error 0x800f0988’:
Microsoft regular release updates and patches for their Microsoft Windows operating system to fix all known issues, add several new features and performance improvements to Windows computer. It is quite simple & easy to install latest Windows update or patches in Windows 10 computer using built-in Settings app. To do so, you need to open ‘Settings’ app in Windows PC and go to ‘Update and Security > Windows update’ and click ‘Check for updates’ button, and download & install all available updates in computer.
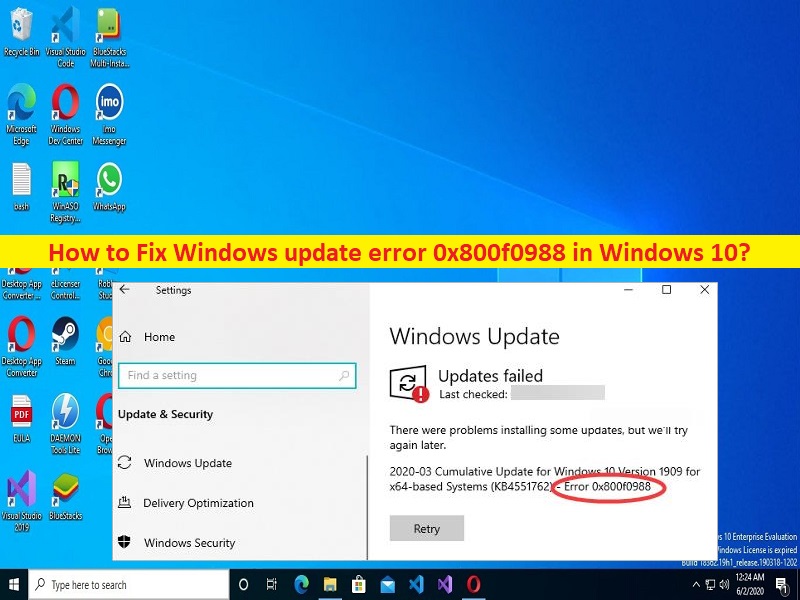
However, several users reported they faced Windows update error 0x800f0988 on their Windows 10 computer when they tried to update Windows 10 OS to latest version. This issue indicates you are unable to download and install Windows update in Windows PC via Settings app for some reasons. The error is appeared with some message saying ‘There were some problems installing updates, but we’ll try again later. (Cumulative Update for Windows 10 1909 (KB4528760) – Error 0x800f0988)’.
There could be several reasons behind the issue including corrupted system files or registry, malware or viruses infections in computer, corruption in Windows update components and other issues. It is possible to fix the issue with our instructions. Let’s go for the solution.
How to fix Windows update error 0x800f0988 in Windows 10?
Method 1: Fix Windows update error 0x800f0988 with ‘PC Repair Tool’
‘PC Repair Tool’ is easy & quick way to find and fix BSOD errors, DLL errors, EXE errors, problems with programs/applications, malware or viruses infections in computer, system files or registry issues, and other system issues with just few clicks.
Method 2: Run StartComponentCleanup via Task Scheduler
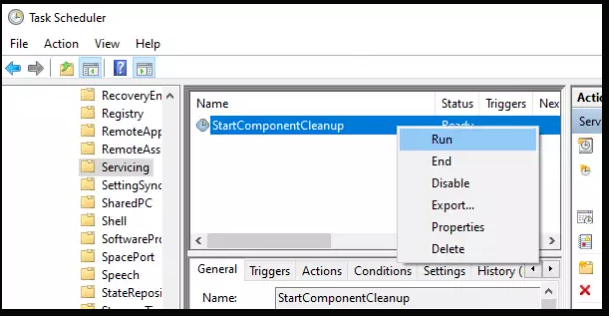
Step 1: Press ‘Windows + R’ keys on keyboard, type ‘taskschd.msc’ in ‘Run’ window and hit ‘Ok’ button to open ‘Task Scheduler’, and go to following path
Library\Microsoft\Windows\Servicing\
Step 2: Select ‘StartComponentCleanup’, right-click it and select ‘Run’. Wait till the process is completed and after that check for updates and check if the issue is resolved.
Method 3: Run StartComponentCleanup via DISM
Step 1: Type ‘cmd’ in Windows Search Box and press ‘SHIFT + ENTER’ keys on keyboard to open ‘Command Prompt as Administrator’
Step 2: Type the following command and hit ‘Enter’ key to execute.
dism /online /cleanup-image /startcomponentcleanup
Step 3: Once executed, restart your computer and check if the issue is resolved.
Method 4: Run Windows Update troubleshooter
Windows built-in Windows update troubleshooter can resolve the issue.
Step 1: Open ‘Settings’ app in Windows PC via Windows Search Box and go to ‘Update & Security > Troubleshoot’
Step 2: Find and select ‘Windows Update’ troubleshooter, and click ‘Run the troubleshooter’ button and follow on-screen instructions to finish troubleshooting and once finished, check if the issue is resolved.
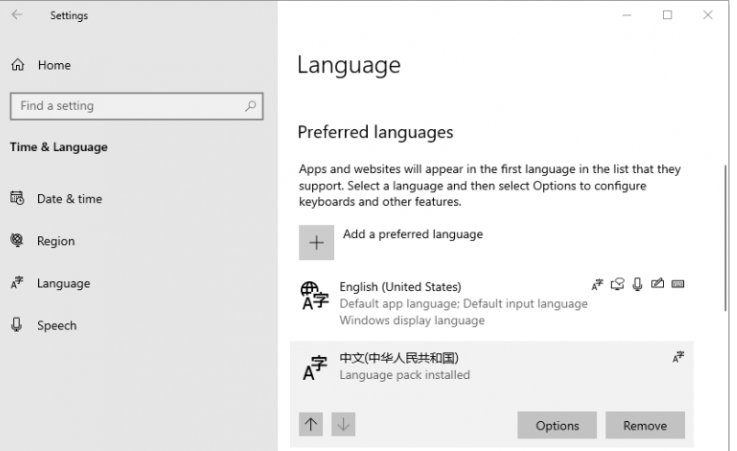
Method 5: Remove the additional languages
Step 1: Open ‘Settings’ app in Windows PC and go to ‘Time & Language’
Step 2: Click on language, scroll down and see if any other language is select other than EN under ‘Preferred Language’
Step 3: If additional language package is installed, then remove it by clicking on language and select ‘Remove’ button.
Method 6: Reset Windows Update components
Resetting Windows Update components can resolve the issue.
Step 1: Using ‘Method 3’, open ‘Command Prompt as Administrator’
Step 2: Type the following commands and hit ‘Enter’ key after each to execute.
net stop bits
net stop wuauserv
net stop appidsvc
net stop cryptsvc
Ren C:\Windows\SoftwareDistribution SoftwareDistribution SoftwareDistribution.old
Ren C:\Windows\System32\catroot2 Catroot2.old
net start bits
net start wuauserv
net start appidsvc
net start cryptsvc
Step 3: Once executed, restart your computer and check if the issue is resolved.
Method 7: Try re-creating Windows Update Store folder
Step 1: Open ‘Services’ app in Windows PC via Windows Search Box
Step 2: Find and right-click ‘Windows Update’ service, and select ‘Stop’ to stop the service
Step 3: Open ‘File Explorer’ in Windows PC and go to ‘C: > Windows’
Step 4: Find and select ‘SoftwareDistribution’ folder, and delete it
Step 5: Click ‘Continue’ in ‘Folder Access Denied’ window, and once done, restart your computer and check if the issue is resolved.
Conclusion
I am sure this post helped you on How to fix Windows update error 0x800f0988 in Windows 10 with easy ways. You can read & follow our instructions to do so. That’s all. For any suggestions or queries, please write on comment box below.


