
Are you struggling with Window 10 Installation Error 0xC1900101 – 0x20017 while trying to upgrade Windows from an obsolete version to a higher version? Well in such case, you have arrived at the right platform; keep scrolling the article to help yourself.
The above mention error gets displayed when the installation completely fails. The full error message reads as:
The installation failed in the SAFE_OS phase with an error during BOOT operation
It’s pertinent to mention this error is similar to Error 0xc1900101-0x30018. As per the reports, when the above mention error occurs, the installed process completely gets interrupted and rollbacks to the earlier Operating System Version or previous Windows build. Furthermore, the users receive this error exactly when the update reaches 99%. When the update reaches 99%, the system starts freezing and this annoying error suddenly appears on the screen.
Since, the error message is not very helpful in analyzing the root cause but it implies that the installation process could not be performed. And if we talk about the reasons, there could be a number of reasons such as issues with registry, insufficient disk space, presence of malware, interference of third party software and so on. But don’t panic, we have collected some tried and tested methods to deal with the trouble.
Try these Solutions for Resolving Window 10 Installation Error 0xC1900101 – 0x20017
Method 1: Run the Windows Update Troubleshooter
Windows provides a number of in-built tools to deal with Windows issues. One such instance is Windows Update Troubleshooter. You are suggested to run this in-built tool, to proceed use the following steps:
Step 1: Press the Windows keys and I keys to open the Settings Window > then go to Update & Security > Troubleshoot
Step 2: Now click the Additional troubleshooter link > Choose Windows Update and click Run the troubleshooter
Step 3: Then follow the on-screen instructions to complete the process
Method 2: Turn Off all third-party Antivirus, firewall or drive encryption software for some time
If you have third-party software that might interfere with file import installed, uninstall it and see of that helps you (you can reinstall software later):
Here’s how:
Step 1: In Windows Search, type in Control Panel and then press Enter key > then go to Program > Uninstall a Program
Step 2: Locate an Antivirus, Firewall or other software > Right-click and select Uninstall
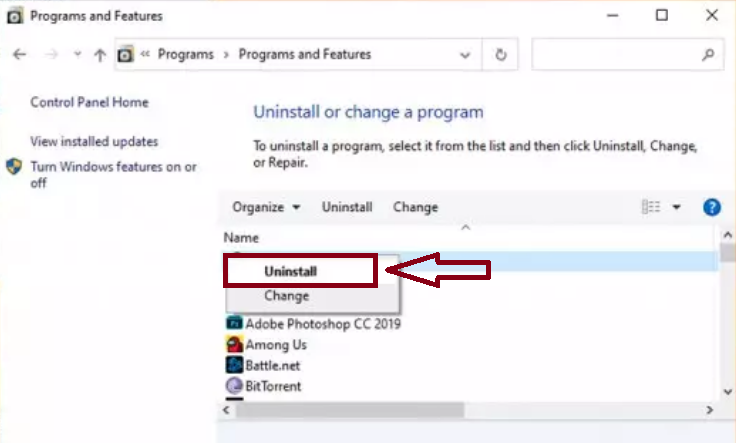
Step 3: Follow on-screen instructions to finalize > Reboot and try to upgrade/update Windows once again
Method 3: Run CHKDSK
You are most likely to face the above mention error due to disk errors, so ensure to run CHKDSK to fix errors. To do so follow the below mention guidelines:
Step 1: Run Command Prompt as administrator > In the prompted window, type in “chkdsk C: /f /r” and press Enter
Step 2: Then type “Y” to confirm to run the check disk utility on the next start > finally Restart your PC to perform the error checking
Method 4: Change your Registry
The error may also get trigger if there’s something wrong with the registry. So ensure to modify the registry. To do so, you can use the following steps:
Step 1: Press Windows + R keys to open Run utility box > In the prompted box, type in regedit and press Enter key to proceed
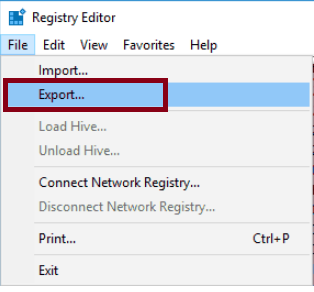
Step 2: Optional: Modifying the registry can be potentially dangerous, therefore it’s recommended to export your registry before making any changes. To do that, navigate to File> Export
Step 3: Select All as Export range and enter the desired file name. Choose a safe location and click on Save
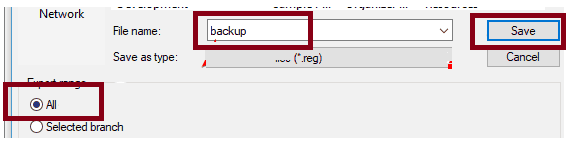
After exporting your registry, you will have the backup of the registry on your PC. Now you can easily restore your registry to an earlier state in case anything goes wrong after changing the registry. Simply double click the exported file and you will restore your registry to the original state.
Step 4: In the left pane, go to HKEY_LOCAL_MACHINE\SOFTWARE\Microsoft\WindowsSelfHost\Applicability.
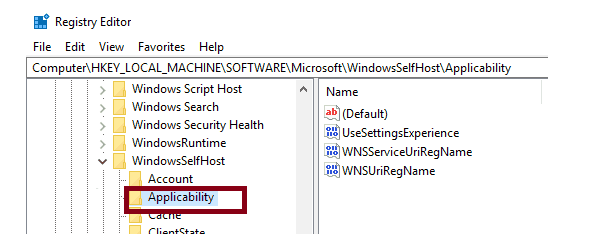
Step 5: Now change the following values:
Ring = WIF
RingBackup = WIS or Enabled
EnablePreviewBuilds = 2
BranchName = TH1
UserPreferredBranchName = TH1
After making these changes, close Registry Editor and Restart your PC
Note that this solution might work only for Insider builds so if you don’t have these keys in your registry, you can skip this solution.
Method 5: Disable the Intel Virtualization Technology
Sometimes enabling the Intel Virtualization Technology may create issues for you, in such scenario we suggest you to enable it. To do so, use the following steps:
Step 1: Enter BIOS Settings > then turn off Intel VT-d features in Advanced Settings> Chipset
Step 2: Save and exit from BIOS Settings
Step 3: Try to install the update
Method 6: Disable the Secure Boot
Disabling the Secure boot may resolve the above mention issue, so you can try this method.
Here’s how:
Step 1: Restart and boot into the BIOS menu > In the Security or Boot Options settings, find the Secure Boot option and disable it
Step 2: Save the changes and restart your PC to check if you have gotten rid of the error message “the installation failed in the SAFE_OS phase with an error during BOOT operation”.
Method 6: Uninstall Broadcom Bluetooth and Wireless drivers
If the Broadcom drivers are not compatible with Windows 10, you may get stuck with the above mention error. So ensure to uninstall them and then upgrade to Windows 10.
Here’s how:
Step 1: Open Device Manager > Find your Bluetooth driver on the list
Step 2: Right-click the driver and choose Uninstall device
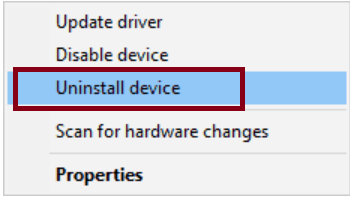
Step 3: Now Repeat the process for wireless network driver
Method 7: Make sure you have enough disk space
Sometimes insufficient disk space create nuisance for the users, so ensure to have adequate disk space. So first of all, you need to check how much space your disk holds.
#. For Windows 32-bit version, you will need at least 20 GB of free space.
#. For Windows 64-bit version, you will need at least 32 GB of free space
#. Windows Update size varies, although it is typically much less that the sizes above
If you have too little space, you should perform Disk Cleanup and/or delete unnecessary files:
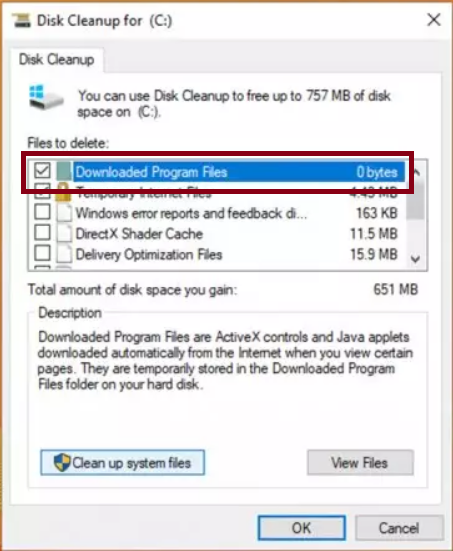
#. In Windows Search bar, type Disk Cleanup and press Enter key
#. Select the drive you are using to install Windows/ Updates (C: by default)
#. Select appropriate fields and press Clean Up System files
Method 8: Reset Windows Update Components
Resetting Windows Update Components is also a good way to tackle the Window 10 Installation Error 0xC1900101 – 0x20017. In order to get started with the method, use the following:
Step 1: Press Win key + X keys and select Command Prompt (Admin)
Step 2: Disable BITS, Cryptographic, MSI Installer, and the Windows Update Services > To do so, type the following commands in the Command Prompt and press Enter key after each of them:
net stop wuauserv, net stop cryptSvc, net stop bits and net stop msiserver.
Step 3: Then type these commands to rename SoftwareDistribution and Catroot2 folders. Don’t forget to type Enter after each of them: ren C:\\Windows\\SoftwareDistribution SoftwareDistribution.old and ren C:\\Windows\\System32\\catroot2 Catroot2.old
Step 4: Once done, then enable BITS, Cryptographic, MSI Installer, and the Windows Update Services > this can be done by typing the following commands followed by Enter:
net start wuauserv, net start cryptSvc, net start bits, and net start msiserver.
Step 5: Lastly, close Command Prompt window ad reboot your PC
Method 9: Use Media Creation Tool
If none of the above mentioned methods work for you we suggest you to use Media Creation Tool. To do so follow the below mention guidelines:
Step 1: Download Windows 10 Installation Media from the official Microsoft Website > Double-click the installer to launch it
Step 2: Then Agree to Terms and select Next > Select Create installation media (USB flash drive, DVD or ISO file) for another PC and click Next
Step 3: Choose USB flash drive (ensure you have connected USB to your PC)
Step 4: Then follow the on-screen instructions and once the option to pick partition style shows up, Select UEFI
Step 5: Proceed with on-screen instructions to finalize the process > Once done, then double-click Ready to install option

Step 6: Select Keep Personal files > then wait till the installation is finished
Bottom Line!
These were some of the tried and tested measures to deal with Window 10 Installation Error 0xC1900101 – 0x20017. We have tried our best to provide all possible methods to resolve the error. But in case, if you are looking for a hassle free solution it is suggested to use an automatic PC Repair Tool. This professional tool is capable for errors originated due to system corruption, so try it once.


