People look for how to reset network settings Windows 11 when they are dealing with connecting issues. However, we recommend you not to tinker with Network Settings and use alternative options as far as possible.
For example, you can check the modem and router, run the Network Troubleshooter, update your drivers, and give a simple PC reboot and so on as these are equally responsive for the said issue. Also, sometimes, certain PC problems lead to the Connectivity issues.
These could be corrupted system files, BSODs, registry errors, DLLs and Exes errors and so on. If this is the case, you can easily get rid of the issue just by running a full system scan using PC Repair Tool – an automatic tool to check for possible system issues and provides their fixes. Here is its direct download link.
Resetting Network Settings means
Network Setting manages a wide variety of device functions, related to networking and connectivity. Many could refer to the network settings and modify according to their need. Sometimes, however, such changes backfire and in turns require complete reset to such changes.
Resetting network settings will delete the WI-FI connections and passwords, remove the network adapter and other crucial networking components and revert everything back to its factory settings. This option however should be opted as a last resort.
How to reset Network Settings Windows 11
Windows 11’s settings panel has a dedicated option to reset Network Settings with just once click. This will uninstall and re-install all yours network drivers and adapters on your systems and delete the added VPNs, DNs settings, proxy settings and any other network connectively related settings. Here are the steps:
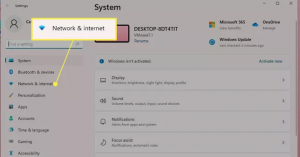
- Press Win+ I to open Start menu,
- Click on Settings,
- Go to the Network & Internet option,
- Select Advanced Network Settings therein,
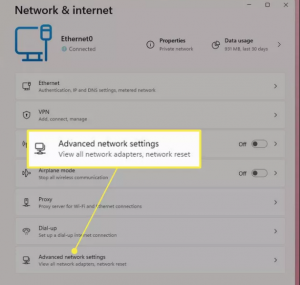
- Now, click on More settings and then on Network Reset,
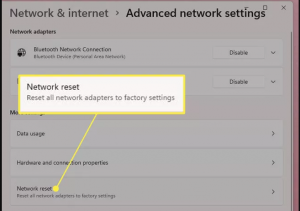
- On the next window, click Reset Now button,

- Confirm your action to reset network settings on Windows 11,

- Wait, after a few minutes, your Windows will reboot and all your network adapters will be reset to their factory settings.
Alternatively, you can use your Command Prompt to reset Network Settings:
- Press Win+ R, enter CMD,
- Right-click on Command Prompt on the search results and select Run as Administrator,
- On the command window, type in the below commands and hit Enter each time:
netsh winsock reset
netsh int ip reset
netsh advfirewall reset
ipconfig / flushdns
ipconfig / release
ipconfig / renew
Once you enter the above commands, close the window. Restart the device the then. Once the computer restarts, you will see your PC has been restored to the network options and connections to the internet.
Conclusion
We have provided you complete detail guide how to reset Network Settings Windows 11. We again highlight this fact that you should always try to use every other possible alternative in case of any connectivity related issues occur on your system and choose this as a last resort.


