If you frequently use the network resources, you might look for the option to map network drives. When you map a location onto your network drive, you can easily access it from the File Explorer as local drive.
The method is so simple. If you would like to add a network drive to Windows File Explorer so that you can’t have to manually type the network address on each time, you should follow the steps provided just below:
- Press Win+ E to open File Explorer,
- In the File Explorer Window, select This PC on the left,
- Click on see more option on the right corner,
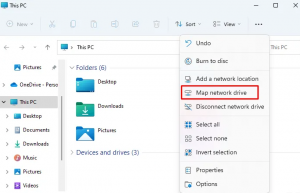
- In the menu list, click on Map network drive,
- Select your drive from the drives list,
- Click on browse option to locate the folder or computer you want to select from the Folder box,
- Next, select Reconnect at sign-in checkbox and then click on Finish option.
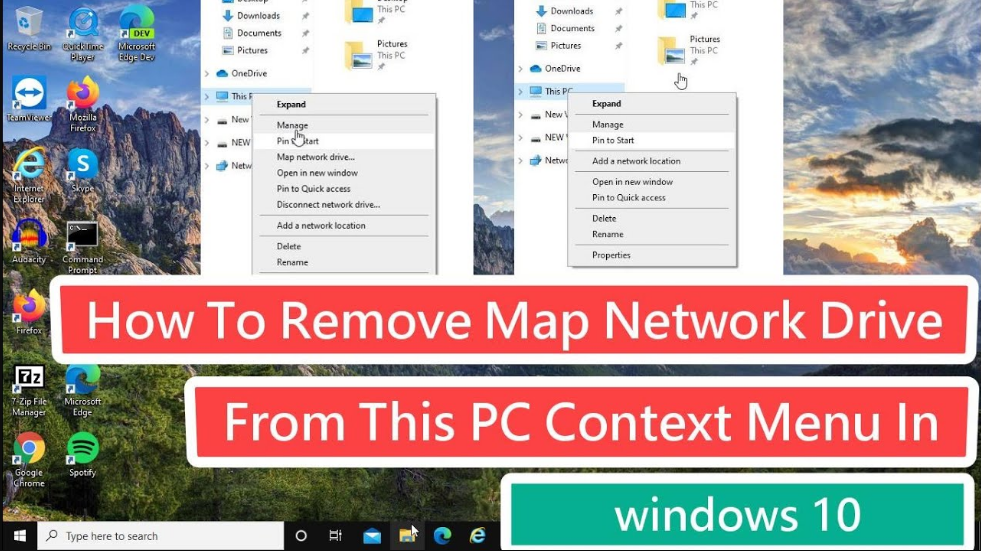
However, if you are already using the feature and do not find it useful, you can remove Map Network Drive from Context Menu on your computer. You can do this in two possible, namely using Group Policy Editor and Through Registry Editor. We have discussed below both the methods in detailed manner.
Easy methods to remove Map Network Drive from Context Menu
Method 1: Use Group Policy Editor
This method is for you if you are using Windows 10 Pro, Enterprise or Education edition. In other word, this method does not work for Microsoft Windows Home Edition as it does not offer the group policy editor by default. The steps to remove Map Network Drive from Content Menu using Group Policy Editor on Windows version that it supports are:
- Press Windows + R to open Run dialog box,
- In the dialog box, type gpedit.msc and hit Enter,
- On the next page, navigate to User Configuration> Administrative Templates> Windows Components> File Explorer,
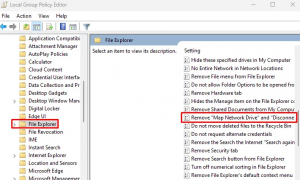
- Move to the right pane, scroll down to the settings column, and double-click on Remove Map Network Drive and Disconnect Network Drive,
- Inside this window, select Enabled option, click on Apply the next and then click Ok to confirm the changes.

In future, if you want to add the Map network drive content menu item, simply follow these above steps and click on the Disabled option on the Remove Map Network Drive and Disconnect Network Drive window.
Method 2: Through Registry Editor
If you don’t use Windows basic Windows variant, then this method to remove Map Network Drive from Content Menu is for you. The complete steps you have to follow are mentioned below:
Search for regedit in the Task search box and click on Registry Editor in the search result to open Registry Editor,
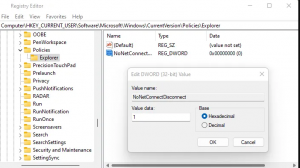
- Once in the Registry Editor Window, go to the below path:
HKEY_CURRENT_USER\Software\Microsoft\Windows\CurrentVersion\Policies\Explorer
- Click on the Explorer directory on the left side of the window,
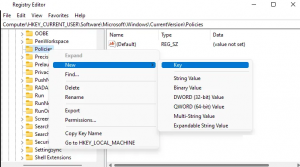
- If you do not find this option, create a new one,
- For this, right-click on Policies directory and select New> key,
- Type Explorer in the Name box and hit Enter,
- Next, right-click on the blank space on the right pane and select New> DWORD (32-bit) value,
- Assign the key name NoNetConneectDisconnect and hit Enter,
- Double-click on NoNetConnectDisconnect and set its value data 1,
- Click OK to save the changes,
- Exit the Registry Editor Window and restart your device.
Conclusion
That’s all! We have provided the best tutorial on how to remove Map Network Drive from Context Menu. Hope so, the methods provided in this post are helpful for you. Comment down below the comment section and share your experience about the post.


