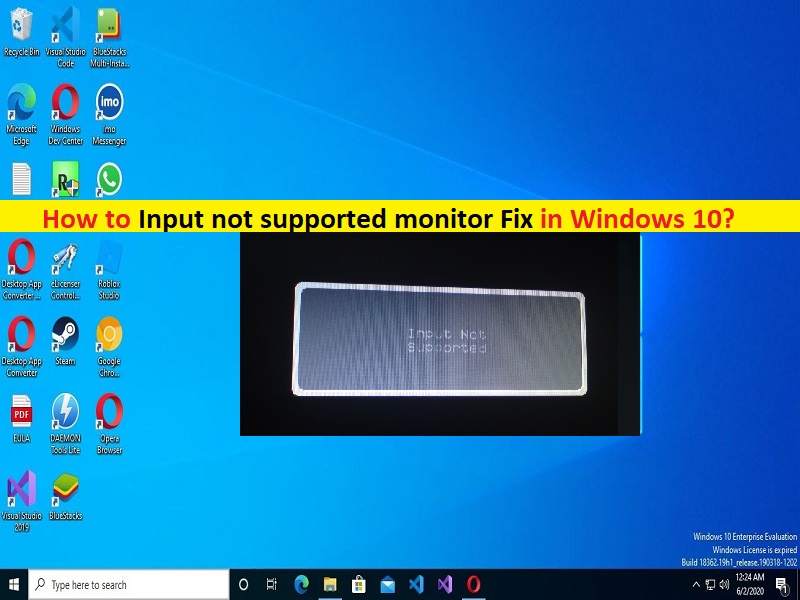
What is ‘Input not supported monitor’ in Windows 10/11?
In this article, we are going to discuss on How to Input not supported monitor Fix, Input not supported monitor in Windows 10/11. You will be guided with easy steps/methods to resolve the issue. Let’s starts the discussion.
‘Input not supported monitor’: It is common Windows PC Problem considered as Monitor issue. This ‘Input not supported’ error is appeared in your PC/laptop monitor screen usually when you plug in a new monitor with your computer or you change the resolution some value that doesn’t supported. This issue indicates the computer’s resolution doesn’t match with monitor that’s why you are experiencing the error.
This error is also appeared when you are playing games on Windows PC or through some third-party applications/clients like Steam Client. Another possible reason behind the issue can be the bad monitor connection, wrong display resolution settings in Windows PC, interference of conflicting apps/games, and other Windows issues. It is possible to fix the issue with our instructions to fix the issue. Let’s go for the solution.
How to Input not supported monitor Fix in Windows 10/11?
Method 1: Fix Input not supported monitor with ‘PC Repair Tool’
‘PC Repair Tool’ is easy & quick way to find and fix BSOD errors, DLL errors, EXE errors, problems with programs/applications, malware or viruses issues, system files or registry issues, and other system issues with just few clicks. You can get this tool through button/link below.
Method 2: Using Base Video in MSConfig
One possible way to fix the issue is to use Base Video in MSConfig/System Configuration app in Windows PC.
Step 1: At first, you need to start/restart your computer in Safe Mode. Once you are in Safe Mode Windows 10/11, open ‘System Configuration’ app in Windows PC via Windows Search Box
Step 2: Click ‘Boot’ tab, check ‘Base Video’ option and then hit ‘Apply > Ok’ to save the changes
Step 3: Now, exit Safe Mode and boot normally in Windows PC. Once you in Normal profile, right-click on desktop and select ‘Display Settings’
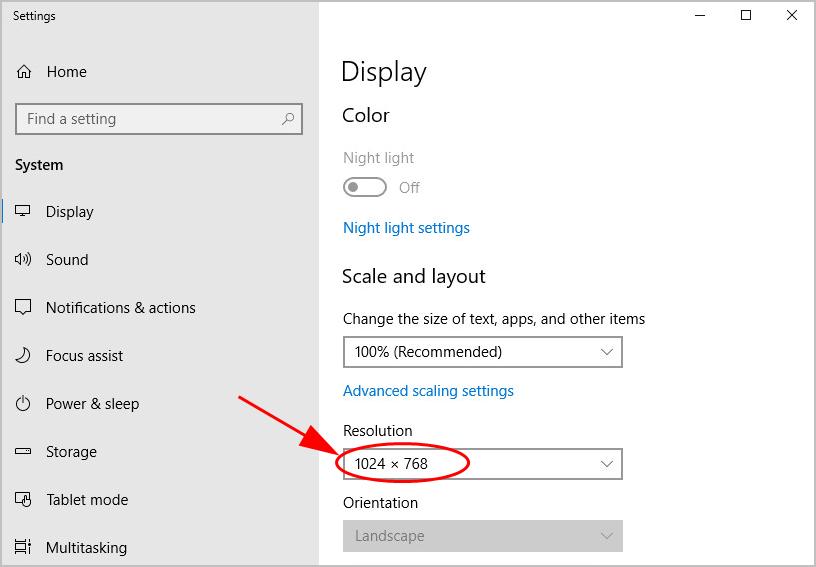
Step 4: Change the resolution. You can try changing resolution other than the recommended resolution if it was not working. After changing the resolution, open ‘System Configuration’ app again, uncheck ‘Base Video’ option under ‘Boot’ tab and the save the changes.
Step 5: Once done, restart your computer and check if the issue is resolved.
Method 3: Booting in VGA/Low-Resolution Mode
Some users reported booting VGA/Low-Resolution Mode can resolve the issue. Let’s try.
Step 1: Restart your computer and when booting process initiates, press ‘F8’ key on keyboard to open Advanced Boot Options menu
Step 2: On Windows 7, select ‘Enable Low-resolution video (640X480)’ option, and hit ‘Ok’ button to boot in this resolution
Step 3: On Windows 8/10, select ‘Enable Low-resolution video mode’ option of list of options to perform this. Go to ‘Troubleshoot > Startup Settings’ and then choose this option.
Step 4: Once you are booted, repeat the ‘Method 2’ to set the resolution to some lower value, save the changes and then restart your computer normally, and check if the issue is resolved.
Method 4: Using Another monitor
Another possible way to fix the issue is to use another monitor in your computer. You can try using another monitor your Windows computer and try making possible resolution changes, and once done, check if the issue is resolved.
Method 5: Run game in Windowed Mode
If this issue is occurred while playing game, it might possible game doesn’t support this display resolution or the game doesn’t support to run in Full Screen Mode. So, you can try to fix the issue by changing game’s Full Screen mode to Windowed Mode and check if it works for you. To do so, you need to launch the game and press ‘ALT + ENTER’ key to enter into Windowed Mode directly, or add ‘-Windowed as a parameter’ in shortcut and force it to run.
Method 6: Check your game for Wide Screen Fix
This issue can be occurred if the game doesn’t support widescreen monitors. You can search online for widescreen fixes. These fixes are in form of different patches. You need to integrate them into your game files before your game successfully launch in your system.
Method 7: Update Graphics Card Driver
Updating graphics card driver to latest & compatible version can resolve the issue. You can try to update all Windows drivers including graphics card driver to latest & compatible version using Automatic Driver Update Tool. You can get this tool through button/link below.
Method 8: Boot into compatibility Support Mode
Step 1: Restart your computer and when booting initiates, press ‘F2’, ‘Delete’ or other BIOS supported key to enter into BIOS mode.
Step 2: Go to ‘Advanced’ tab or ‘Boot’ tab, and enable ‘Launch CSM/Launch Compatibility Support Module’. Save the changes and exit BIOS setting page, and once done, restart your computer and check if the issue is resolved.
Method 9: Replace CMOS Battery
If the issue is still persist, you can try to fix the issue by replacing CMOS battery in your computer. To do so, you need to open CPU case of your computer and remove CMOS battery from motherboard’s slot, and insert the new CMOS battery into computer and then turn your computer ON, and check if the issue is resolved.
Conclusion
I am sure this post helped you on How to fix Input not supported monitor in Windows 10/11 with several easy steps/methods. You can read & follow our instructions to do so. That’s all. For any suggestions or queries, please write on comment box below.


