Tips to increase VRAM in Windows 11:
In this article, we are going to discuss on How to increase VRAM in Windows 11. You will be guided with easy steps/methods to do so. Let’s starts the discussion.
‘VRAM – Video RAM’: Dual-ported Video RAM or VRAM is dual-ported variant of DRAM (Dynamic RAM), which was once commonly used to store the framebuffer in graphics adapters. Most computers and game consoles don’t use this form of memory, and dual-ported VRAM should not be confused with other forms of video memory. VRAM has two sets of data output pins, and thus two ports that can be used simultaneously including DRAM port and video port.
If you are not aware, your computer’s processor is always moving data from hard drive to RAM before it can be used. It is also possible that you will need to buffer a high-quality video, 3D structures, and new games on your Windows PC. If you want to buffer the high-quality visual display to your computer’s screen, you will need a special type of memory called VRAM or Video RAM. Some new fames and videos may require you to play videos at 1080p or 4k resolutions that require a lot of VRAM.
Why would you require VRAM?
VRAM is built into graphics card or GPUs to store the images and video data that they make. Virtual VRAM is also called ‘Virtual VRAM’. Graphics card uses Virtual VRAM to store graphics applications, games, complex textures, and 3D graphics quickly. In case if you don’t have enough VRAM, you won’t be able to play the most up-to-date games or new games in your device. For high resolution images and complex textures to load quickly, you may need to add more dedicated VRAM to your graphics card. Let’s go for the steps to increase VRAM – Video RAM in your Windows 11/10 computer.
How to increase VRAM in Windows 11?
Method 1: How to check VRAM in Windows 11 using Settings App?
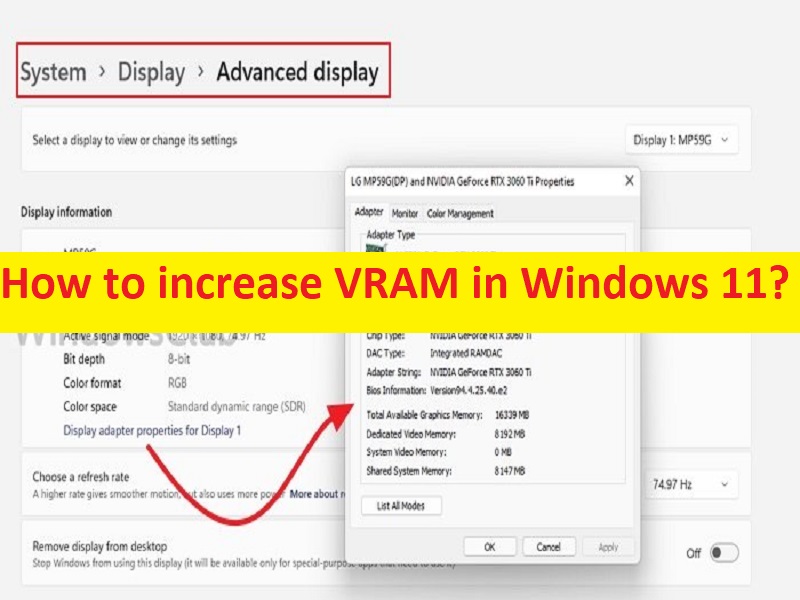
Step 1: Open ‘Settings’ app in Windows PC via Windows Search Box and go to ‘System > Display > Advanced Display’
Step 2: Select ‘Display Adapter Properties’. If you have multiple monitors, select the one you want to see the VRAM information for. In new window, next to ‘Dedicated Video Memory’, you will see amount of video memory in computer.
Step 3: In Adapter Type section, you will see the name of your NVIDIA or AMD graphics card, depending on device you have.
Method 2: How to increase VRAM in Windows 11 using BIOS?
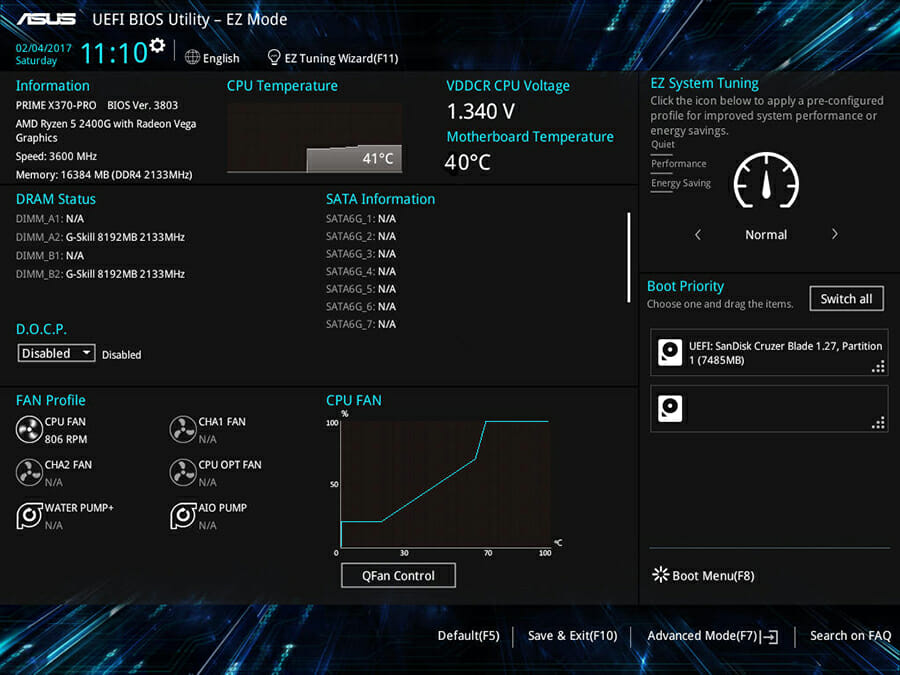
Step 1: Restart your computer and when booting initiates, press ‘F2’, ‘F5’, ‘Delete’ key or other BIOS support key to open BIOS settings page.
Step 2: Once you are in BIOS menu, look for option called ‘Advanced Features’, look for Graphics settings, Video Settings or VGA Share Memory Size options.
Step 3: The default value here is 128MB and you can change the amount of memory allocated to your GPU to 256 or 5123MB
Step 4: Finally, save the changes and restart your computer. This feature is present on all CPU and BIOS.
Method 3: How to increase VRAM in Windows 11 using Registry Editor?
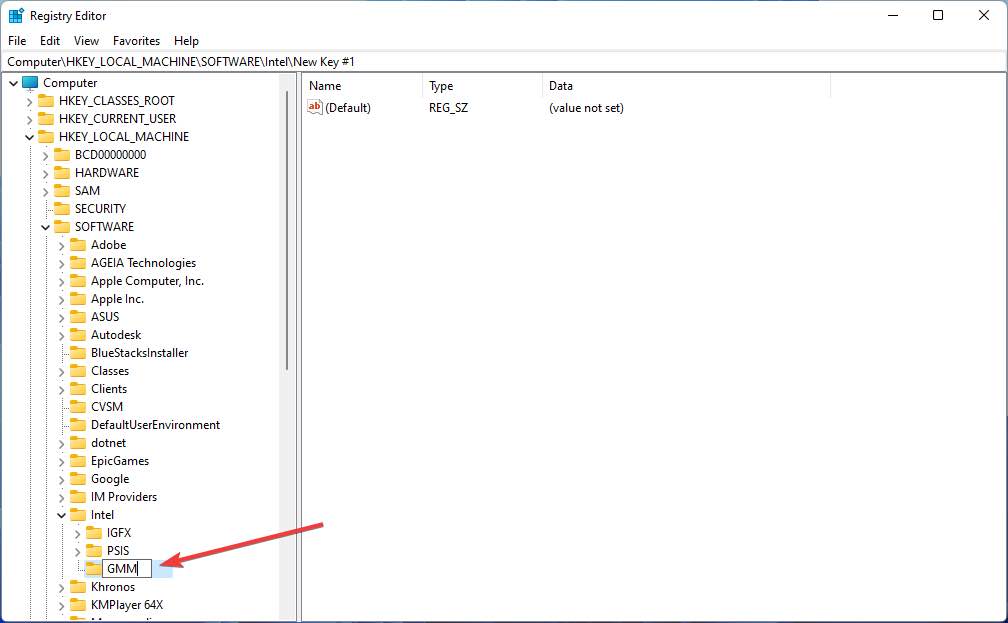
Step 1: Press ‘Windows + R’ keys on keyboard, type ‘regedit’ in ‘Run’ window and hit ‘Ok’ button to open ‘Registry Editor’ app, and navigate to following path.
HKEY_LOCAL_MACHINE\Software\Intel
Step 2: Find and right-click on ‘Intel’ folder, select ‘New > Key’ and name the key to ‘GMM’ and click on it
Step 3: Right-click on empty space in right-pane and select ‘New > DWORD (32-bit) Value’ and name it to ‘DedicatedSegmentSize’.
Step 4: Double-click on newly created registry value to edit, select ‘Hexadecimal’, enter the recommended value data using your system RAM information like 1GB – 128MB; 2GB – 256MB; 4GB – 512MB; 6GB – 1024MB; 8GB – 2048MB; 16GB – 4096MB and hit ‘Ok’ button to save the changes.
Conclusion
I am sure this article helped you on How to increase VRAM in Windows 11 with several easy steps/methods. You can read & follow our instructions to do so. That’s all. For any suggestions or queries, please write on comment box below.


