
When you are facing problems in accessing some sites or apps, flushing the DNS Cache could help you in getting rid of the issue. The required steps will depend on which type of OS version you are using. In this article, we will discuss how to flush DNS Cache in Windows 11.
Know about DNS Cache
This is a file containing the hostnames and IP addresses of the pages you visit on your computer. It is located in the client computer and the ISP servers. As the name suggest, it caches every page you visit, making the loading experience faster the next time you open it.
The process of updating the cache and hostname happens automatically within systems. But, when changing in the IP address of a webpage takes place before the update, the problem could occur in it. This occurs when there is connectivity issue due to which the page can’t load on the browser.
Flushing Cache is useful operation in this scenario. It will remove the stored cache information and the then the computer will retrieve the new information rather serving with that the older one. So, below are the methods how to flush DNS Cache in Windows 11:
Different methods to flush DNS Cache in Windows 11
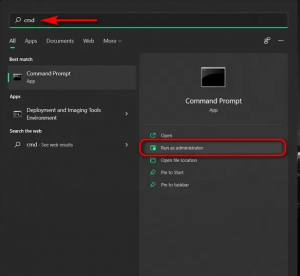
Method 1: Flush DNS Cache using Command Prompt
- Search for cmd in the Windows Search,
- Right-click on Command Prompt and select Run as Administrator,
- Now, copy and paste the below command and hit Enter:
ipconfig /flushdns
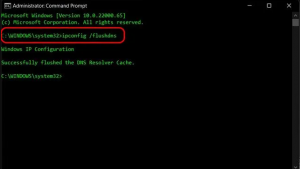
- You will receive a message that the operation is successful on the screen.
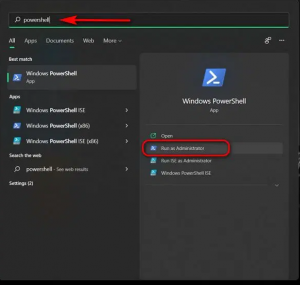
Method 2: Use PowerShell Command to flush DNS Cache
- Simply search for Powershell and click Run as Administrator,
- Copy and paste the below command and hit Enter:
Clear-DnsClientCache
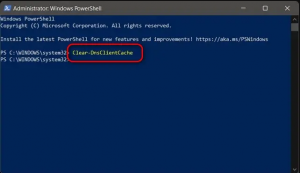
- Restart your device for the best result.
Method 3: Flush DNS Cache Windows 11 using Run Command
- Press Win+ R, type in ipconfig /flushdns and hit Enter,
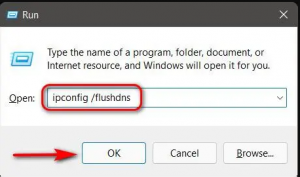
- This will flush the DNS cache on your Windows 11 computer.
Method 4: Use a Batch file
You can create batch file to automate this process. The batch file includes the set of commands and all that you need to is to run the file at scheduled interval or on-demand to execute those commands.
Delete DNS Cache Chrome
Some of the Windows apps such as Google Chrome also have DNS Cache of their own. It is different from the DNS cache stored by your operating system. You should clear the DNS cache of such apps as well. For Google Chrome, you have to perform the below steps:
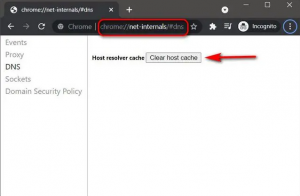
- Open Chrome on your computer,
- Copy and paste the below URL on the address bar and hit Enter:
chrome://net-internals/#dns
- In the opened net internals page, click on Clear host Cache to clear up the Chrome’s DNS resolver cache.
Conclusion
Steps how to flush DNS in Windows 11 is so easy to perform. There are multiple ways to perform this operation. The best option is to the use the Run command. When you receiving connecting issues, you should first try with flushing the cache data on your Windows 11 and rest assuring that it is not the problematic, move to the other methods.
In case of any Windows related issues, you can use automatic PC Repair Tool – a professional tool to take care of PC related issues to provide an automatic solution. It is also famous in the internet sphere for its optimizing capability. Here is the link to download PC Repair Tool.


