What is ‘wsappx high disk usage’ issue in Windows 10?
In this article, we are going to discuss on How to fix wsappx high disk usage Windows 10. You will be guided with easy steps/methods to resolve the issue. Let’s starts the discussion.
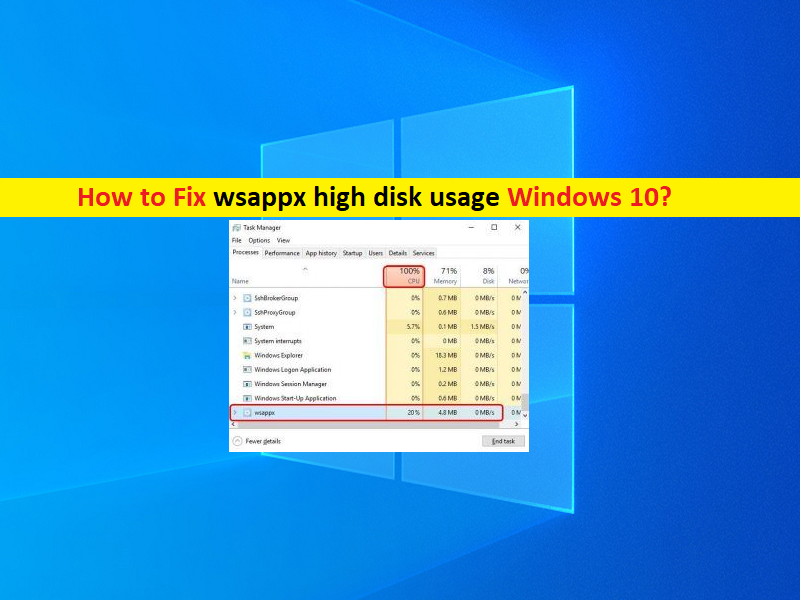
‘wsappx high disk usage’: It is common Windows Problem considered as Wsappx high disk usage issue. When you open ‘Task Manager’ app in your Windows 10 computer in order to check which program/process is draining your system resources and causing high Disk Usage, you may experience Wsappx process is causing high disk usage issue. If you are not aware, Wsappx is process that handles installing, removing and managing Universal apps through Microsoft Store in Windows 10/8 computer.
Wsappx is Microsoft Windows Sore process that includes AppX Deployment Service (AppXSVC) and Client License Service (ClipSVC). AppXSCV deploys the UWP Store apps that are distributed as .appx packages while ClipSVC handles infrastructure support for Microsoft Store. However, several users reported they faced Wsappx high disk usage Windows 10 issue when they attempt to download an app or installing an update in Windows computer from Microsoft Windows Store. This process shows higher number of Disk/CPU usage in Task Manager in terms of percentage that prevents from using Windows Store functionality in computer.
This issue can be occurred due to inference of background process/programs running in computer, malware or viruses infections in computer, corruption in hard disk drives or system image, outdated/corrupted device drivers, insufficient storage in virtual memory, and other issues. It is possible to fix the issue with our instructions. Let’s go for the solution.
How to fix Wsappx high disk usage Windows 10?
Method 1: Fix ‘Wsappx high disk usage’ with ‘PC Repair Tool’
‘PC Repair Tool’ is easy & quick way to find and fix BSOD errors, EXE errors, DLL errors, problems with programs/applications, malware or viruses issues, system files or registry issues, and other system issues with just few clicks.
Method 2: Increase Virtual Memory in Windows PC
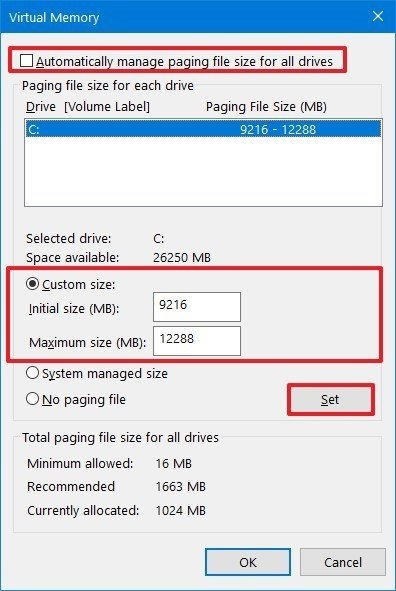
One possible way to fix the issue is to increase Virtual Memory in Windows computer.
Step 1: Type ‘Performance’ in Windows Search Box and click to open ‘Adjust Appearance vs Performances in Windows’ from results appear
Step 2: In the opened window, click ‘Advanced’ tab, go to ‘Virtual Memory’ and click ‘Change’
Step 3: Uncheck ‘Automatically manage paging file size for all drives’ checkbox, select the drive where OS is installed and click ‘Custom Size’
Step 4: Set ‘Initial Size’ to size of RAM in MB and ‘Maximum Size’ to double of initial size and click ‘Set > Ok’, and restart your computer and check if the issue is resolved.
Method 3: Disable Windows Store
Another possible way to fix the issue is to disable Windows Store in Windows computer.
Disable Windows Store using Group Policy Editor:
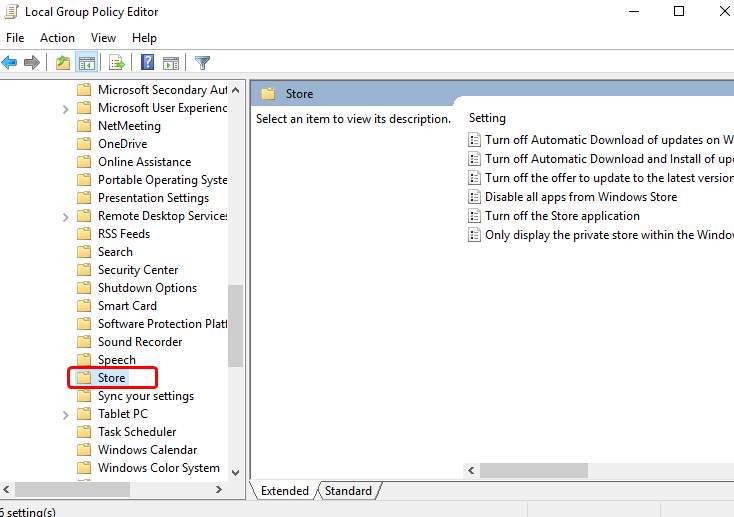
Step 1: Press ‘Windows + R’ keys on keyboard, type ‘gpedit.msc’ in ‘Run’ window and hit ‘Ok’ button to open ‘Local Group Policy Editor’
Step 2: In the opened window, go to ‘Computer Configuration > Administrative Templates > Windows Components > Store’
Step 3: Find and double-click on ‘Turn OFF Store Application’ setting in right pane, select ‘Enable’ and ‘Apply > Ok’ to save the changes
Disable Windows Sore using Registry Editor:
Step 1: Press ‘Windows + R’ keys on keyboard, type ‘regedit’ in ‘Run’ window and hit ‘Ok’ button to open ‘Registry Editor’ and navigate to following path
HKEY_LOCAL_MACHINE\SOFTWARE\Policies\Microsoft\WindowsStore key
Step 2: Right-click on right-pane and select ‘New > DWORD (32-bit) Value’ and name the value to ‘RemoveWindowsStore’. Now, double-click on created key to edit, set its value data to ‘1’ and hit ‘Ok’ button to save the changes. Once done, check if the issue is resolved.
Method 4: Change the value of AppXSVC in Registry
Step 1: Open ‘Registry Editor’ using method and navigate to following path
HKEY_LOCAL_MACHINE\SYSTEM\ControlSet001\Services\AppXSvc
Step 2: Double-click on ‘AppXVC’ value to edit, set its value data to ‘4’ and hit ‘Ok’ button to save the changes. Once done, restart your computer and check if the issue is resolved.
Method 5: Perform Clean Boot in Windows PC
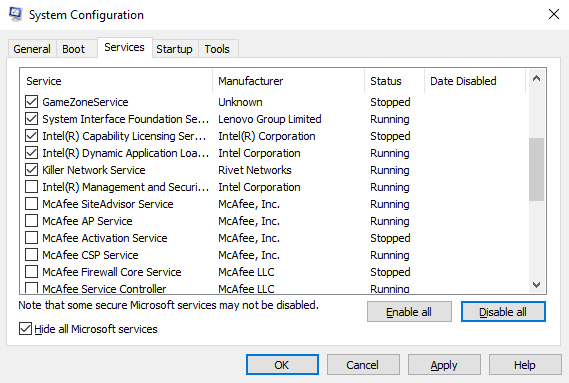
If the issue is still persist, then you can perform clean boot in computer in order to fix.
Step 1: Open ‘System Configuration’ app in Windows PC via Windows Search Box
Step 2: Click ‘Services’ tab, tick ‘Hide all Microsoft Services’ checkbox and hit ‘Disable All’ button
Step 3: Now, click ‘Startup’ tab and click ‘Open Task Manager’. In Task Manager, right-click on each startup item and select ‘Disable’ to disable them and then close Task Manager
Step 4: Now, click ‘Apply’ and ‘Ok’ button on system configuration app to save the changes and then restart your computer, and check if the issue is resolved.
Method 6: Update Device Drivers in Windows PC
Updating all necessary drivers to latest & compatible version can resolve the issue. You can get updates for all Windows drivers including graphics card driver, sound card driver and device drivers in Windows PC using Automatic Driver Update Tool. You can get this tool through button/link below.
Conclusion
I am sure this post helped you on How to fix Wsappx high disk usage Windows 10 with several easy steps/methods. You can read & follow our instructions to do so. That’s all. For any suggestions or queries, please write on comment box below.


