Being able to connect wireless is one of the biggest pros of modern technology. Microsoft has implemented the wireless technology in their Windows Operating System in the form of Internet connection, audio as well as display. The Wireless Display being the most prominent. This feature allows users to project/cast content of their display to another display wirelessly. The content can include movies, photos, media files and web.
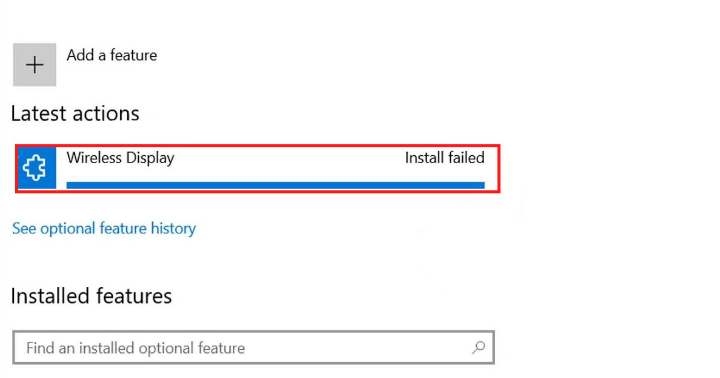
While we can get this feature through settings application on our Windows, there have been multiple reports of people getting different kind of error including Wireless Display Install Failed in Windows 11.
Some of the reasons why this error is happing in the first place are:
- In-active Internet Connection.
- Instable Internet Connectivity.
- Metered Connection is enabled.
Fix Wireless Display Install Error
FIX 1: Active Internet Connection
Many of the installation packages require an active internet connection to install in Window 11. If you are not connected to internet then this might explain the issue. If you are connected to internet and still having issue then, switch to other internet sources and try installing again.
FIX 2: Stable Internet Connectivity
Instable internet connectivity can be the other cause of installation error of wireless display. Reboot your computer to fix any temporary bugs and glitches that might be the reason of instable internet connection. Also, restart your router or other source that you might be connected to.
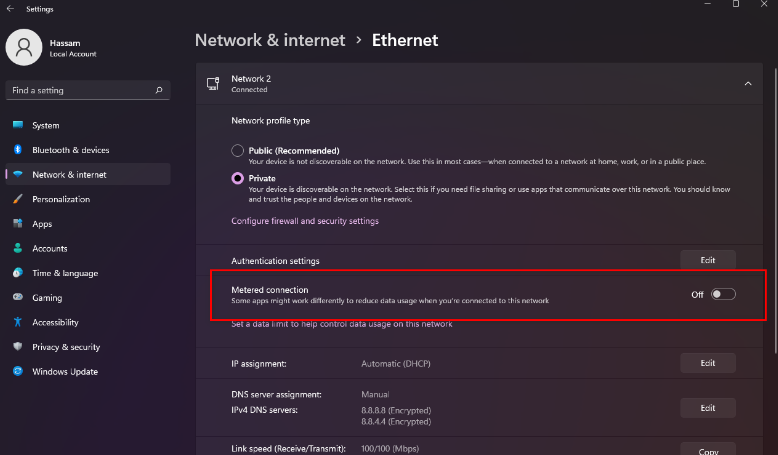
FIX 3: Deactivate Metered Connection
Metered Connection limit the amount of data you can use. If the limit has been crossed then you might not be able to use the internet properly. Disabling Metered Connection will ensure that there will be no hindrance with the connection. Follow the steps to manually disable Metered Connection:
Step 1: Open Settings application by pressing Windows + I on the keyboard simultaneously.
Step 2: Select Network & Internet from the left side of the setting window.
Step 3: Choose Properties from the right side.
Step 4: Navigate to Metered Connection and toggle it off.
FIX 4: Install Wireless Display through PowerShell Script
PowerShell can be a reliable way to install optional Windows features like Wireless Display and others. To install through PowerShell follow the steps given below:
Step 1: Right-click on Start icon.
Step 2: Select Windows PowerShell (Admin) from the given list.
Step 3: Click Ok if UAC prompts.
Step 4: In PowerShell Windows type the following command and press Enter
DISM /Online /Add-Capability /CapabilityName:App.WirelessDisplay.Connect~~~~0.0.1.0
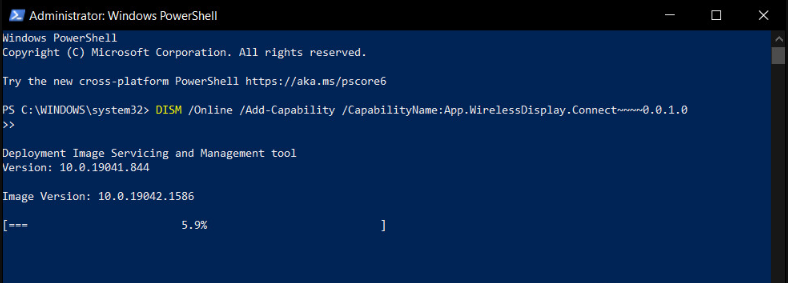
Step 5: PowerShell will now install the Wireless Display on your computer. Wait for installation to complete and restart your system to save the changes you have made.
FIX 5: Install Wireless Display via Command Prompt
This is not troubleshooting rather a different approach to install wireless display on your computer. If you want to install through command prompt then follow these simple steps:
Step 1: Click Start Icon and open search bar.
Step 2: In search bar, type cmd and press Enter.
Step 3: From the given list select Command Prompt and right-click on it.
Step 4: Now click Run as Administrator to open command prompt in an elevated window.
Step 5: Select yes if UAC prompt.
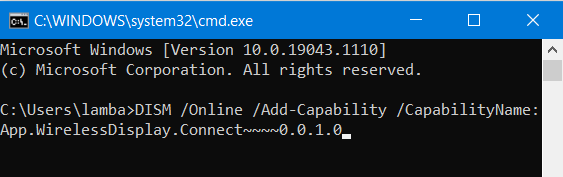
Step 6: Type the command followed by Enter.
DISM /Online /Add-Capability /CapabilityName:App.WirelessDisplay.Connect~~~~0.0.1.0
Step 7: Wait for the installation to complete and then close the Window.
These are all the possible fixes for Wireless Display Install Failed in Windows 11 and hopefully are will be able to resolve the issue by following these simple instructions.


