What is ‘Windows Event log high CPU’ issue in Windows 10?
In this article, we are going to discuss on How to fix Windows Event log high CPU issue in Windows 10. You will be guided with easy steps/methods to resolve the issue. Let’s starts the discussion.
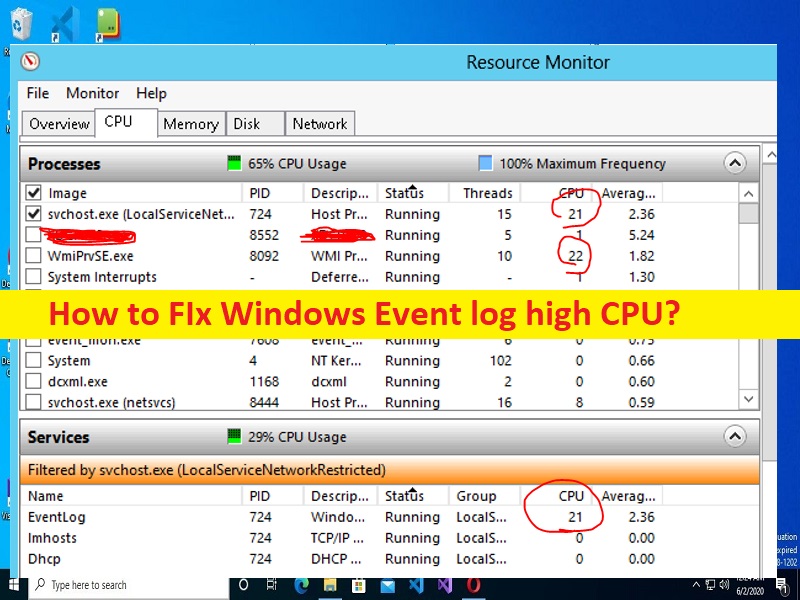
‘Windows Event log high CPU’ issue: It is common Windows Problem considered as Windows Event Log error. This issue indicates you are experiencing high CPU usage issue by Windows Event log service in Windows computer that is causing overall system performance slowdown issue in computer. When you open Task Manager app in Windows PC in order to check which program/process is consuming your system resources, you may experience Windows Event log service is showing higher percentage under CPU usage section.
There could be several reasons behind the issue including the interference of Windows Firewall or other conflicting services/applications, corruption in Windows computer, malware or viruses infections in computer, issue with Windows Even Viewer Log, and other issues. It is possible to fix the issue with our instructions. Let’s go for the solution.
How to fix Windows Event log high CPU issue in Windows 10?
Method 1: Fix Windows Event log high CPU issue with ‘PC Repair Tool’
‘PC Repair Tool’ is easy & quick way to find and fix BSOD errors, DLL errors, EXE errors, problems with programs/applications, malware or viruses infections in computer, system files or registry issues, and other system issues with just few clicks.
Method 2: Check your antivirus/firewall
This issue can be occurred due to interference of antivirus/firewall program in computer. You can disable or uninstall antivirus/firewall program in computer in order to fix the issue and once done, check if the issue is resolved.
Method 3: Use Process Explorer
You can also try to fix the issue by using Process Explorer tool in your computer. This is freeware tool and it’s available as part of Windows Sysinternals package. You can see available processes just like Task Manager but you can also see much more additional information, and check if it works for you.
Method 4: Clear Event Viewer log
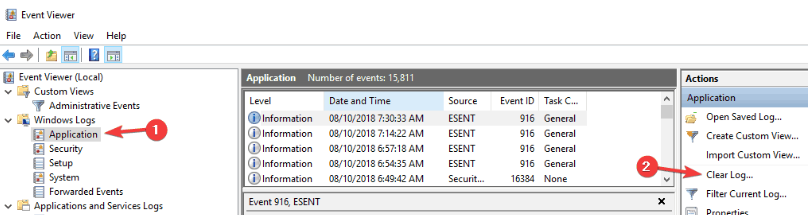
Step 1: Open ‘Windows Event Viewer’ app in Windows PC via Windows Search Box
Step 2: Expand ‘Windows Logs’ section in left pane and select ‘Applications’. In right-pane, click ‘Clear Log’ and you can save your logs before removing them if you want
Step 3: Go back to ‘Windows Logs’ section, select the Next category on list and remove its logs as well. Repeat the same steps to clear all logs from Windows logs section and once done, check if the issue is resolved.
Method 5: Boot your computer in Safe Mode
Step 1: Open ‘Settings’ app in Windows PC via Windows Search Box and go to ‘Update and Security > Recovery’ and click ‘Restart Now’
Step 2: Now, select ‘Troubleshoot > Advanced Options > Startup Settings’ and click ‘Restart’. Once restarted, you need to choose Safe Mode option from list of boot options and proceed. Once you are in Safe Mode, check if the issue is resolved.
Method 6: Perform Clean Boot
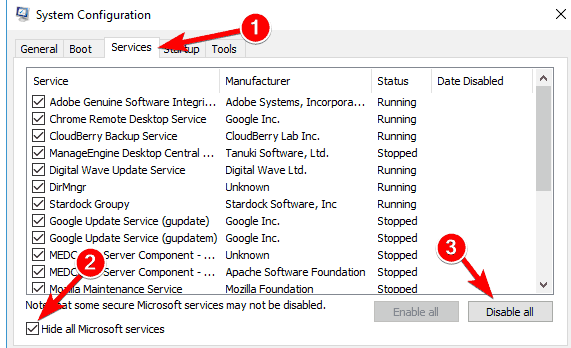
You can perform clean boot in computer to disable all unnecessary applications and services that is causing the issue.
Step 1: Open ‘System Configuration’ app in Windows PC via Windows Search Box
Step 2: Click ‘Services’ tab, tick ‘Hide All Microsoft Services’ checkbox and hit ‘Disable All’ button
Step 3: Click ‘Startup’ tab, and click ‘Open Task Manager’, right-click on each startup item and select ‘Disable’ to disable them and then close Task Manager
Step 4: Finally, click ‘Apply > Ok’ button on System Configuration app to save the changes and check if the issue is resolved.
Method 7: Create a new user account
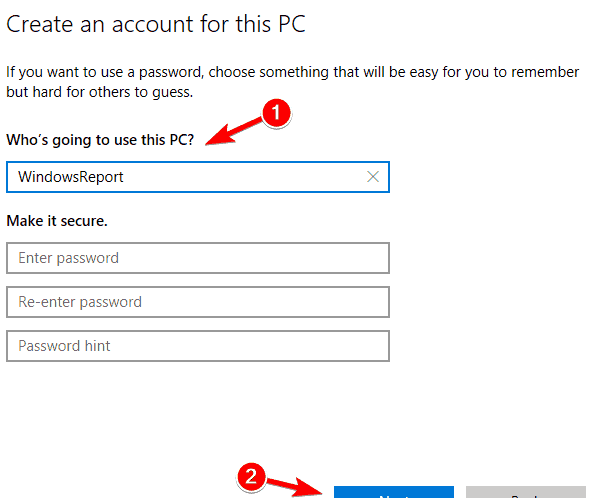
This issue can be occurred due to some issue with user account in Windows computer. You can create a new user account in order to fix.
Step 1: Open ‘Settings’ app in Windows PC and go to ‘Accounts > Family & other people > Add someone else to this PC > I don’t have this person’s sign-in information > Add a user without a Microsoft Account’
Step 2: Enter a desired username and password and hit ‘Next’ and once the account is created, restart your computer and login with newly created account and check if the issue is resolve.
Method 8: Perform System Restore
If the issue is still persist, you can perform System Restore app in computer in order to fix the issue.
Step 1: Press ‘Windows + R’ keys on keyboard, type ‘rstrui’ in ‘Run’ window and hit ‘Ok’ button to open ‘System Restore’ app
Step 2: Click ‘Next’, select a valid restore point according to date & time when there was no issue at all in computer, and click ‘Next > Finish’ to start restoring process and once finished, check if the issue is resolved.
Conclusion
I am sure this post helped you on How to fix Windows Event log high CPU in Windows 10 with easy ways. You can read & follow our instructions to do so. That’s all. For any suggestions or queries, please write on comment box below.


