What is ‘Windows error event ID 7023’?
If you are experiencing ‘Windows error event ID 7023’ while you open ‘Event Viewer’ in Windows 10 computer, then you are in right place for the solution. Here, you will be guided with easy steps/methods to resolve the issue. Let’s starts the discussion.
‘Event Viewer’ in Windows: Event Viewer is component of Microsoft’s Windows NT operating system that offers administrators and users view the event logs on local or remote machine. Applications and operating system components can be use this centralized log service to report events that have taken place like a failure to start a component or to complete an action.
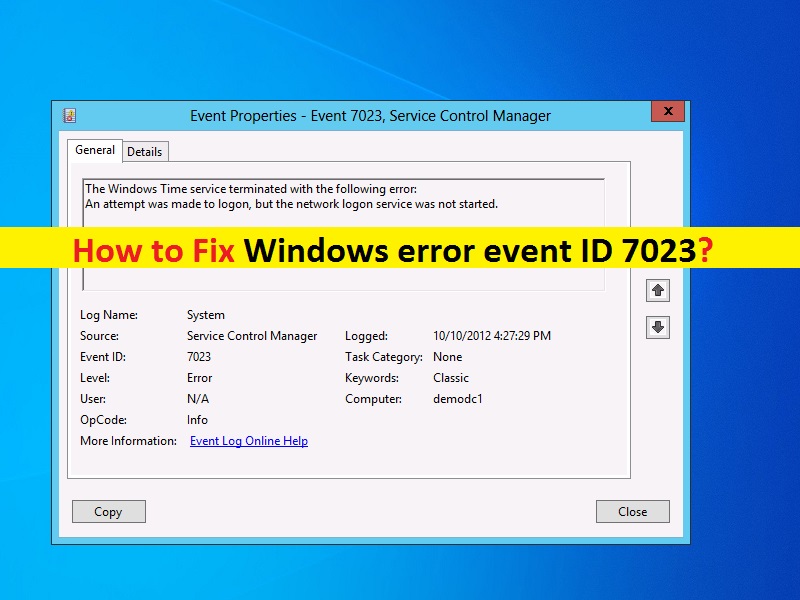
However, several users reported that they faced ‘Windows error event ID 7023’ while they open Event Viewer service in Windows 10 computer. They explained that while troubleshooting the issue in web server they notice this error in Event Viewer service. The Event ID 7023 error indicates that some Windows service like ‘Windows Process Activation Service’ service or ‘Connected Devices Platform Services’ is terminated or not running properly in computer that’s why you are facing the error. Let’s take a look at error message.
“Event ID 7023: The Windows Process Activation Service service terminated with the following error: The system cannot find the file specified”
The possible reason behind Windows error event ID 7023 can be corruption in system files or registry, corruption in system images or drives, problem with Windows service like ‘Windows Process Activation Service’ service or ‘Connected Devices Platform Services’, malware or viruses issues in computer and other reasons.
The Event ID error can also be occurred due to interference of your third-party antivirus software installed in computer. You can disable your antivirus temporarily or uninstall antivirus completely from computer in order to fix the issue. Let’s go for the solution.
How to fix Windows error event ID 7023?
Method 1: Fix ‘Event ID 7023’ in Windows 10 with ‘PC Repair Tool’
If this error is occurred due to some problems in Windows computer, then you can fix the issue with ‘PC Repair Tool’. This software offers you to find and fix BSOD errors, EXE errors, DLL errors, problems with programs, malware or viruses issue, system files or registry issues, and other system issues with just few clicks. You can get this tool through button/link below.
Method 2: Run SFC and DISM scan
You can run SFC scan to repair system files and run DISM scan to repair system images in order to fix Windows error event ID 7023.
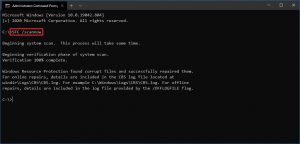
Step 1: Press ‘Windows + X’ keys on keyboard and select ‘Command Prompt as Administrator’
Step 2: Run SFC Scan. Type ‘sfc /scannow’ command and hit ‘Enter’ key to execute
Step 3: Once executed, run DISM scan. Type the following command commands and hit ‘Enter’ key after each command to execute
DISM /online /Cleanup-Image / ScanHealth
DISM /Online /Cleanup-Image /RestoreHealth
Step 4: Once executed, restart your computer and check if the error is resolved.
Method 3: Enable ‘Connected Devices Platform Service’ service or ‘Windows Process Activation Service’ service
This Event Viewer error can be occurred if ‘Connected Devices Platform Service’ service or ‘Windows Process Activation Service’ service is disabled or not running properly in computer. You can enable this service in order to fix the issue.
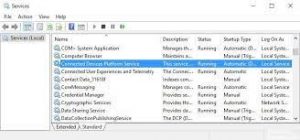
Step 1: Press ‘Windows + R’ keys on keyboard, type ‘services.msc’ in the opened ‘Run’ dialog box and hit ‘OK’ button to open ‘Services’ window
Step 2: Find and double-click on ‘Connected Devices Platform Service’ to open its ‘Properties’
Step 3: In ‘Properties’, select ‘Automatic (Delayed)’ option from ‘Startup Type’ dropdown and hit ‘Start’ button under ‘Service Status’ section, if the service is disabled.
Step 4: Finally, save the changes by hitting ‘Apply’ and ‘OK’ button and then restart your computer. Repeat the same steps if you are facing error causing by termination of ‘Windows Process Activation Service’ and enable this service.
Method 4: Check dependent ‘connected device platform service’ services are enabled
Check some dependent services are running properly or not.
Step 1: Open ‘Services’ window using above method, find and double-click on ‘Network Connection Broker’ service to open its ‘Properties’
Step 2: In ‘Properties’, select ‘Automatic’ option from ‘Startup Type’ dropdown and click on ‘Start’ button under ‘Service Status’ section, and finally hit ‘Apply’ and ‘OK’ to save the changes. Repeat the same steps for ‘TCP/IP NetBIOS Helper’ service and enable it if not enabled.
Method 5: Select ‘Restart the service’ option in ‘Connected Devices Platform Service’ service or ‘Windows Process Activation Service’ service’

Step 1: Open ‘Properties’ window of ‘Connected Devices Platform Service’ service or ‘Windows Process Activation Service’ service in ‘Services’ window. To do so, you can follow ‘step 1’ of above method
Step 2: In ‘Properties’ window, click on ‘Recovery’ tab and select ‘Restart the service’ option from ‘Subsequent failures’ dropdown, and then hit ‘Apply’ and ‘OK’ to save the changes.
Method 6: Turn ON ‘Share Across Devices’ option in settings

Step 1: Press ‘Windows + I’ keys on keyboard to open ‘Settings’ App in Windows 10
Step 2: In ‘Settings’ App, go to ‘System >Shared Experiences’ and in right pane, turn ON ‘Share across devices’ option if it is OFF. Once done, please check if the error is resolved.
Method 7: Perform Clean Boot operation in Windows 10
If the problem is still persist, then you can try to fix this issue by performing clean boot operation in Windows computer.
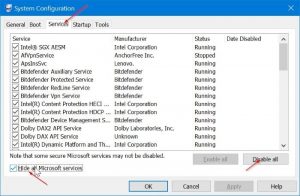
Step 1: Press ‘Windows + R’ keys on keyboard, type ‘msconfig’ in the opened ‘Run’ dialog box and hit ‘OK’ to open ‘System Configuration’ window
Step 2: In the opened window, under ‘General’ tab, click ‘Selective Startup’ radio button and deselect ‘Load Startup items’ checkbox and tick ‘Use original boot configuration’ checkbox
Step 3: Click on ‘Services’ tab, select ‘Hide all Microsoft Services’ checkbox and hit ‘Disable All’ button
Step 4: Finally, click ‘Apply’ and ‘OK’ button to save the changes and restart your computer. After restart, please check if the error is resolved.
Conclusion
I am sure this post helped you on How to fix Windows error event ID 7023 with several easy steps/methods. You can read & follow our instructions to do so. That’s all. For any suggestions or queries, please write on comment box below.


