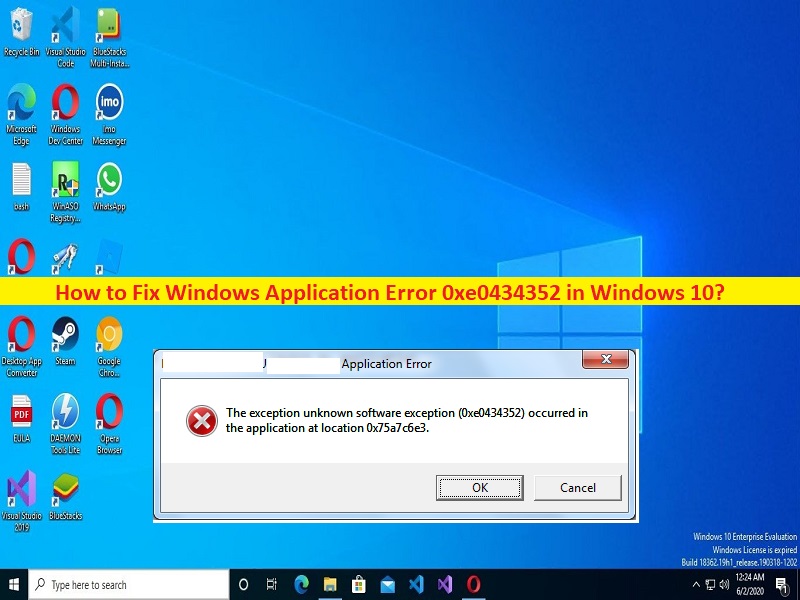
What is ‘Windows Application Error 0xe0434352’ in Windows 10/8/7?
In this post, we are going to discuss on How to fix Windows Application Error 0xe0434352 in Windows 10/8/7. You will be guided with easy steps/methods to resolve the issue. Let’s starts the discussion.
‘Windows Application Error 0xe0434352’: It is common Windows Problem considered as Windows Application Error. This error is usually appeared you try to launch and run certain applications or specific applications in Windows 10/8/7 computer, or when you start/restart your Windows computer. It is confirmed to occur this error on Windows 10/8/7 OS based computer. There could be several reasons behind the issue including corruption in system files or registry or in system image, malware or viruses infections in computer and other issues.
This issue can also be occurred due to Graphics Card Driver inconsistency issue, corruption or incompatible.net framework, bad hard disk sector, interference of third-party antivirus/firewall or other third-party software conflict, and other issues. You should make sure graphics card driver is properly installed and is up-to-date to latest & compatible version.
Also, make sure Windows OS is up-to-date to latest version in computer if you don’t want to face this type of issue. You can run system scan for malware or viruses infections in computer with some powerful antivirus software or PC Repair Tool to find and remove all threats in computer and fix all Windows issues. It is possible to fix the issue with our instructions. Let’s go for the solution.
How to fix Windows Application Error 0xe0434352 in Windows 10/8/7?
Method 1: Fix Windows Application Error 0xe0434352 with ‘PC Repair Tool’
‘PC Repair Tool’ is easy & quick way to find and fix BSOD errors, DLL errors, EXE errors, problems with programs/applications, malware or viruses infections in computer, system files or registry issues and other system issues with just few clicks.
Method 2: Update graphics card driver
Updating graphics card driver to latest & compatible version can resolve the issue.
Step 1: Open ‘Device Manager’ in Windows PC via Windows Search Box and expand ‘Display Adapters’ category
Step 2: Right-click on your graphics card driver and select ‘Update Driver’ and follow on-screen instructions to finish update and once updated, restart your computer and check if the issue is resolved.
Download or reinstall graphs card driver update in Windows PC [Automatically]
You can also try to update all Windows drivers including graphics card driver to latest & compatible version using Automatic Driver Update Tool. You can get this tool through button/link below.
Method 3: Run .Net Framework Repair Tool
You can run .Net Framework Repair Tool to repair corruption in .net framework in computer.
Step 1: Open your browser and visit Microsoft official site to download ‘Microsoft .net framework repair tool’ from there
Step 2: Check the box associated with ‘NetFxREpairTool.exe’, and then hit next to initiate the download and once downloaded, double-click on downloaded setup and follow on-screen instructions to finish repairing tasks.
Method 4: Run CHKDSK scan
You can run CHKDSK scan in Windows computer repair bad sector and hard drive corruption to fix the issue.
Step 1: Type ‘cmd’ in Windows Search Box and press ‘SHIFT + ENTER’ keys to open ‘Command Prompt as Administrator’
Step 2: Type ‘chkdsk /f’ command and hit ‘Enter’ key to execute. Once executed, restart your computer and check if the issue is resolved.
Method 5: Perform Clean Boot operation
You can perform clean boot operation in computer to disable the apps/services causing conflict issue.
Step 1: Open ‘System Configuration’ app in Windows PC via Windows Search Box
Step 2: Click ‘Services’ tab, select ‘Hide all Microsoft services’ checkbox and hit ‘Disable All’ button
Step 3: Click ‘Startup’ tab, and click ‘Open Task Manager’, right-click each startup item and select ‘Disable’ to disable them and then close Task Manager.
Step 4: Finally, click ‘Apply >Ok’ button on ‘System Configuration’ app to save the changes and once done, check if the issue is resolved.
Method 6: Update Windows OS
Updating Windows OS to latest version can resolve the issue.
Step 1: Open ‘Settings’ app in Windows PC via Windows Search Box and go to ‘Update & Security > Windows Update’ and click ‘Check for updates’ button
Step 2: Download and install all available updates in computer and once updated, restart your computer and check if the issue is resolved.
Method 7: Run the problematic software as administrator
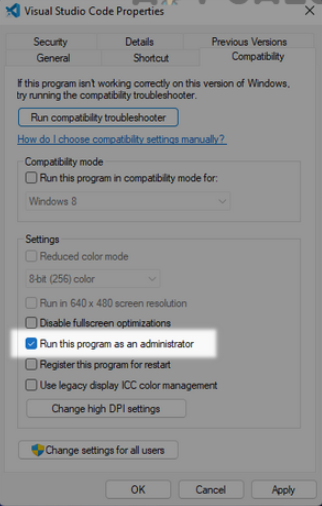
You can run the program with administrator that is causing error and then check if it works for you.
Step 1: Find and right-click on the application’s icon that is causing error, select ‘Run as Administrator’
Step 2: Also, you can right-click on application’s icon and select ‘Properties’. Click ‘Compatibility’ tab, tick ‘Run this program as an administrator’
Step 3: Finally, click ‘Apply > Ok’ to save the changes and check if the issue is resolved.
Method 8: Install latest .net framework
Step 1: Open your browser and visit Microsoft Dotnet framework official site
Step 2: Download the latest dotnet framework from there and install it in computer. Once done, restart your computer and check if the issue is resolved.
Method 9: Change keyboard language of system
Step 1: Open ‘Settings’ app in Windows and search or for ‘Language’ settings and go to ‘Manage keyboard settings’
Step 2: Click ‘Add a language’ and search for ‘Another language’ that you can understand, select the desired language, and hit ‘Next’, and set the newly added language as ‘Windows Display Language’
Step 3: Now, remove the older display language of system and restart your computer and check if it works.
Method 10: Run SFC scan and DISM scan
Step 1: Using ‘Method 4’, open ‘Command Prompt as Administrator’
Step 2: Type the following commands and hit ‘Enter’ key after each to execute.
sfc /scannow
DISM.exe /Online /Cleanup-image /Restorehealth
Step 3: Once executed, restart your computer and check if the issue is resolved.
Method 11: Reinstall the problematic software
If the issue is still persist, you can uninstall and then reinstall the application that is causing issue in order to fix.
Step 1: Open ‘Settings’ App in Windows PC via Windows Search Box and go to ‘Apps > Apps & Features’, find and select the program that is causing the issue and click ‘Uninstall’ to uninstall it and after that, restart your computer.
Step 2: After restart, download and install the software again and check if the issue is resolved.
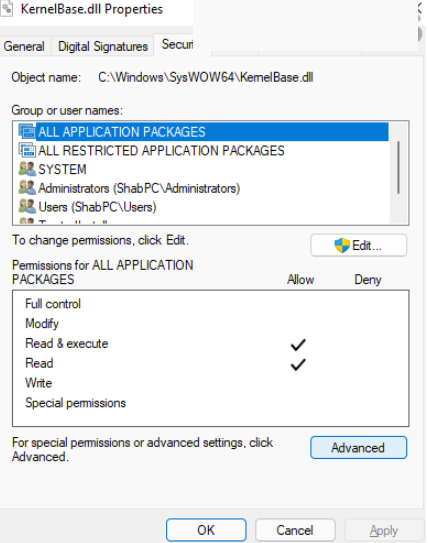
Method 12: Change KernelBase.Dll file’s permissions and replace it
Step 1: Copy the KernelBase.dll form another computer of same Windows version like Windows 64-bit or 32-bit
Step 2: Now, on your problematic computer, open ‘File Explorer’ and search for KernelBase.dll file
Step 3: Right-click on it and select ‘Properties’, click ‘Security’ tab > Advanced
Step 4: In front of Owner, click ‘Change’ and in ‘Object Name’, type ‘Everyone’
Step 5: Click ‘Check Names’ button and afterward and click ‘Ok’
Step 6: Check ‘Replace owner on sub containers and objects’, switching to ‘Auditing’ tab and click ‘Add’
Step 7: Click ‘Select principal’ link and add ‘Everyone’
Step 8: Check ‘Full Control’ and hit ‘Ok’, switch to ‘Effective Access’ tab and click ‘Select a User’ link
Step 9: Add ‘Everyone’ and make sure to check ‘Full Control’ and then hit ‘Apply’ and wait to applied the permissions
Step 10: Go to ‘Advanced’ section of Security tab of Properties window, and click ‘Edit’ and make sure to click ‘Change Permission’
Step 11: In Object Name, add ‘Everyone’ and hit ‘Apply’ to save the changes. Now, paste the copied file from other computer and paste on your problematic computer. Once done, check if the issue is resolved.
Method 13: Create a new Windows User profile
Step 1: Create a new administrator user account and log out of current user profile
Step 2: Log into the newly created user profile and check if the issue is resolved.
Conclusion
I am sure this article helped you on How to fix Windows Application Error 0xe0434352 with easy ways. You can read & follow our instructions to finish the issue. That‘s all. For any suggestions or queries, please write on comment box below.


