Tips to fix Wifi doesn’t have a valid IP Configuration error in Windows 10:
In this post, we are going to discuss on How to fix Wifi doesn’t have a valid IP Configuration error in Windows 10. You are provided with easy steps/methods to resolve the issue. Let’s starts the discussion.
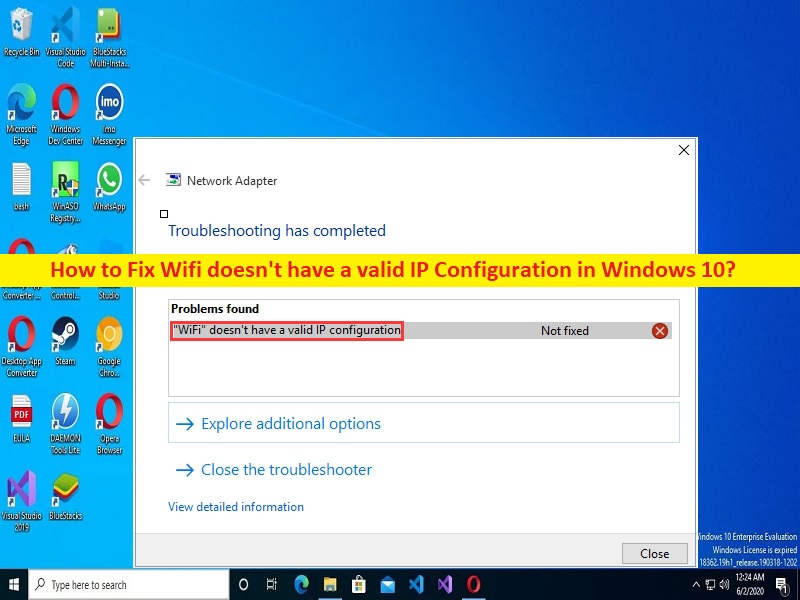
‘Wifi doesn’t have a valid IP Configuration’ error in Windows 10: It is common Windows Problem considered WiFi Connection problem. When you run Network Diagnostic Tool in Windows 10 computer in order to check why you are facing WFi connection problem, then you may experience ‘Wifi doesn’t have a valid IP Configuration’ error in Network Diagnostic Tool’s report window. This error indicates there is some issue with router configuration, WiFi/internet settings, IP settings in computer and other issues that’s why the error is occurred.
There could be several reasons behind the issue including the network inconsistency issue with router or your network device, corrupted/outdated network adapter driver, incorrect IP settings, DNS settings and other network settings, and some other issues. You should make sure network adapter driver is properly installed and is up-to-date to latest version in computer. It is possible to fix the issue with our instructions. Let’s go for the solution.
How to fix Wifi doesn’t have a valid IP Configuration error in Windows 10?
Method 1: Fix Wifi doesn’t have a valid IP Configuration error with ‘PC Repair Tool’
‘PC Repair Tool’ is easy & quick way to find and fix BSOD errors, DLL errors, EXE errors, problems with programs/applications, malware or viruses infections in computer, system files or registry issues, and other system issues with just few clicks.
Method 2: Restart your computer and router
Sometimes, this type of issue is occurred due to some issue with your computer and network device like router. You can fix the issue just by restarting your computer and network device (router/modem) and then check if the issue is resolved.
Method 3: Run Network troubleshooter
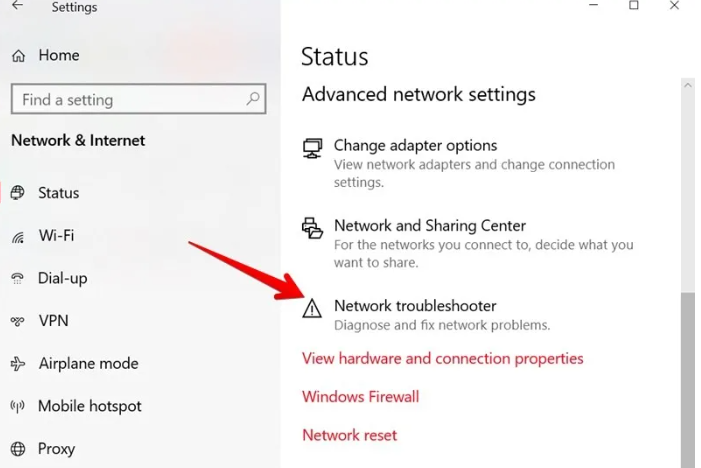
Windows built-in Network troubleshooter can resolve the issue.
Step 1: Open ‘Settings’ app in Windows PC via Windows Search Box and go to ‘Network & Internet > Status’ and click ‘Network troubleshooter’
Step 2: Wait to finish troubleshooting and once finished, check if the issue is resolved.
Method 4: Disable third-party antivirus/firewall
This issue can also be occurred due to interference of third–party antivirus/firewall program installed in computer. Disabling antivirus/firewall program can resolve the issue so you can try this, and check if it works for you.
Method 5: Reset TCP/IP Stack
Step 1: Type ‘cmd’ in Windows Search Box and press ‘SHIFT + ENTER’ keys on keyboard to open ‘Command Prompt as Administrator’
Step 2: Type the following commands one-by-one and hit ‘Enter’ key to execute.
netsh winsock reset catalog
netsh int ip reset
Step 3: Once executed, restart your computer and check if the issue is resolved.
Method 6: Renew IP lease and flush DNS cache
Step 1: Open ‘Command Prompt as Administrator’ using above method
Step 2: Type the following commands and hit ‘Enter’ key after each to execute.
ipconfig /release
ipconfig /flushdns
ipconfig /renew
Step 3: Once executed, restart your computer and check if the issue is resolved.
Method 7: Check IP address settings
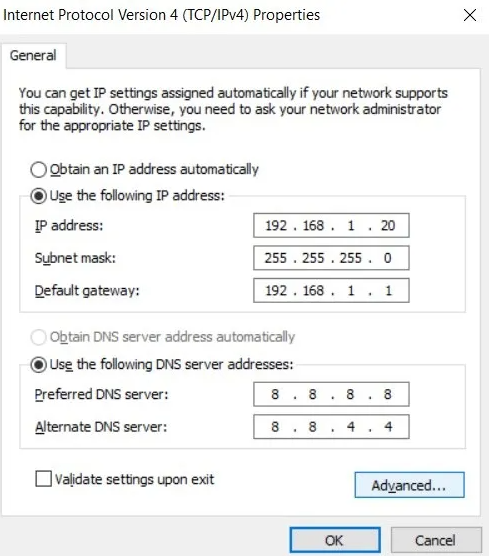
Step 1: Open ‘Settings’ app in Windows PC via Windows Search Box and go to ‘Network & Internet > Status > Advanced Network Settings > Change Adapter Options’
Step 2: Right-click on your WiFi Adapter and select ‘Properties’. Find and select ‘Internet Protocol Version 4 (TCP/IP)’ and hit ‘Properties’
Step 3: Check ‘Obtain IP address automatically’ and ‘Obtain DNS server address automatically’ radio button to enable automatic settings
Step 4: If those are already selected, enable the radio buttons next to ‘Use the following IP address’ and ‘Use following DNS server addressees’, enter the addresses as shown in image.
Step 5: Finally, hit ‘Ok > Apply > Ok’ button to save the changes and restart your computer and check if the issue is resolved.
Method 8: Disable Wireless Network Adapter
Step 1: Open ‘Settings’ app and go to ‘Network & Internet > Change Adapter settings’
Step 2: Right-click on your WiFi adapter and select ‘Disable’ to disable it
Step 3: After few seconds, right-click on it again and select ‘Enable’ to enable it and once done, check if the issue is resolved.
Method 9: Update Wireless Network Adapter Driver
Updating Wireless Network Adapter Driver/Wifi driver to latest & compatible version can resolve the issue.
Step 1: Open ‘Device Manager’ in Windows PC via Windows Search Box and expand ‘Network Adapters’ category
Step 2: Right-click on your WiFi driver/Wireless network adapter, and select ‘Update Driver’ and follow on-screen instructions to finish. Once updated, restart your computer and check if the issue is resolved.
Download or reinstall wireless network adapter driver update in Windows PC [Automatically]
You can also try to update all Windows drivers including wireless network adapter driver using Automatic Driver Update Tool. You can get this tool through button/links below.
Method 10: Reset Network Settings
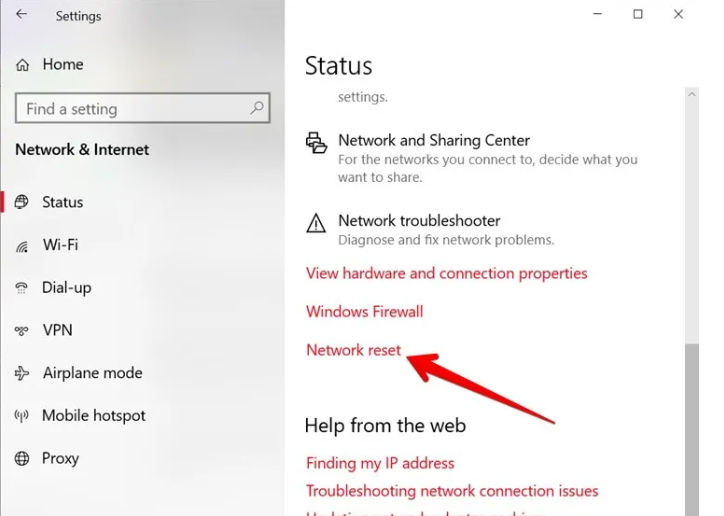
Resetting Network Settings can resolve the issue.
Step 1: Open ‘Settings’ app in Windows PC and go to ‘Network and Internet > Status’ and click ‘Network Reset’
Step 2: Confirm resetting and once finished, restart your computer and check if the issue is resolved.
Method 11: Change router properties
Another possible ways to fix the issue is to change router’s SSID and password. To do so, at first you need to change WiFi router security from WAP2/WAP3 to WAP/WAP2. It may trigger Windows to set up this up as new network, bypassing the error.
Conclusion
I am sure this post helped you on How to fix Wifi doesn’t have a valid IP Configuration error in Windows 10 with easy ways. You can read & follow our instructions to do so. That’s all. For any suggestions or queries, please write on comment box below.


