What is ‘vt-xamd-v hardware acceleration is not available on your system’ error – VM in Windows 10?
In this article, we are going to discuss on How to fix vt-xamd-v hardware acceleration is not available on your system error in Windows 10. You are provided with easy steps/methods to resolve the issue. Let’s starts the discussion.
‘vt-xamd-v hardware acceleration is not available on your system’ error:
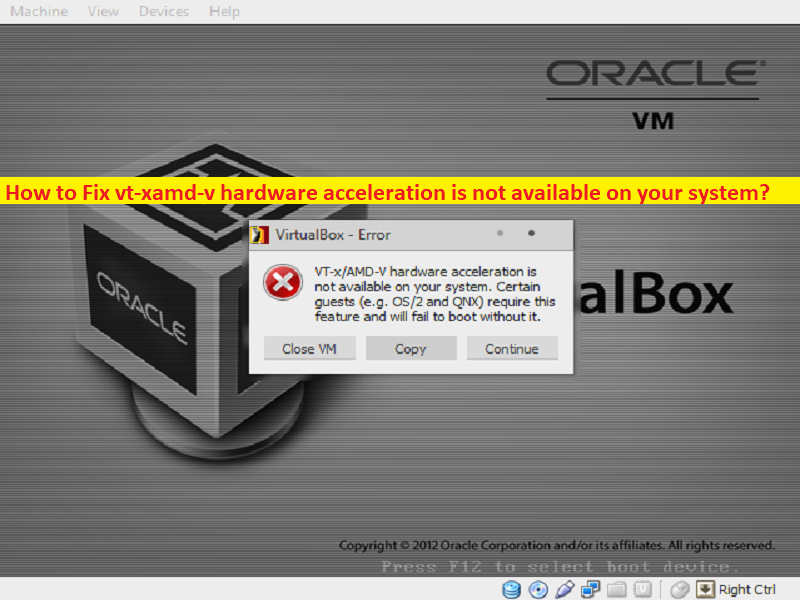
It is common Windows Problem considered as Virtual Machine (VM) issues. This error is usually appeared when you try to run Virtual Machine (VM) in computer. The error is appeared with message saying ‘VT-x/AMD-V hardware acceleration is not available on your system. Your 64-bit guest will fail to detect a 64-bit CPU and will not be able to boot’. This issue prevents you from installing and/or launching a virtual machine in Oracle VM Virtualbox.
The possible reasons behind the issue can be the your PC/laptop’s CPU doesn’t support vt-xamd-v, vt-xamd-v was disabled by Hyper-V, vt-xamd-v is disabled within BIOS, and other issues. It might possible you have older CPUs that are not equipped to support Intel’s vt-x or AMD-V. Also, the same problem can occur if vt-x/amd-v is disabled in your computer by Hyper-V feature. It is possible to fix the issue with our instructions. Let’s go for the solution.
How to fix vt-xamd-v hardware acceleration is not available on your system error – VM in Windows 10?
Method 1: Verify if your CPU supports virtualization
Before going to troubleshoot the issue, you can verify if your CPU supports virtualization or not. There are several different ways to perform this task. You can use a automatic tool to perform this, or you can a dedicated program in Windows PC.
How to verify if CPU support virtualization? [Automatically]
‘SecurAble’: SecurAble is easy & quick tool offers you to find out if your computer supports virtualization.
Step 1: Download and install SecurAble tool from ‘https://www.grc.com/securable.htm’ page official
Step 2: Open the SecurAble executable and click ‘Yes’ at UAC prompt if asked.
Step 3: If your computer is equipped to support hardware virtualization, you will see green ‘Yes’ above Hardware Virtualization.
Step 4: If the answer is Yes, it means that your computer’s CPU is equipped to support virtualization and one of next methods below will allow you to fix the error.
How to verify if your CPU supports virtualization? [Manually]
For Intel:
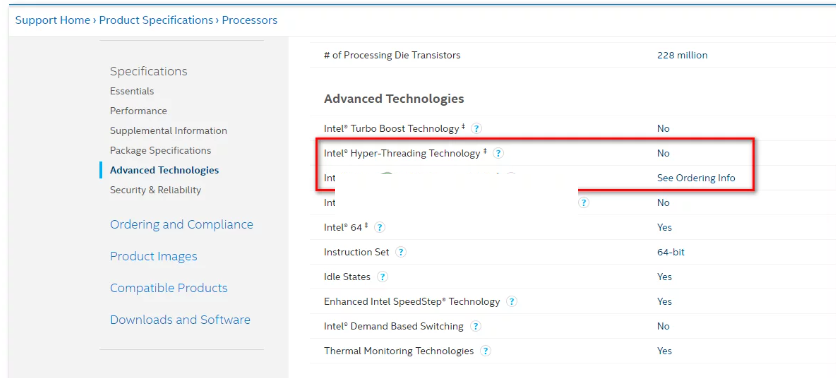
Step 1: You can visit ‘https://ark.intel.com/’ page official to check whether virtualization is supported by looking at processor documentation.
Step 2: On the page opened, scroll down to ‘Advanced Technologies’ tab and see the status of ‘Intel Virtualization Technology for Directed I/O (VT-D)’ and ‘Intel Virtualization Technology (VT-x)’. If any of them labelled as NO, the virtualization technology is not supported by the processor model.
For AMD:
Step 1: You can verify for virtualization supports by visiting ‘https://www.amd.com/’ page official
Step 2: On the opened page, expand the key features dropdown and see if Virtualisation is among the Supported Technologies. If you found that virtualization is supported, proceed with the next methods to fix.
Method 2: Disable Hyper-V
You can disable Hyper-V feature in Windows computer in order to fix the issue.
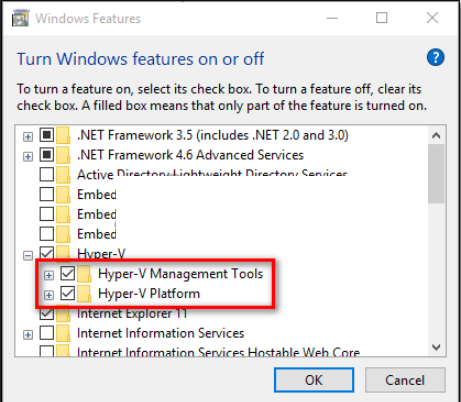
Step 1: Open ‘Control Panel’ in Windows PC and go to ‘Uninstall a Program > Programs & Features > Turn Windows Features ON or OFF’
Step 2: In the opened Windows Features window, find and deselect the checkboxes relating to Hyper-V, and then hit ‘Ok’ button
Step 3: Once done, restart your computer and check if the issue is resolved.
Method 3: Enable virtualization using BIOS/UEFI
Step 1: Restart your computer and when booting initiates, press ‘F2’, ‘F4’, ‘DEL’ key or other BIOS supported key to enter into BIOS/UEFI mode
Step 2: Once you are in BIOS/UEFI mode, boot into Advanced Startup option, and looking for option vt-x/amd-v, Intel virtualization technology, vanderpool, etc. You can find the option under Processor, Security, Chipset, Advanced, Advanced Chipset Control, Advanced CPU configuration, etc.
Step 3: When you manage to find the option, make sure you enable it. Once you manage to enable virtualization, save the changes and restart your computer, and check if the issue is resolved.
Fix Windows Issues with ‘PC Repair Tool’:
‘PC Repair Tool’ is easy & quick way to find and fix BSOD errors, DLL errors, EXE errors, problems with programs/applications, malware or viruses infections in computer, system or registry issues, and other system issues with just few clicks.
Conclusion
I am sure this article helped you on How to fix vt-xamd-v hardware acceleration is not available on your system with easy ways. You can read & follow our instructions to do so. That’s all. For any suggestions or queries, please write on comment box below.


