What is ‘The driver can’t release to failure’ error in Windows 10?
In this article, we are going to discuss on How to fix The driver can’t release to failure Windows 10. You will be guided with easy steps/methods to resolve the issue. Let’s starts the discussion.
‘The driver can’t release to failure’ error in Windows 10’: It is common Windows Problem considered as motherboard drivers issue. This issue is usually appeared with PC with Gigabyte Motherboards. The message states itself doesn’t tell which driver has problems but it has been tightly connected to Gigabyte motherboards, especially the ones who don’t have wireless capabilities.
The failure in the message is acutely failure to find wireless hardware, and failure recovery protocol in the code is insufficient, and given you this error. ‘The driver can’t release to failure’ error occurs when you are using Gigabyte Software. This issue can be occurred due to problem in Cloud Station Server, and since it depends on having WiFi capabilities, computers without such capabilities have issues with it.
One possible way to fix the issue is to update Motherboard drivers in your Windows computer to latest & compatible version. You can also try to fix the issue by reinstalling Gigabyte services in computer. It is possible to fix the issue with our instructions. Let’s go for the solution.
How to fix The driver can’t release to failure Windows 10?
Method 1: Fix ‘The driver can’t release to failure’ error with ‘PC Repair Tool’
‘PC Repair Tool’ is easy & quick way to find and fix BSOD errors, DLL errors, EXE errors, problems with programs/applications, malware or viruses issues, system files or registry issues, and other system issues with just few clicks.
Method 2: Update motherboard drivers
Updating motherboard driver to latest & compatible version can resolve the issue. However, it is hard to find which device drivers are causing the error. So, you can use Automatic Driver Update Tool to update all Windows drivers including motherboard drivers to latest & compatible version. You can get this tool through button/link below.
Method 3: Switch OFF the always run on next reboot setting
Step 1: Open ‘Gigabyte App Center’ via System Tray
Step 2: Click ‘Cloud Station Server’ tab at bottom of the app
Step 3: Switch off the ‘Always run on next reboot’ setting for ‘Cloud Station Server’
Step 4: Select the OC tab for Remote OC, and switch the ‘Always run on next reboot option’ off
Step 5: Select the Gigabyte Remote tab, and turn OFF ‘Always run on next reboot’ option
Step 6: Restart your computer and check if the issue is resolved.
Method 4: Reinstall Gigabyte Services via Command Prompt
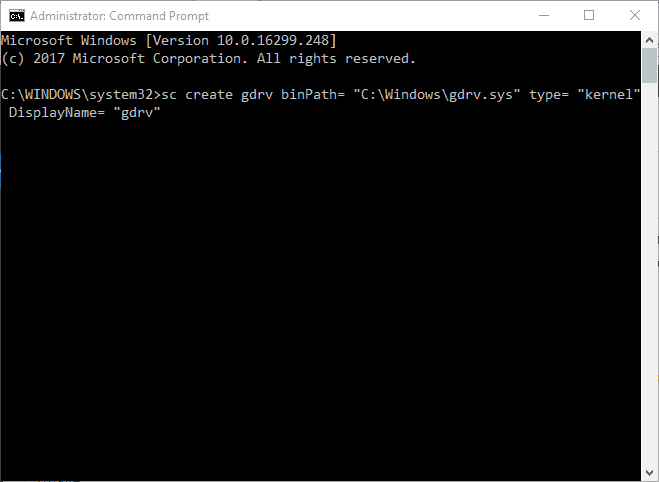
Step 1: Type ‘cmd’ in Windows Search Box and press ‘SHIFT + ENTER’ keys on keyboard to open ‘Command Prompt as Administrator’
Step 2: Type ‘sc delete gdrv’ command and hit ‘Enter’ key to execute. Now, execute the following command
‘sc create gdrv binPath= “C:Windowsgdrv.sys” type= “kernel” DisplayName= “gdrv”‘
Step 3: Once executed, restart your computer and check if the issue is resolved.
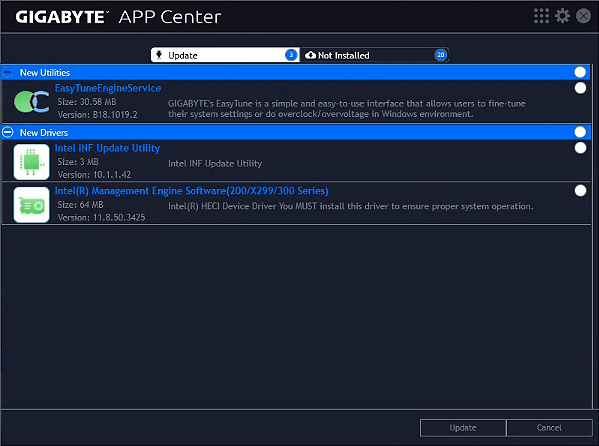
Method 5: Update Gigabyte App Center
You can also try to fix the issue by updating Gigabyte App Center to latest & compatible version. You can visit ‘https://www.gigabyte.com/Support/Utility’ page to get latest & compatible version of Gigabyte App Center in your computer.
Method 6: Uninstall Gigabyte App Center
Step 1: Open ‘Control Panel’ in Windows PC via Windows Search Box and go to ‘Uninstall a Program > Programs & Features’
Step 2: Find and select ‘GigaByte App Center’, and select ‘Uninstall’ to uninstall it and after that, restart your computer. Once done, check if the issue is resolved.
Conclusion
I am sure this post helped you on How to fix The driver can’t release to failure Windows 10 with several easy steps/methods. You can read & follow our instructions to do so. That’s all. For any suggestions or queries, please write on comment box below.


