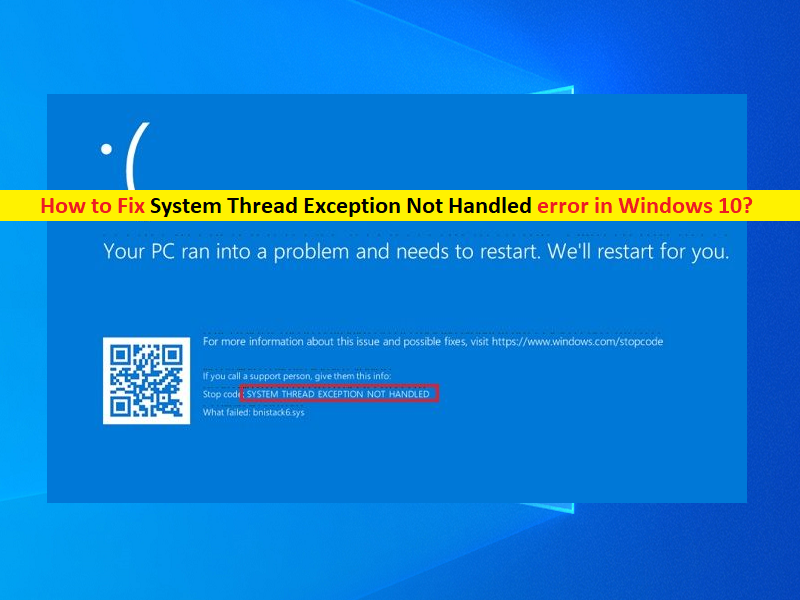
What is ‘System Thread Exception Not Handled’ error in Windows 10?
If you are facing ‘System Thread Exception Not Handled’ – BSOD error in Windows 10 in the middle of your work on computer or while starting/restarting Windows 10 computer, then you are in right place for the solution. Here, you will be guided with easy steps/methods to resolve the error. Let’s starts the discussion.
‘System Thread Exception Not Handled’ error: It is common Windows Problem considered as Blue Screen of Death (BSOD) error. This error is appeared with message saying ‘Your PC ran into a problem and needs to restart. We’re just collecting some error info, and then we’ll restart for you’ along with some error codes including 0x0000007E or 0x1000007E. This BSOD error is usually appeared in the middle of your work on Windows 10 computer or while you start/restart Windows 10 computer.
There could be several reasons behind this BSOD error including outdated device drivers and Windows OS, faculty software or hardware installed in computer, corrupted system files or registry, or hard disk system image, misconfigured system’s settings, interfered by some conflicting software or antivirus installed in your computer. In such case, you can fix the PC issues with ‘PC Repair Tool’ offers you to fix any types of system issues in Windows computer.
Enabled Overclocking GPU/CPU feature in your Windows computer may help you to improve your graphics and gaming performances and experiences. However, enabled overclocking GPU/CPU feature can cause sometime system issues like this type of BSOD error. In such case, you can try disabling overclocking CPU/GPU in your Windows computer and check if it works for you. Another possible reason behind this Blue Screen of Death (BSOD) error can be the interference of your third-party antivirus/firewall program installed in your computer. You can fix the issue by disabling antivirus/firewall program temporarily in computer. Let’s go for the solution.
How to fix System Thread Exception Not Handled error in Windows 10?
Method 1: Fix ‘System Thread Exception Not Handled (BSOD)’ error with ‘PC Repair Tool’
‘PC Repair Tool’ is easy & quick way to find and fix BSOD errors, DLL errors, EXE errors, problems with programs/applications, malware or viruses infections in computer, system files or registry issues, and other system issues with just few clicks. You can get this tool through button/link below.
Method 2: Analyse the Minidump files in Windows 10
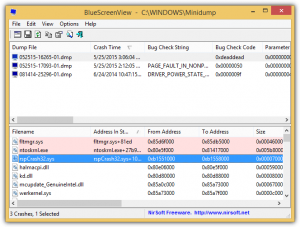
It is the best to analyse the minidump file which is responsible for logging the crashes and can provide more details on what exacting is causing this BSOD error.
Step 1: Right-click on ‘This PC’ or ‘My Computer’ icon on desktop and select ‘Properties’
Step 2: In ‘Properties’ window, click ‘Advanced’ tab and under ‘Startup and Recovery’ section, click ‘Settings’
Step 3: Under ‘System Failure’ section, click to select the checkboxes for actions that you want Windows to perform if system errors
Step 4: Now, you need to disable the system log option that specify event information is recorded in system log. To do so, open ‘Command Prompt’ via Windows Search Box, type the following command and hit ‘Enter’ key to execute.
wmic recoveros set WriteToSystemLog = False
Step 5: The Send an administrate alert option specifies that administrators are notified of system error if you configured administrative alerts. To disable this option by modifying registry, enter following command in Command Prompt
wmic recoveros set SendAdminAlert = False
Step 5: The Automatically restart option specify that Windows automatically restart your computer. By default, this option is enabled. To disable this option by modifying the registry, enter the following command
wmic recoveros set AutoReboot = False
Method 6: Now, under ‘Write Debugging Information’, select the type of information that you want Windows to record memory dump file if computer stops unexpectedly. Enter the following command to specify that you want to use small memory dump file by modifying the registry
wmic recoveros set DebugInfoType = 3
Step 7: Now, to specify that you want to use ‘D:\Minidump’ folder as your small dump directory to modifying the registry, set the MinidumpDir Expandable String Value to ‘D:\Minidump’. For example, enter following command in Command Prompt
wmic recoveros set MiniDumpDirectory = D:\Minidump
Step 8: The kernel Memory Dump option records only kernel memory. This option stores information than a small memory dump file, but it takes less time to complete than a complete memory dump file.
How to open and read Minidump file?
Step 1: Open your browser and visit ‘https://developer.microsoft.com/en-us/windows/hardware/windows-driver-kit’ page to download Windows Driver Kit in your computer and download this tool
Step 2: Once downloaded, double-click on downloaded executable and follow on-screen instructions to finish installation
Step 3: Open ‘Command Prompt’ in Windows 10 via Windows Search Box and change the debugging tools for Windows Folder by entering following command
cd c:\program files\debugging tools for windows
windbg -y SymbolPath -i ImagePath -z DumpFilePath
kd -y SymbolPath -i ImagePath -z DumpFilePath
windbg -y srv*c:\symbols*http://msdl.microsoft.com/download/symbols -i c:\windows\i386 -z c:\windows\minidump\minidump.dmp
Step 4: Once executed, check the file for any errors and bugs related to system files and make sure you Google each file next to error message to make sure it is driver or part of certain third-party app.
Method 3: Update or reinstall Windows 10 drivers
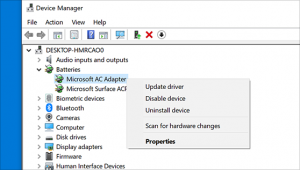
Step 1: Open ‘Device Manager’ in Windows 10 via Windows Search and expand each device category one-by-one in order to check which device driver is outdated/corrupted or problematic
Step 2: Right-click on the driver you want to update, and select ‘Update Driver’. Follow on-screen instructions to finish update process. Once updated, restart your computer and check if the issue is resolved.
Download or reinstall Windows 10 drivers update [Automatically]
You can also try to update all Windows drivers with ‘Automatic Driver Update Tool’. You can get this tool through button/link below.
Method 4: Run Windows Memory Diagnostic Tool
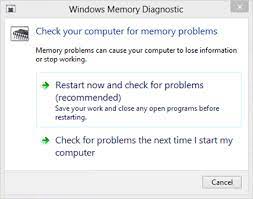
This issue can be occurred due to faculty RAM or memory in your computer. You can check and repair the issue by running Windows Memory Diagnostic Tool.
Step 1: Type ‘Windows Memory Diagnostic’ in Windows Search and open this tool from results appear
Step 2: Select ‘Restart now and check for problems’ option and wait to finish the process. Once done, restart your computer and check if the error is resolved.
Method 5: Update BIOS firmware
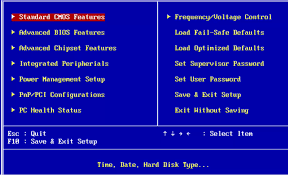
Updating/upgrading BIOS can resolve the issue. Let’s try.
Step 1: Press ‘Windows + R’ keys on keyboard, type ‘msconfig’ in the opened ‘Run’ window and hit ‘Ok’ button to open ‘System Configuration’ window
Step 2: In the opened window, click on ‘Tools’ tab and highlight ‘System Information’ and click ‘Launch’, then remember ‘BIOS Version/Date’
Step 3: Download the correct new BIOS version from your PC’s motherboard manufacturer official site
Step 4: Once downloaded, plug-in USB containing BIOS version and enter the BIOS to update the firmware. Once updated, restart your computer and check if the issue is resolved.
Method 6: Run SFC scan and DISM scan in Windows 10
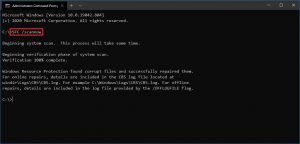
Step 1: Type ‘cmd’ in Windows Search Box and press ‘Shift + Enter’ keys on keyboard to open ‘Command Prompt as Admin’
Step 2: Type the following commands one-by-one and hit ‘Enter’ key after each to execute
Sfc /scannow
dism.exe /Online /Cleanup-image /Scanhealth
dism.exe /Online /Cleanup-image /Restorehealth
Step 3: Once executed, restart your computer to see the changes and check if the error is resolved.
Method 7: Perform System Restore
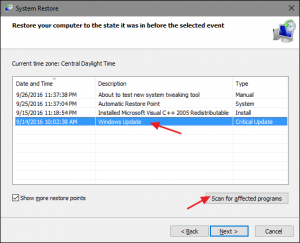
If the issue is still persist, then you can try to fix the issue by performing System Restore operation in computer.
Step 1: Press ‘Windows + R’ keys on keyboard, type ‘rstrui’ in the opened ‘Run’ window and hit ‘Ok’ button to open ‘System Restore’
Step 2: In the opened window, click on ‘Next’ button, select the restore point according to date & time when there was no issue at all, and click ‘Next > Finish’ to start restoring process and once done, restart your computer and check if it works for you.
Method 8: Reinstall Windows OS

If the issue is still persist, then you can try to fix the issue by reinstalling Windows 10 OS. This will erase everything from your computer and clean install Windows 10 OS in your computer. After reinstalling Windows OS, check if the issue is resolved.
Conclusion
I am sure this post helped you on How to fix System Thread Exception Not Handled error in Windows 10 with several easy steps/methods. You can read & follow our instructions to do so. That’s all. For any suggestions or queries, please write on comment box below.


