
What is ‘Printer error 0x000007d1’ in Windows 10?
If you are facing Printer error 0x000007d1 in your Windows 10 computer with printer device attached while trying to print a document, then you are in right-place for the solution. Here, you will be guided with easy steps/methods to resolve the error. Let’s starts the discussion.
‘Printer error 0x000007d1’: It is common Windows Problem considered as Printer error. This Printer error is usually appeared when you try to print something or a document in your Windows 10 computer with printer device attached. This issue indicates your printer is not printing in Windows 10 computer for some reasons. There could be several reasons behind the issue can be corrupted/altered files and device drivers as the message of this error indicates.
Printer drivers play important role in communication between your printer device and operating system installed in computer. Corrupted/outdated or incompatible printer driver in your computer can cause this type of error. So printer driver update is necessary in this case if you don’t want any printing job relating issue. Sometimes, this type of issue is occurred due to some temporary issues in your printer device and/or your Windows computer.
You can fix temporary issue just by restarting your computer and printer device both, and check if it works for you. If not, you can follow our instructions to do so. One possible way to fix the issue is to disconnect and reconnect printer or reinstall printer driver in your computer. Let’s go for the solution.
How to fix Printer error 0x000007d1 in Windows 10?
Method 1: Fix ‘Printer error 0x000007d1’ with ‘PC Repair Tool’
‘PC Repair Tool’ is easy & quick way to find and fix BSOD errors, DLL errors, EXE errors, problems with programs/applications, malware or viruses issues, system files or registry issues, and other system issues with just few clicks.
Method 2: Check if your printer is connected
Before troubleshooting the issue, you should check and make sure your printer is connected and it says ‘Connected’ in Windows settings.
Step 1: Type ‘Printers’ in ‘Windows Search Box’ and open ‘Printers & Scanners’ from results appear
Step 2: You should see the page with all your available printers and scanners. Make sure under your printer it says ‘Connected’
Step 3: If not, restart your printer and check if it reconnects, and check if the issue is resolved.
Method 3: Run Printer troubleshooter
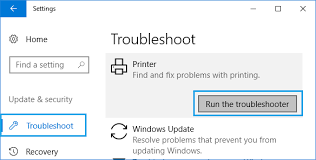
Step 1: Open ‘Settings’ App in Windows 10 via Windows Search Box and go to ‘Update & Security > Troubleshoot > Additional Troubleshooters’
Step 2: Select ‘Printer’ and hit ‘Run the troubleshooter’ button, follow on-screen instructions to finish troubleshooting and once done, restart your computer and check if it works.
Method 4: Fix Printer error 0x000007d1 using Registry Editor
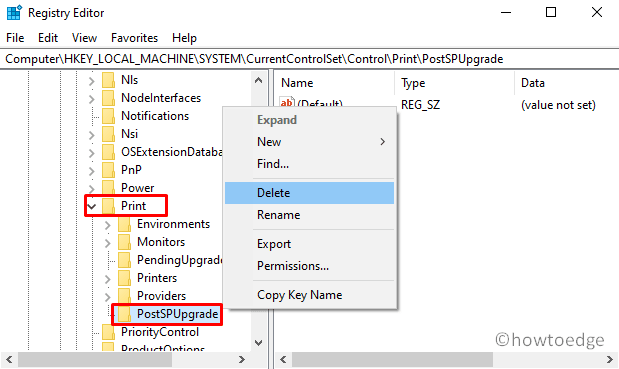
Step 1: Open ‘Registry Editor’ in Windows PC via Windows Search Box and navigate to following path and click the registry subkey
HKEY_LOCAL_MACHINE\\SYSTEM\\CurrentControlSet\\Control\\Print\\PostSPUpgrade/
Step 2: On the Edit menu, click ‘Delete’ and click ‘Yes’ to confirm the removal of ‘PostSPUpgrade’ registry key. Once done, restart your computer and check if it works.
Method 5: Update Printer driver
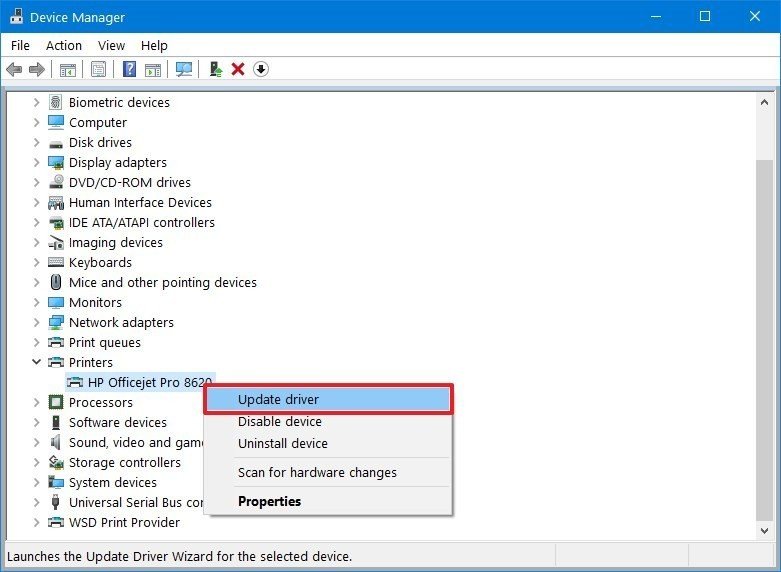
Updating printer driver to latest & compatible driver version can resolve the issue.
Step 1: Open Device Manager in Windows PC via Windows Search Box and expand ‘Printers’ or ‘Print Queue’ category
Step 2: Right-click on your printer device and select ‘Update Driver Software’
Step 3: Follow on-screen instructions to finish update and once done, restart your computer and check if the issue is resolved.
Download or reinstall printer driver update in Windows PC [Automatically]
You can also try to update all Windows drivers including Printer drivers using Automatic Driver Update Tool. You can this tool through button/link below.
Method 6: Clear Print Spooler
If the issue is still persist, then you can try to fix the issue by clearing Print Spooler service in computer.
Step 1: Open ‘Services’ app in Windows PC via Windows Search Box, find and right-click on Print Spooler service, and select ‘Stop’ to stop the service
Step 2: Now, open File Explorer and navigate to ‘C:\\WINDOWS\\System32\\spool\\PRINTERS’ path
Step 3: Once you are in correct path, delete all folders in this one. Now, go back to Services window, right-click on Print Spooler service, and select ‘Start’ option. Once done, please check if the error is resolved.
Conclusion
I am sure this post helped you on How to fix Printer error 0x000007d1 in Windows 10 with several easy steps/methods. You can read & follow our instructions to do so. That’s all. For any suggestions or queries, please write on comment box below.


