
What is ‘Outlook error 0x8004102a’ in Windows 10?
In this article, we are going to discuss on How to fix Outlook error 0x8004102a Windows 10. You are provided with easy steps/methods to resolve the issue. Let’s starts the discussion.
‘Outlook error 0x8004102a’:
‘Outlook’: Outlook or Microsoft Outlook is personal information manager software system from Microsoft, available as part of Microsoft Office Suite. Outlook includes email client features, calendaring, task managing, contact managing, note-taking, journal logging and web browsing. Individuals can use Outlook as standalone application and organization can deploy it as multi-user software for such shared functions like mailboxes, calendars, folders, data aggregation, and appointment scheduling.
However, several users reported they faced Outlook error 0x8004102a Windows 10 or Outlook error 0x8004102a on their Windows 10 computer when they tried to send or receive emails from outlook.com to outlook servers. Some users reported they faced this error when they tried to synchronize the Hotmail with Outlook. The possible reasons behind the issue with Outlook application itself like incorrect or bad configured Outlook settings, corruption in outlook installation file, issue with Send/Receive settings, and other issues.
This issue can also be occurred due to various outlook add-ins installed, disabled cached Exchange mode, issue with Certification Verification Check, corrupted .pst, and .ost files are one of major reasons behind the issue. You should make sure you entering correct credentials for login and then check if it works for you. It is possible to fix the issue with our instructions. Let’s go for the solution.
How to Fix Outlook error 0x8004102a Windows 10?
Method 1: Use send/receive settings
You can try to fix the issue by modifying send/receive settings in Outlook.
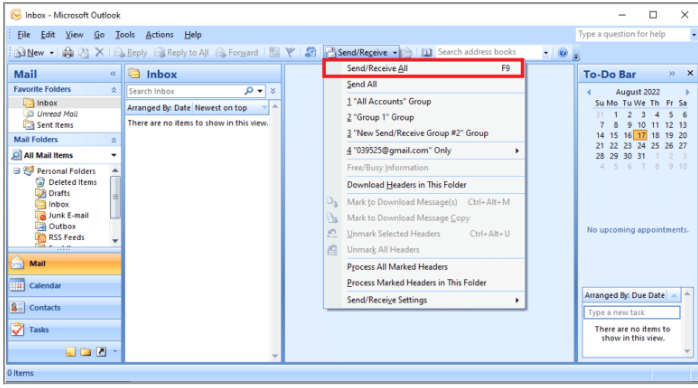
Step 1: Open ‘Outlook’ app in Windows PC and click ‘Send/Receive dropdown’ button, and click ‘Send/Receive All’
Step 2: Wait for the Sync to complete and once done, check if the issue is resolved.
Method 2: Manually Synchronize folders
Step 1: Open Outlook app and locate and click ‘Send/Receive’ dropdown button, and go to ‘Send/Receive settings’, and click ‘Define Send/Receive Groups…’
Step 2: In Send/Receive group dialog box, click ‘New’, and enter a desired name for new group and click ‘Ok’, and check ‘Include the selected accounts in this group’
Step 3: In ‘Account Options’, check ‘Send mail items’ and ‘Receive mail items’
Step 4: Under ‘Folder Option’, select the folder that you want to include in ‘Send/Receive option’, and hit ‘Ok’ button and then click ‘Close’ to close it, and check if it works for you.
Method 3: Run Outlook without Add-ins
Step 1: Press ‘Windows + R’ keys on keyboard, type ‘Outlook.exe /safe’ in ‘Run’ window and hit ‘Ok’ button to open Outlook in Safe mode
Step 2: This will open Outlook in Safe Mode and without add-ons, and then check if the issue is resolved.
Method 4: Enable Use Cached Exchange Mode
Step 1: Open Outlook app and click ‘File’ tab and click ‘Info > Account Settings > Account Name and Sync Settings’
Step 2: In ‘Exchange Account Settings’ window, click ‘More Settings’
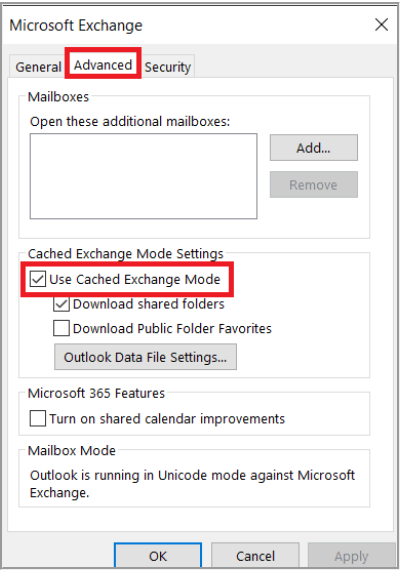
Step 3: Go to ‘Advanced’ tab and check ‘Use Cached Exchange Mode’, and then hit ‘Apply > Ok’ button to save the changes. Once done, check if the issue is resolved.
Method 5: Re-add Outlook account
This issue can be occurred due to some temporary issue with your Outlook account. You can fix the issue by removing your Outlook account and then re-add it.
Step 1: Open Outlook app and go to ‘Tools’ and click ‘Account Settings’ and click ‘Remove’ button and confirm it.
Step 2: Click ‘New’ to again add the account and then check if the issue is resolved.
Method 6: Add account to new profile
Step 1: Open ‘Control Panel’ app in Windows PC and click ‘View By’ dropdown and hit ‘Large Icons’ option, and then click ‘Mail’ setting option
Step 2: In the opened window, click ‘Profile’ tab and click ‘Show Profiles’ and click ‘Add’ button
Step 3: Give your New Profile a name and hit ‘Ok’ and click on new profile, and select ‘Always use this profile’ option, and hit ‘Apply > Ok’ button to save the changes
Step 4: Once done, re-launch Outlook and add a new profile, and check if the issue is resolved.
Method 7: Disable Certificate Verification Check
Step 1: Press ‘Windows + R’ keys on keyboard, type ‘control /name Microsoft.InternetOptions’ in ‘Run’ window, and hit ‘Ok’ button to open ‘Internet Properties’ window
Step 2: Click ‘Advanced’ tab, uncheck ‘Check for Publisher’s certificate revocation’ and ‘Check for server certificate revocation’ checkbox, and then hit ‘Apply > Ok’ button to save the changes, and check if the issue is resolved.
Method 8: Repair .pst and .ost files
Step 1: Open Outlook app and click ‘Tools’ and click ‘Account Settings’
Step 2: Go to ‘Data Files’ tab and copy the ‘Personal Folders’ file location and close Outlook
Step 3: Now, open ‘File Explorer’ and go to following path [for MS Outlook 2007]
C:\Program Files (x86)\Microsoft Office\Office12
Step 4: Find and open ‘scanpst.exe’ file, click ‘Browse’ to enter the name of file you want to scan, and paste the path of location, and click ‘Start’ to run the scan. Click ‘Repair’ to start fix and wait to finish
Step 5: Once done, check if the issue is resolved.
Method 9: Repair Outlook app
If the issue is still persist, you can fix the issue by repairing Outlook app.
Step 1: Open ‘Control Panel’ app in Windows PC via Windows Search Box and go to ‘Uninstall a Program > Programs & Features’
Step 2: Find and right-click ‘Office suite’, and click ‘Change’ and click ‘Repair’ and wait to finish repairing and once done, restart Outlook and check if the issue is resolved.
Method 10: Update Outlook app
Step 1: Open Outlook app and click ‘File’ menu, select office account from left-hand side and click ‘Update Options’
Step 2: Choose ‘Update Now’ and wait to finish updating and once finished, check if the issue is resolved.
Method 11: Create new Windows user profile
If the issue is still persist, you can try to fix the issue by creating new user profile in Windows PC.
Step 1: Open ‘Settings’ app in Windows PC and go to ‘Accounts > Family & other users > Other People’
Step 2: Click ‘Add someone else to this PC’ enter the credentials to create an account for this PC, and click ‘Next’ and once done, check if the issue is resolved.
Fix Windows PC Issues with ‘PC Repair Tool’:
‘PC Repair Tool’ is easy & quick way to find and fix BSOD errors, DLL errors, EXE errors, problems with programs/applications, malware or viruses infections in computer, system files or registry issues, and other system issues with just few clicks.
Conclusion
I hope this post helped you on How to fix Outlook error 0x8004102a Windows 10 with easy ways. You can read & follow our instructions to do so. That’s all. For any suggestions or queries, please write on comment box below.


