
.Net Framework is a general purpose platform developed by Microsoft. It provides a runtime environment and set of libraries and tools for running applications on the Windows Operating System. It is also used for building websites, web services and games. So basically it can be used for performing a wide range of tasks to increase the productivity.
But sometimes users face troubles while installing .NET Framework 3.5 or a different optional feature in Windows. Here in article we ill thoroughly discuss about one such error “.Net Framework installation error 0x800f0954”. Countless users have claimed this error while trying to install the package via Windows features. Nevertheless, some are receiving it while using the DISM tool. It’s pertinent to mention it can occur on Windows 7, 8.1 and 10 as well. The full error message reads as:
Windows couldn’t complete the requested changes.
The changes couldn’t be completed. Please reboot your computer and try again.
Error code: 0x800F0954
Speaking about the causes, there are a number of culprits. Some of the prominent factors are as follows:
#. Obsolete .NET Version
You are most likely to face the above mention error if you are attempting to install the older version of .NET. Note that obsolete version is incompatible with the OS and often create nuisance.
#. Windows Update Server Issue
It’s noteworthy to mention Windows Server Update services allow the users to update Windows on a PC Network. The error may also get triggered if your system fails to reach WSUS, DISM.
#. DISM CBS logs issue
Several times, you may face this above mention trouble due to DISM CBS logs issue.
#. The interference of Local Group Policy Editor
If one policy is disabled from Local Group Policy Editor due to specific reasons, there will be a hindrance in the connection between Windows Server Update Services and Windows Optional Features Installer.
Since we have discussed all the possible reasons, now take a look at all the workarounds.
Try these Solutions for .Net Framework installation error 0x800f0954
Method 1: Clean the CBS Logs
In this first method we suggest you to delete the Component Based Servicing Logs related to DISM. To do so follow the below mention guidelines:
Step 1: Use Windows + E keys to open File Explorer > then navigate to the following location: C:\Windows\Logs\CBS
Step 2: Press Ctrl + A to select all the files inside the CBS folder and right-click on them to choose Delete
Step 3: After that close the CBS folder and run Command Prompt as an administrator
Step 4: Run the following command to install .NET Framework and press Enter key
Dism.exe /online /enable-feature /featurename:NetFX3 /source:C:\
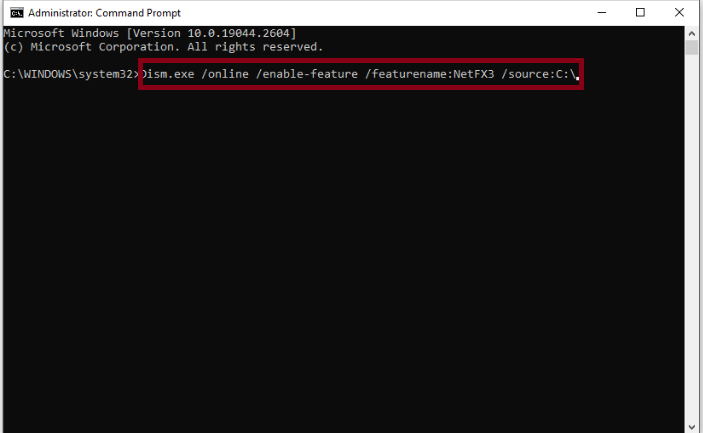
Now try to install .NET Framework and see if you are still facing error.
Method 2: Install .NET Framework 3.5 with PowerShell
In this method we suggest you to install .NET Framework 3.5 using PowerShell. To proceed use the following:
Step 1: Right-click on the Start icon and choose Windows PowerShell (Admin) in the context menu
Step 2: In the Command Window, type Add-WindowsCapability –Online -Name NetFx3~~~~ –Source D.\sources\sxs and press Enter key.

Step 3: Once the process is done, exit Windows PowerShell and reboot your PC
Method 3: Skip Windows Server Temporarily
It’s pertinent to mention if your system fails to access Windows Update Server, it won’t let you install optional Windows Updates which eventually leads to .NET Framework 3.5. In such case, we suggest you to bypass the WSUS Server.
Here’s how:
Step 1: Press Windows + R keys to open Run dialog box > In the prompted box, type in regedit and press Enter key to launch Registry Editor. If prompted by User Account Control, press Yes to grant permissions.
Step 2: Then navigate to the following location:
HKEY_LOCAL_MACHINE\SOFTWARE\Policies\Microsoft\Windows\WindowsUpdate\AU
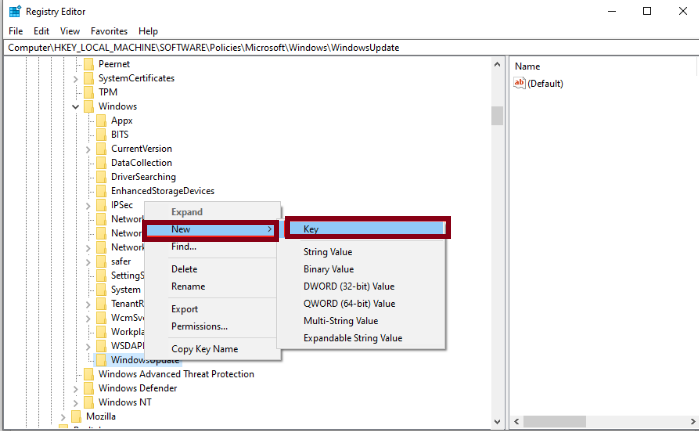
Step 3: If you find there is no WindowsUpdate key under Windows, you can create it manually. Just right-click on the Windows key > select New > Choose key > rename it to Windows Update
Step 4: Then right-click on WindowsUpdate > select New > choose key > rename it to AU
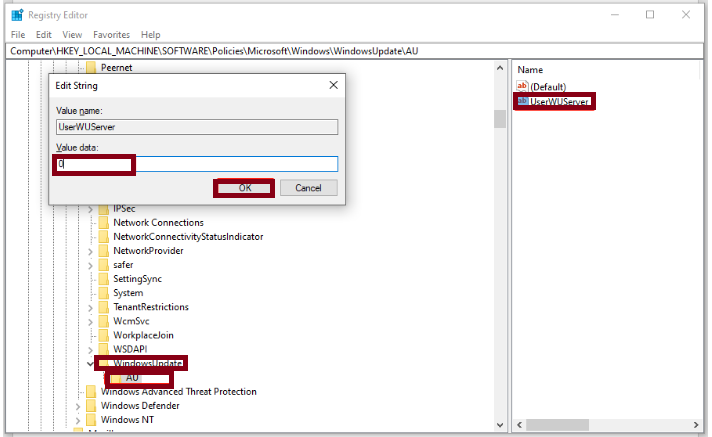
Step 5: Select the AU Keys > right-click on the blank area on the right side > select New > choose String Value > rename it to UserWUServer
Step 6: Double-click on UserWUServer to change Value data to 0 and press OK to save the modifications.
Step 7: Then open File Explorer and right-click on This PC to choose Manage
Step 8: Double-click on Services and Applications & Services > scroll down to find Windows Update > right-click on it to choose Restart. Now, you can install .NET Framework 3.5 successfully
Method 4: Install .NET Framework 3.5 from Windows 10 ISO
If you are still struggling with .Net Framework installation error 0x800f0954 we suggest you to install .NET Framework 3.5 from Windows 10 ISO. But ensure the ISO File corresponds to the version of Windows 10 installed on your PC.
Step 1: Navigate to Microsoft Official Website and click on Download tool now
Step 2: Now click on Accept to accept the license terms > tick Create installation media (USB flash drive, DVD, or ISO file) for another PC > press Next > select Language, Architecture and Edition> press Next > tick ISO file > tick Next > choose a download location for Windows 10 ISO file > Press Save
Step 3: Once downloaded, find the ISO file in File Explorer and right-click on it to choose the Mount Option > then note down the drive letter of the mounted drive
Step 4: Then launch Command Prompt as an administrator and run the following command (note that you have to replace H:\ with the drive letter of your mounted drive):
dism /online /enable-feature /featurename:NetFX3 /Source:H:\sources\sxs /LimitAccess
Method 5: Alter Group Policies
One of the prominent reasons for facing the above mention error is issues with the Group Policies. So you can follow the below mention steps to amend the Group Policies:
Points to Remember: This method is not applicable for all the Windows Versions. If you use Windows 10 Home, you are suggested to skip this because it will not support Local Group Policy Editor.
Step 1: Use Windows + R keys to open Run utility box > In the prompted box, type in gpedit.msc and press OK button to launch Local Group Policy Editor > If prompted by UAC, press Yes
Step 2: Then go to Computer Configuration > Administrative Templates > System. With System selected, scroll down in the right-hand pane to find Specify settings for optional component installation and component repair and double-click on it.
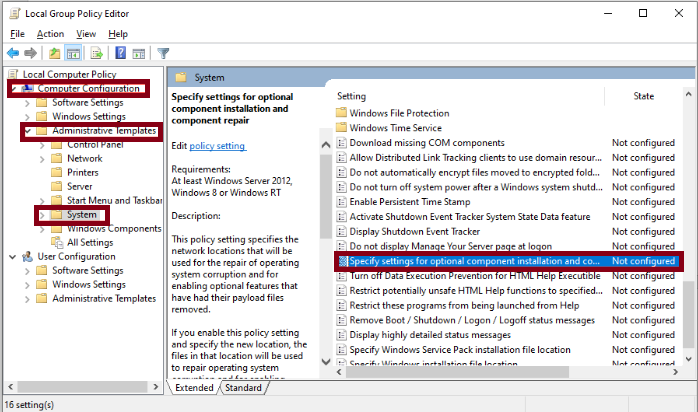
Step 3: Set the Policy to Enabled and check Download repair content and optional features directly from Windows Update instead of Windows Server Update Services (WSUS).
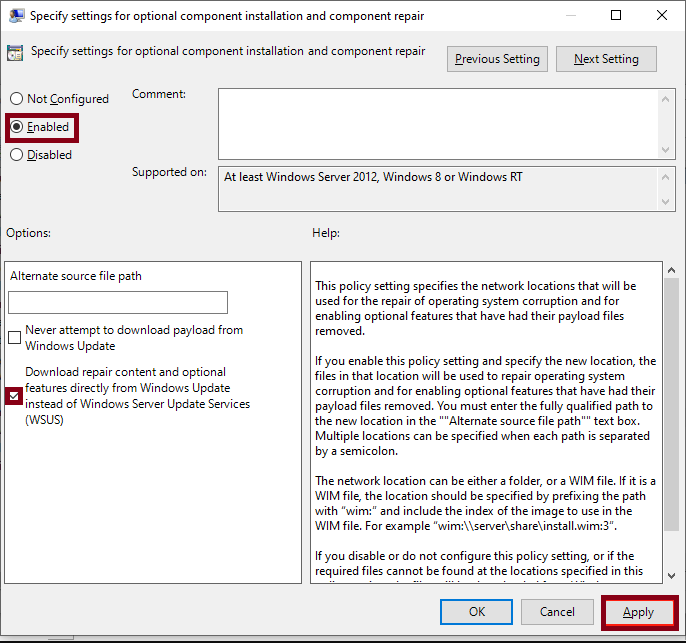
Step 4: Now click on Apply to save the configuration and then exit Local Group Policy Editor
Go for an Automatic Solution
We have tried our best to provide all the possible methods to deal with Error 0x800f0954 while installing .NET Framework. But if you are looking for a hassle free solution, in such case you are suggested to go for an automatic PC Repair Tool to resolve the error. This professional tool is capable for dealing such errors and will take your few minutes.
⇑Get PC Repair Tool from Here⇓
Conclusion
That’s all folks! We really hope this article was helpful for you and you learnt something from this article. Thanks for Reading.


