Hello dear! I just to install the KB5017497 update on my PC. The KB5017497 fails to install on Windows 11. I could not understand why this is happening so. Please, help me to resolve the problem.
Windows 11 is the newest Widows OS versions from Microsoft. Like previously released Oss, it requires to be updated from time to time to run it smoothly. Microsoft releases the latest update on regular basis. An update generally brings new functionalities, bug fixes and security patches.
Keeping your system and software up-to-date ensures that there would be no vulnerabilities to be explored by hackers. Quite recently, KB5017497 update was released on Windows 11. It contains security patches.
It fixes an issue where an attacker could convince a local user to open a specifically crafted file that could execute malicious code on an affected system. The issue is better known as .NET Framework Remote Code Execution Vulnerability (CVE-2022-26929).
Many a people reported that KB5017497 fails to install on Windows 11. If you are also dealing with the same problem, go with our manual troubleshooting solutions provided below the post. Alternatively, use PC Repair Tool and let it to check for possible Windows related issues causing the problem and repair them:
Manual troubleshooting solutions for KB5017497 fails to install on Windows 11
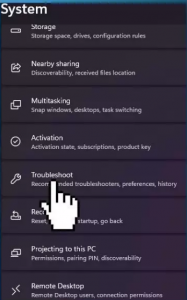
Solution 1: Use the Windows Update Troubleshooter
- Click on Windows and Select Settings,
- Pick System,
- Scroll down to click on Troubleshoot option,
- Select Other Troubleshooters,
- Navigate to Windows update troubleshooter and hit the Run option.
Solution 2: Run SFC and DISM scan
This method helps you to resolve KB5017497 fails to install on Windows 11 if the problem is caused due to corrupted system files. These are built-in Windows tools to check for such corrupted files and automatically repair them:
- On the Windows Search, type CMD,
- Right-click on Command Prompt and select Run as Administrator,
- Use the below command and hit Enter:
Sfc /scannow
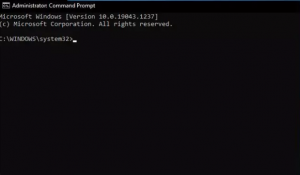
- Reboot the system and no matter what is the result that the SFC scan show, use the below commands and hit Enter on each time:
DISM /Online /Cleanup-Image /CheckHealth
DISM /Online /Cleanup-Image /ScanHealth
DISM /Online /Cleanup-Image /RestoreHealth
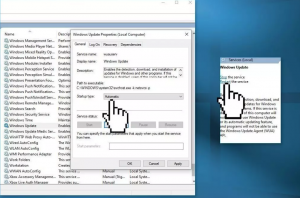
Solution 3: Restart certain services
Many users reported about this issue said that they able to resolve the problem by restarting the Windows Update and Background Intelligent Transfer Service:
- Search for services on the Windows Search and launch Services Utility,
- Navigate to Windows Update on the list,
- Double-click on it to open Properties,
- Set the Startup type to Automatic and click Apply,
- Now, restart the service,
- Perform the same action for Background Intelligent Transfer Service now and check the next if the problem is resolved now.
Solution 4: Use Microsoft Update Catalog
If automatic method to downloading Windows Update fails, you can download and install KB5017497 update manually:
- Visit the Microsoft Update Catalog website,
- Type the KB number KB5017497 on the search and hit Enter,
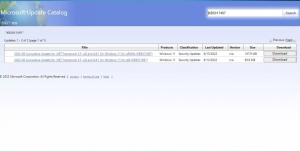
- You will see the update with different versions – find the matched one with your PC specs and Windows version,
- Click on download and proceed with its installation by following the on-screen instructions,
- Finally restart your system.
Solution 5: Reset Windows Update Components
If KB5017497 fails to install on Windows 11 issue continues, you should try this update after resetting the Windows Update Components:
- Open Command Prompt as Admin,
- In the Command line, input the below commands and hit Enter on each time:
net stop bits
net stop wuauserv
net stop appidsvc
net stop cryptsvc
Del “%ALLUSERSPROFILE%\Application Data\Microsoft\Network\Downloader\*.*”
rmdir %systemroot%\SoftwareDistribution /S /Q
rmdir %systemroot%\system32\catroot2 /S /Q
regsvr32.exe /s atl.dll
regsvr32.exe /s urlmon.dll
regsvr32.exe /s mshtml.dll
netsh winsock reset
netsh winsock reset proxy
net start bits
net start wuauserv
net start appidsvc
net start cryptsvc
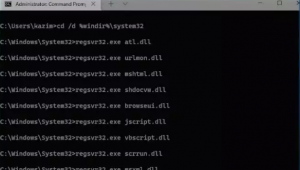
- Restart your computer to see the changes.
Solution 6: Perform an in-place upgrade
If none of the methods work, you should upgrade your system using Windows Media Creation Tool. Before proceeding, make sure you backup your personal files as a precautionary measure and disconnect all the optional peripherals, including printers, scanners, webcams and etc. Here are the steps to how to upgrade system:
- Download Windows Installation Media from official Microsoft website,
- Double-click on the installer and click on Yes option on the UAC prompt,
- Agree the terms and click Next,
- Select Upgrade this PC now and then click Next,
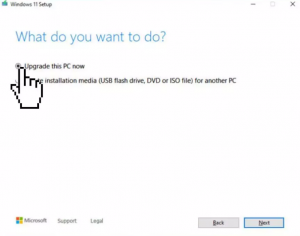
- Windows will download the necessary files,
- Once done, Agree to the terms once again and click Next,
- Finally, click on the Install option to begin upgrading process.
Conclusion
That’s all! We are now rounding off our article on how to fix KB5017497 fails to install on Windows 11 error. Hope so, these fixes are helpful for you in resolving the problem. Comment down below in case of any queries, questions or suggestions you have regarding the post.


