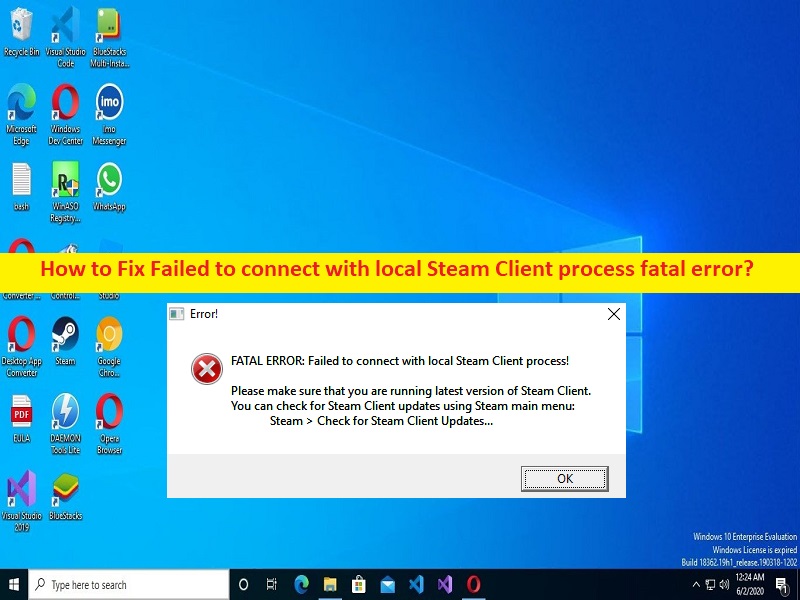
What is ‘Failed to connect with local Steam Client process fatal error’ in Windows 10/11?
In this post, we are going to discuss on How to fix Failed to connect with local Steam Client process fatal error in Windows 10/11. You will be guided with easy steps/methods to resolve the issue. Let’s starts the discussion.
‘Failed to connect with local Steam Client process fatal error’: It is common problem relating games. When you try to launch and play a game in Windows 10/11 computer, you may experience ‘Failed to connect with local Steam Client process fatal error’ error when the game fails to connect game server or when game is unable to launch and play for some reasons. It is confirmed to occur this error with Counter-Strike Global Offensive or similar Valve games such as CS 1.6, Team Fortress 2, or Half-Life games.
The possible reasons behind the issue can be the outdated/corrupted game files relating to game that is causing issue, corrupted games, required administrator permission not given to Steam Client, malware or viruses infections in computer, corruption in Windows computer, and other issues. It is possible to resolve the issue with our instructions. Let’s go for the solution.
How to fix Failed to connect with local Steam Client process fatal error in Windows 10/11?
Method 1: Fix Failed to connect with local Steam Client process fatal error with ‘PC Repair Tool’
‘PC Repair Tool’ is easy & quick way to find and fix BSOD errors, DLL errors, EXE errors, problems with programs/applications, malware or viruses infections in computer, system files or registry issues, and other system issues with just few clicks.
Method 2: Run Steam Client as Administrator
You can run Steam Client as administrator in order to fix.
Step 1: Type ‘cmd’ in Windows Search Box and press ‘SHIFT + ENTER’ keys on keyboard to open ‘Command Prompt as Administrator’
Step 2: Type the following command and hit ‘Enter’ key to execute.
taskkill /f /IM “steam.exe”
Step 3: This command will end all steam process running in background. Find and right-click on Steam Client app icon, and select ‘Open File Location’
Step 4: Find and right-click on executable of Steam Client and select ‘Properties’. Click ‘Compatibility’ tab, tick ‘Run this program as an administrator’ checkbox, and then hit ‘Apply > Ok’ button to save the changes. One done, check if the issue is resolved.
Method 3: Verify integrity of game files
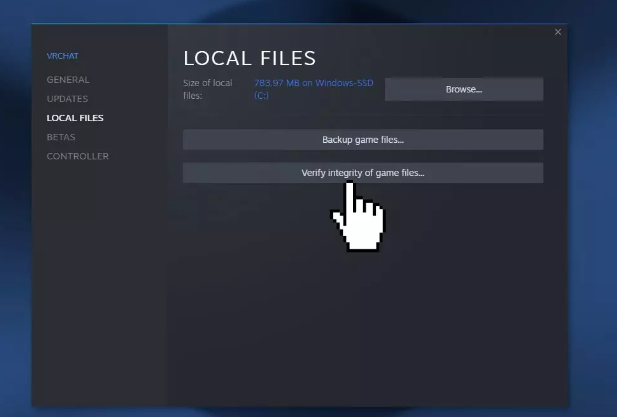
Step 1: Open ‘Steam Client’ app in Windows PC via Windows Search Box
Step 2: Go to ‘Libraries’, find and right-click on the game that is causing error, and select ‘Properties’. Click ‘Local Files’ tab and click ‘Verify Integrity of game files’ button and wait to finish scanning and repairing and once done, restart your computer and check if the issue is resolved.
Method 4: Restart Steam Client
Step 1: Press ‘CTRL + SHIFT + ESC’ keys on keyboard to open ‘Task Manager’ app
Step 2: Find and right-click on Steam relating processes, and select ‘End Task’ to close them. Once done, restart Steam Client app and then restart the game and check if the issue is resolved.
Method 5: Update Steam Client
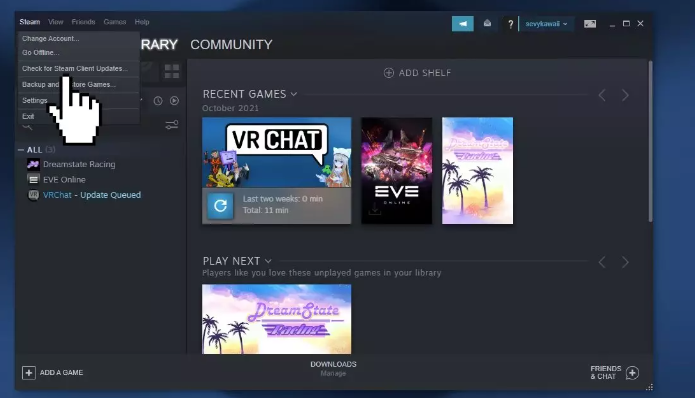
Step 1: Open ‘Steam Client’ app in Windows PC via Windows Search Box
Step 2: Click ‘Steam’ and click ‘Check for Steam Client Updates’
Step 3: Once updated, restart Steam Client and game and check if the issue is resolved.
Method 6: Log out of Steam Client and login again
This issue can be occurred due to some temporary issues with your Steam Client. You can logout of Steam client and log in again in order to fix and check if it works.
Method 7: Uninstall the game and then reinstall it
You can uninstall and then reinstall the game in order to fix.
Step 1: Open ‘Steam’ app in Windows PC and go to ‘Libraries’, find and right-click on game the that is causing issue, and select ‘Uninstall’ and then restart your computer
Step 2: After restart, download and install the game again from Steam Client or from official site and once installed, check if the issue is resolved.
Method 8: Delete AppCache folder in Steam Root
Step 1: Go to ‘Steam’s root folder’ in File Explorer and look for Appcache folder
Step 2: Right-click it and select ‘Delete’ option from context menu, confirm any dialogs and re-open Steam to see if the same error still appears.
Method 9: Opt in Steam Beta Client
Step 1: Open Steam Client go to ‘Settings > Account’
Step 2: Click ‘Change’ button under Beta participation. A new window appear, under ‘Beta Participation’ section, click to open dropdown and select ‘Steam Beta Updates’ option, and save the changes. Once done, restart your computer and check if the issue is resolved.
Method 10: Uninstall and reinstall Steam
If the issue is still persist, you can uninstall and reinstall Steam Client in computer in order to fix.
Step 1: Open ‘Settings’ app and go to ‘Apps > Apps & Features’
Step 2: Find and select ‘Steam Client’, and click ‘Uninstall’ to uninstall it and after that, restart your computer
Step 3: After restart, download and reinstall Steam client from official site and once installed, check if the issue is resolved.
Conclusion
I am sure this post helped you on How to fix Failed to connect with local Steam Client process fatal error in Windows 10 with easy ways. You can read & follow our instructions to do so. That’s all. For any suggestions or queries, please write on comment box below.


