What is ‘Event ID 566 kernel-power error’ in Windows 10?
In this article, we are going to discuss on How to fix Event ID 566 kernel-power error in Windows 10. You will be guided with easy stesps/methods to resolve the issue. Let’s starts the discussion.
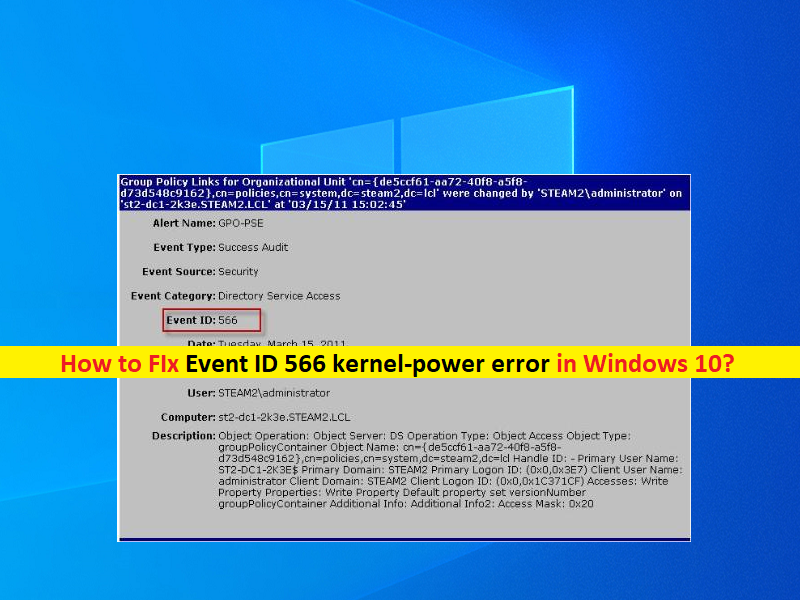
‘Event ID 566 kernel-power error’: It is common Windows Problem considered as kernel-power error in Windows Event Viewer. When you open Windows Event Viewer App in Windows 10 computer in order to check why you are experiencing system crashes issues randomly, you may experience Event ID 566 kernel-power error in Windows Event View App. This error indicates there is problem with permission requested by the user or application.
Several Windows users reported about the issue and explained they faced unexpected restarts and failure of proper performance of their Windows Operating System. The possible reasons behind the issue can be the issue with hard disk drive hardware and its connection, and other hardware issues, corruption in system files or system images, malware or viruses infections in computer, outdated Windows OS, and other Windows issues.
You should make sure all device drivers and Windows OS are up-to-date to latest & compatible version. If not, you can update your Windows OS and all necessary Windows Device Drivers in order to fix the issue. It is possible to fix the issue with our instructions. Let’s go for the solution.
How to fix Event ID 566 kernel-power error in Windows 10?
Method 1: Fix Event ID 566 kernel-power error with ‘PC Repair Tool’
‘PC Repair Tool’ is easy & quick way to find and fix BSOD errors, DLL errors, EXE errors, problems with programs/applications, malware or viruses issues, system files or registry issues, and other system issues with just few clicks.
Method 2: Disable Fast Startup
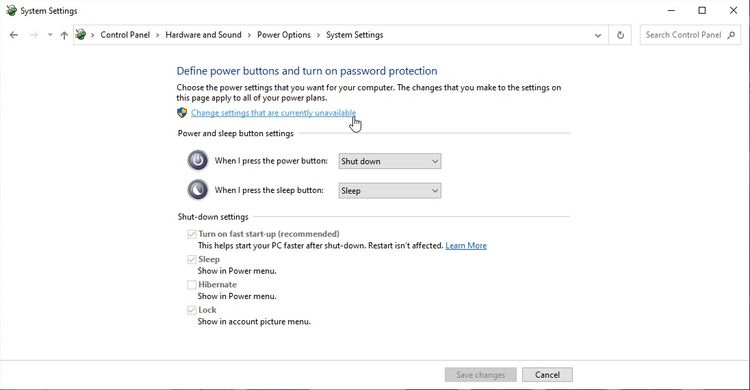
Step 1: Open ‘Control Panel’ in Windows PC via Windows Search Box and go to ‘Hardware and Sound > Power Options > Choose a Power Plan > Choose What the power buttons do’
Step 2: Untick ‘Turn ON Fast Startup’ checkbox and hit ‘Save Changes’ to save the changes and once done, check if the issue is resolved.
Method 3: Restore default power options
Step 1: Press ‘Windows + R’ keys on keyboard, type ‘powercfg -restoredefaultschemes’ in ‘Run’ window to perform restore default power options operation
Step 2: Wait to finish and once finished, restart your computer and check if the issue is resolved.
Method 4: Run the troubleshooter
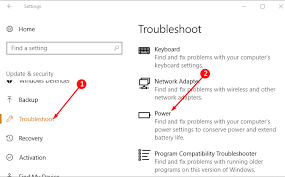
Windows built-in troubleshooter can resolve the issue. Let’s try.
Step 1: Press ‘Windows + R’ keys on keyboard, type ‘msdt.exe /id PowerDiagnostic’ in ‘Run’ window to run the ‘Power’ troubleshooter
Step 2: Follow on-screen instructions to finish troubleshooting and once done, restart your computer and check if the issue is resolved.
Method 5: Update Windows 10 OS
Updating Windows OS to latest version can resolve the issue.
Step 1: Open ‘Settings’ App in Windows PC via Windows Search Box and go to ‘Update & Security > Windows Update’ and click ‘Check for updates’ button
Step 2: Download and install all available Windows update in computer and once updated, restart your computer and check if the issue is resolved.
Method 6: Run CHKDSK Scan and SFC scan Tool
You can run CHKDSK scan and SFC Scan tool in your Windows computer to fix hard disk drive and system files corruption in order to fix the issue.
Step 1: Type ‘cmd’ in Windows Search Box and press ‘SHIFT + ENTER’ keys to open ‘Command Prompt as Administrator’
Step 2: Type the following commands one-by-one and hit ‘Enter’ key after each line to execute
Chkdsk /r
sfc /scannow
Step 3: Once executed, restart your computer and check if the issue is resolved.
Method 7: Update Device Drivers in Windows PC
You can update all necessary device drivers in Windows PC to latest & compatible driver version in order to fix the issue.
Step 1: Open ‘Device Manager’ in Windows PC via Windows Search Box and look for device that is showing Yellow mark on it
Step 2: Right-click on device driver you want to update, and select ‘Update Driver’ and follow on-screen instructions to finish update process and once updated, restart your computer to see the changes and check if the issue is resolved.
Download or reinstall Device Driver Update in Windows PC [Automatically]
You can also try to update all Windows Drivers Update to latest & compatible driver version using Automatic Driver Update Tool. You can get this tool through button/link below.
Conclusion
I am sure this post helped you on How to fix Event ID 566 kernel-power error in Windows 10. You can read & follow our instructions to do so. That’s all. For any suggestions or queries, please write on comment box below.


