What is ‘Mouse Cursor Disappears’ issue in Windows 10?
In this post, we are going to discuss on “How to fix disappearing cursor Windows 10”. You will be guided here with easy steps/methods to resolve this issue. Let’s starts the discussion.
‘Mouse Cursor Disappears’ on Windows 10: It is common problem on most of PC/laptop that indicates mouse cursor is not showing on the screen or is disappeared. This issue is usually occurred when you try to move mouse cursor on particular applications or games. It might possible that some application or game hides mouse cursor when it is in full screen mode in your Windows computer in order to reduce any interruption while using the application. In such case, you can try to fix the issue by exiting the game or application from Full Screen mode and check if it works for you.
In sort, if Mouse Cursor Disappears issue is limit to certain applications or games, then you can fix the issue by exiting the app or apply some changes in game/app settings in order to show cursor again. However, if Mouse Cursor Disappears issue is occurred in entire Windows computer including Windows desktop, taskbar, applications, and other areas of your computer, then there could be some problems in your Windows 10 computer or mouse hardware that’s why you are facing this issue.
Several users reported that they faced ‘disappearing cursor Windows 10’ issue while they tried to navigate to any location on their Windows computer. Users also reported that this issue started occurring usually after Windows update, while some users also reported the issue is occurred when they use certain application or game, when tying, coming out of sleep mode, while scrolling with fingers on laptop touchpad.
In sort, Mouse Cursor Disappears issue occurs in various situations and prevents you from navigating to any location on computer. One possible reason behind this issue can be problem with mouse hardware or its connection itself. You should make sure your mouse device is properly connected into correct port and there is no issue with connection. You can disconnect and then reconnect your mouse into computer properly in order to fix the issue.
If mouse hardware is in condition and it is working on another computer, then you need to fix your Windows PC issues that are causing this problem. Sometimes, this problem is occurred due to some temporary glitch in your Windows computer. In such case, you can fix the issue just by restarting your computer. Another possible reason behind this issue can be outdated Windows OS, corrupted/outdated mouse or touchpad driver, enabled Tablet Mode in Windows computer, and other reasons.
Touchpad/Mouse Cursor Disappears problem can be occurred if Tablet Mode feature is enabled in your Windows 10 computer. When this feature is enabled, you might not see the cursor at all. In such case, you can disable Tablet Mode feature in Windows 10 in order to fix the issue. It is possible to resolve this problem with our instructions. Let’s go for the solution.
How to fix disappearing cursor Windows 10?
Method 1: Fix Mouse Cursor Disappears problem with ‘PC Repair Tool’
If this issue is occurred due to some issue in your Windows computer, then you can fix the issue with ‘PC Repair Tool’. This software offers you to find and fix BSOD errors, DLL errors, EXE errors, problems with programs/applications, malware or viruses issues, system files or registry issues, and other system issues with just few clicks. You can get this tool through button/link below.
Method 2: Check your mouse hardware and its connection
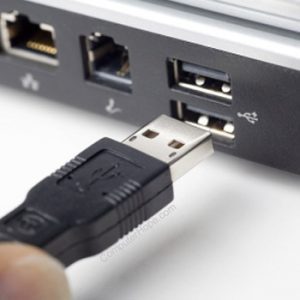
Before troubleshooting the issue, you should check if your mouse is properly connected into correct port of your computer. If you have USB mouse (wired or wireless), please check if mouse USB cable or USB receiver (wireless mouse) is properly connected into correct USB port of computer. If not, disconnect the mouse and then reconnect it properly. You can also test your mouse on another computer and check if it is working on another device. If the problem is still persist on another computer, then you can contact repair center to repair your mouse or replace it with new one.
Method 3: Restart your Windows computer
Sometimes, this problem can be occurred due to some temporary glitch in your computer. You can resolve this problem by restarting your computer. So, restart your computer and check if it works for you.
Method 4: Update Windows 10 OS
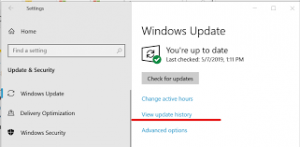
This issue can be occurred due to outdated Windows operating system installed in computer. Updating Windows 10 OS to latest update version can resolve the issue. Let’s try.
Step 1: Press ‘Windows + I’ keys on keyboard to open ‘Settings’ App in Windows 10
Step 2: In ‘Settings’ App, go to ‘Update & Security > Windows Update’ and click on ‘Check for updates’ button. Download and install the available updates in computer and once done, restart your computer to see the changes.
Method 5: Run ‘Hardware and Devices’ troubleshooter in Windows 10
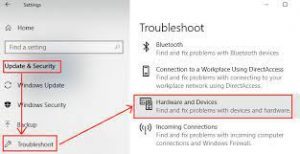
Windows 10 build-in ‘Hardware and Devices’ troubleshooter can resolve this issue. Let’s try.
Step 1: Open ‘Settings’ App in Windows 10 and go to ‘Update & Security > Troubleshoot’, find and select ‘Hardware and Devices’ troubleshooter, and click on ‘Run the troubleshooter’ button. Or you can also try to open ‘Hardware and Devices’ troubleshooter by pressing ‘Windows + R’ on keyboard to open ‘Run’ window, type ‘msdt.exe -id DeviceDiagnostic’ and hit ‘Ok’ button
Step 2: Follow on-screen instructions to finish troubleshooting and check if the issue is resolved.
Method 6: Check mouse/touchpad settings in Windows 10
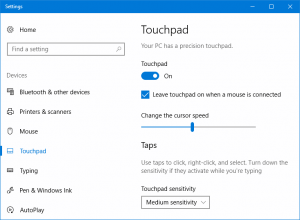
This issue can be occurred if you have disabled mouse/touchpad cursor through mouse settings in your Windows 10 computer. If you face this problem in your Windows 10 laptop, then there is some shortcut key like F6 or F9 key on laptop keyboard offers you to enable or disable touchpad. Also, you can enable/disable touchpad by pressing button on your touchpad itself. Or you can open ‘Mouse Settings’ or ‘Touchpad Settings’ in Settings App and check if settings are configured to disable mouse/touchpad. You can enable your mouse/touchpad through settings in order to resolve the issue.
Method 7: Uninstall mouse/touchpad driver in Windows 10
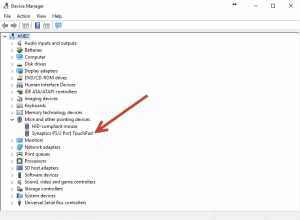
This issue can also be occurred if wrong mouse/touchpad driver is installed in your computer. You can fix the issue by uninstalling the incorrect mouse/touchpad driver and then restart your computer. Restarting computer will automatically reinstall mouse/touchpad driver.
Uninstall and reinstall mouse/touchpad driver using keyboard:
Step 1: Press ‘Windows + X’ keys on keyboard and select ‘Device Manager’
Step 2: In ‘Device Manager’, using ‘Tab’ key on keyboard to jump down to ‘Mice and other pointing devices’ category and then hit ‘Down’ arrow key to land on the category
Step 3: Now, using ‘Right’ arrow key to expand the category, using arrow key highlight the device you want to uninstall. Once selected, press ‘ALT + A’ and then hit ‘U’ key on keyboard to select ‘Uninstall’ option
Step 4: Confirm the uninstall by pressing ‘Spacebar’
Step 5: Wait to finish uninstall process. Once done, restart your computer and check if the issue is resolved.
Method 8: Download or reinstall Windows 10 drivers update [Automatically]
This issue can also be occurred due to corrupted/outdated or missing mouse/touchpad drivers or other device drivers in computer. Updating all necessary Windows drivers can resolve this issue. You can update all Windows 10 drivers with ‘Automatic Driver Update Tool’. This software will automatically find and download all Windows drivers including mouse/touchpad drivers, and then install them into computer. You can get this tool through button/link below.
Method 9: Disable Tablet Mode in Windows 10
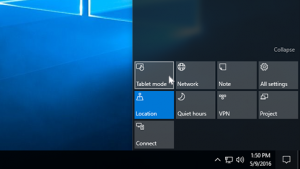
This issue can be occurred if ‘Tablet Mode’ is enabled in your Windows 10 computer. You can disable Tablet Mode in Windows 10 in order to fix the issue.
Step 1: In Windows 10, go to ‘Notification Area’ at bottom-right corner of taskbar and find ‘Tablet Mode’ icon under this section. If not appear, Collapse the menu to see it
Step 2: If Tablet Mode is Blue means it is ON, you can disable it by clicking on Tablet Mode again to turn it into Gray color means it is OFF
Method 10: Disable/enable Hardware Acceleration in Chrome

Some users reported that this issue can be resolved by disabling/enabling Hardware Acceleration feature in Chrome browser. To do so, you need to open Chrome settings and try disabling or enabling Hardware Acceleration feature, and check it works for you. You can also try to fix the issue by resetting Chrome.
Method 11: Disable ‘Hide pointer while typing’ option in Mouse Properties
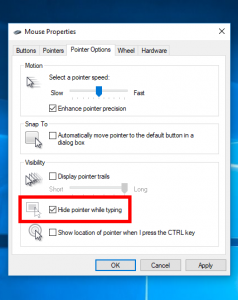
This issue can also be occurred if ‘Hide pointer while typing’ option is enabled in your mouse properties’ settings. You can disable this option in mouse settings in order to fix the issue.
Step 1: Press ‘Windows + R’ keys on keyboard, type ‘control mouse’ in the opened ‘Run’ window and hit ‘Ok’ to open ‘Mouse Properties’ window
Step 2: In ‘Mouse Properties’ window, using ‘SHIFT + TAB’ keys on keyboard to move to tab menu, strike right arrow key twice to go into ‘Pointer Options’ section, tab down to ‘Hide Pointer while typing’ option, and press ‘Spacebar’ key on keyboard to turn it OFF, and then hit ‘Enter’ to save and exit Mouse settings. Check if it works for you.
Method 12: Set Pointer Scheme to ‘None’ and Disable ‘Enable Pointer Shadow’ option in Mouse settings
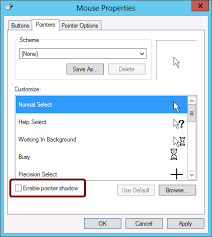
Some users reported the issue can be resolved by setting the pointer scheme to ‘None’ and disabling ‘Enable Pointer Shadow’ option in your mouse settings.
Step 1: Open ‘Mouse’ Properties using above method
Step 2: In ‘Mouse Properties’, go to ‘Pointers’ tab and select ‘None’ option from ‘Scheme’ dropdown and deselect ‘Enable Pointer Shadow’ checkbox if checked, and then hit ‘Apply’ and ‘OK’ button to save the changes and check if it works for you.
Method 13: Disable ‘Use Windows Ink’ option in your tablet properties in Windows 10
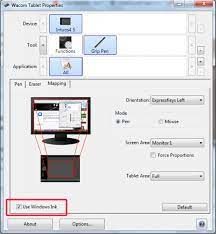
If you are using Wacom graphics tablet in your Windows 10 computer, then you can try to fix the issue by disabling ‘Use Windows Ink’ option in your tablet properties. To do so, you need to open ‘Wacom Tablet properties’ via Windows Search and go to Mapping and deselect ‘Use Windows Ink’ checkbox if checked.
If you don’t want to go this route, you can force Windows to show a diamond pointer. To do so, you need to open ‘Settings’ App in Windows 10 and go to ‘Devices > Pen & Windows Ink’ and enable ‘Show Cursor’ option, and check if it works for you.
Method 14: Fix Mouse Cursor Disappears on multiple monitors
This issue can be occurred if you are using multiple monitors or a projector. It is unlikely problem that the mouse cursor might exist on one of those screens. In such case, you can find your mouse/touchpad cursor by dragging the mouse to left or right several times until it appears on primary screen.
Method 15: Exit the app/game screen
This problem can be occurred while opening app/game screen usually in Full screen Mode. In such case, you can try to fix the issue by exiting screen by pressing ‘CTRL + ALT + DELETE’ keys on keyboard to trigger that screen, or exit the screen in order to see cursor again.
Other Methods:
If this issue is still persist, then you can try to fix the issue with below additional steps.
Step 1: Run system scan for malware or viruses with some powerful security software in order to remove infections in computer, and fix the issue. You can also try ‘PC Repair Tool’ offers the same.
Step 2: Disconnect all USB devices from computer and restart computer, after restart, connect each device one-by-one and check if problematic device
Step 3: Perform System Restore, System repair, or clean Windows 10 install as last solution to fix the issue.
Conclusion
I am sure this post helped you on How to fix disappearing cursor Windows 10 with several easy steps/methods. You can read & follow our instructions to do so. If the post really helped you, then you can share the post with others to help them. That’s all. For any suggestions or queries, please write on comment box below.


