Tips to fix Computer Policy could not be updated successfully error in Windows 10/11:
In this article, we are going to discuss on How to fix Computer Policy could not be updated successfully error in Windows 10/11. You will be guided with easy steps/methods to resolve the issue. Let’s starts the discussion.
‘Computer Policy could not be updated successfully’ error in Windows 10/11:
‘Group Policy’: Group Policy is built-in feature in Microsoft Windows operating system. It contains a variety of advanced settings, particularly for network administrators. Group Policy is not designed for single computer or Home users. It can be applied for large number of computers. This feature will be beneficial for enterprise environment, and if you are using it, then that computer is added in Active Directory.
If the Network Administrators want to change any settings, then that can be defined on domain controller using Group Policy, and then this policy can be applied to all system that is connected to local network. Also, Group Policy administrator is allowed to block access to certain sections of the Windows control panel or specific website for every computer on network. You should check if Windows Update service and Windows Installer service is running properly in computer before applying Group Policy in computer.
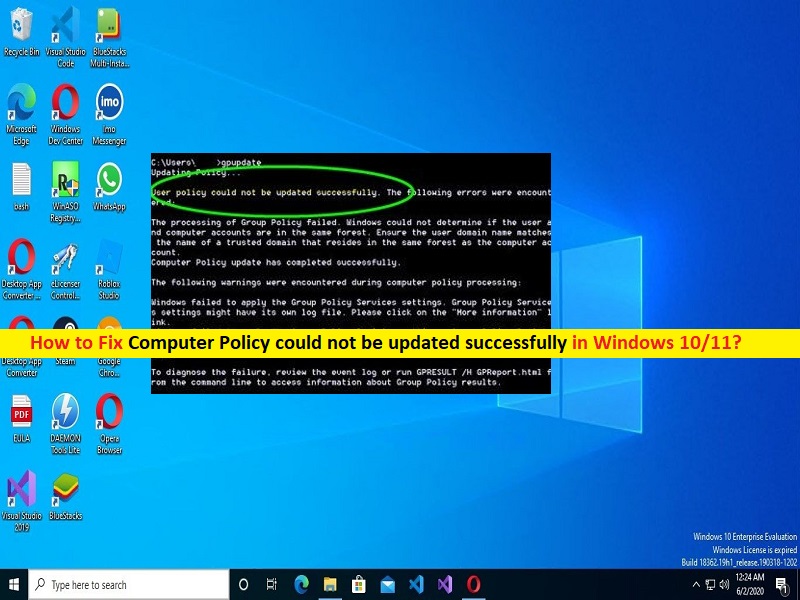
However, several users reported they faced ‘Computer Policy could not be updated successfully’ error on their Windows 10/11 computer when they tried to update Group Policy settings. This issue indicates you are unable to finish applying the update in Group Policy in Windows 10/11 computer for some reasons. There could be several reasons behind the issue including corrupted specific internal file called ‘Registry.Pol’, corruption in Windows computer and other issues. Let’s take a look at error message and then go to for the solution.
“Computer policy could not be updated successfully. The following errors were encountered:
The processing of Group Policy failed. Windows could not apply the registry-based policy settings for the Group Policy object LocalGPO. Group Policy settings will not be resolved until this event is resolved. View the event details for more information on the file name and path that caused the failure.”
How to fix Computer Policy could not be updated successfully error in Windows 10/11?
Method 1: Fix ‘Computer Policy could not be updated successfully’ error with ‘PC Repair Tool’
‘PC Repair Tool’ is easy & quick way to find and fix BSOD errors, EXE errors, DLL errors, problems with programs/applications, malware or viruses infections in computer, system files or registry issues and other system issues with just few clicks.
Method 2: Rename Registry.pol file
Step 1: At first, close Command Prompt window that is showing the ‘Computer Policy could not be updated successfully’ error.
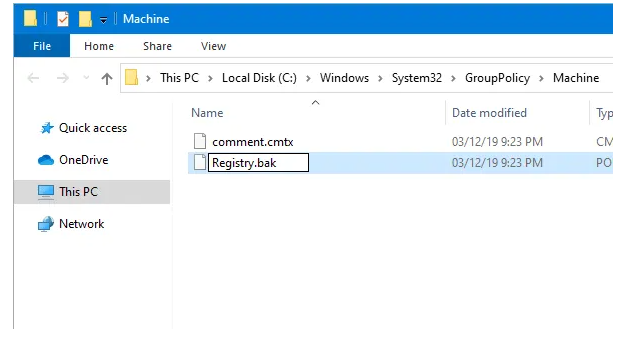
Step 2: Now, open ‘File Explorer’ and go to following path (Machine Folder). Here, ‘C’ is system drive where you installed Windows OS
C:\Windows\System32\GroupPolicy\Machine
Step 3: Or press ‘Windows + R’ keys on keyboard, type the path mentioned above in text field and hit ‘Ok’ button to open the folder
Step 4: Once the Machine folder is opened, you can find two files including comment.cmtx and Registry.pol there. You need to rename ‘Registry.pol’ file. You can rename it to Registry.back or others. BAK file extension for backup files and you can use it here so that you can recognise the old Registry.pol file correctly in future..
Step 5: Once done, restart your computer and check if the issue is resolved or you can use GPUPDATE.exe tool without any issue.
Conclusion
I am sure this post helped you on How to fix Computer Policy could not be updated successfully in Windows 10/11 with easy steps/methods. You can read & follow our instructions to do so. That’s all. For any suggestions or queries, please write on comment box below.


