
What is ‘Clipsvc not starting’ error in Windows 10?
If you are trying to start Clipsvc Service in Windows 10 computer because certain apps/files are unable to open due to disabled Clipsvc service, and experiencing ‘Clipsvc not starting’ error, then you are in right place for the solution. Here, you will be guided with easy steps/methods to resolve the issue. Let’s starts the discussion.
‘Clipsvc – Client License Service’ in Windows 10: Clipsvc service is important Windows service that enables licensing infrastructure support Window Store Apps in Windows computer. You should make sure this service is enabled and running properly in computer if you want to run and use apps/files without any issue. Disabled Clipsvc or Client License Service in Windows 10 can cause issue like some or all dependable applications might fail to function properly or even start correctly.
In sort, Clipsvc should be enabled in your device if you want to certain apps with functionality. However, several users reported that they faced ‘Clipsvc not starting’ error while they tried to start Clipsvc or Client License Service in Windows 10 computer. The text presented in error message states Windows computer is unable to start Clipsvc service and contains some error codes like ‘Error 126’. Let’s take a look at error message.
“Windows could not start Client License Service (ClipSVC) service on Local Computer.
Error 126: The specified module could not be found”
There could be several reasons behind this error including corruption system files or registry, malware or viruses attack in computer, insufficient privileges on system, due to various configuration settings and other reasons. If Clipsvc service is disabled, then no operations related to Microsoft Store licensed apps could be processed. So, it is recommended to enable this service if it is disabled in your Windows computer. Let’s go for the solution.
How to fix Clipsvc not starting error in Windows 10?
Method 1: Fix ‘Clipsvc not starting’ error with ‘PC Repair Tool’
‘PC Repair Tool’ is easy & quick way to find and fix BSOD errors, EXE errors, DLL errors, problems with programs/applications, malware or viruses issues in computer, system files or registry issues and other system issues with just few clicks. You can get this tool through button/link below.
Method 2: Enable Clipsvc or Client License Service manually in Windows 10
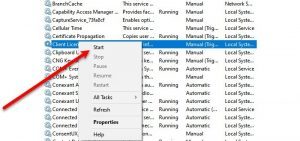
Step 1: Press ‘Windows + R’ keys on keyboard, type ‘services.msc’ in the opened ‘Run’ dialog box and hit ‘Ok’ button to open ‘Services’ window
Step 2: Find and right-click on ‘Client License Service’, and select ‘Start’ option if it is disabled
Step 3: Once done, try opening the file/application that was giving ‘Clipsvc not starting’ error, and check if the error is resolved.
Method 3: Enable Clipsvc or Client License Service via Command Prompt
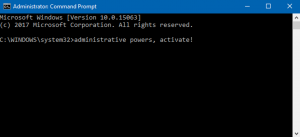
Step 1: Press ‘Windows + X’ keys on keyboard and select ‘Command Prompt as Administrator’
Step 2: Type ‘net start clipsvc’ command and hit ‘Enter’ key to execute. This command will enable Clipsvc service in computer
Method 4: Perform Microsoft Store Reset in Windows 10
Clipsvc service is related to Microsoft Store. You can reset Microsoft Store in computer in order to fix this issue.
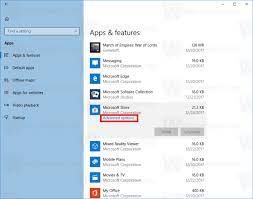
Step 1: Press ‘Windows + R’ keys on keyboard, type ‘Control’ in the opened ‘Run’ dialog box and hit ‘Ok’ to open ‘Control Panel’
Step 2: In ‘Control Panel’, go to ‘Apps > Apps & Features’, find and select ‘Microsoft Store’, and select ‘Advanced Options’
Step 3: Click on ‘Terminate’ button and then click on ‘Reset’ button, and click on ‘Reset’ button again if asked for confirmation. This will reset Microsoft Store app in your computer.
Step 4: Once done, retry opening the file/application that was giving the error, and check if the error is resolved.
Method 5: Run SFC Scan and DISM scan in Windows 10
This error can also be occurred due to corruption in Windows System Files and corruption in disk system image. You can run SFC Scan and DISM scan tool in Windows 10 to repair system files and disk system image in order to fix the error.
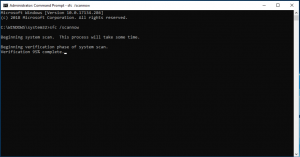
Step 1: Open ‘Command Prompt as Administrator’ using ‘Method 3’
Step 2: Run SFC Scan. Type ‘sfc /scannow’ command and hit ‘Enter’ key to execute
Step 3: Once executed, run DISM scan. Type the following command and hit ‘Enter’ key to execute
DISM /Online /Cleanup-Image /RestoreHealth
Step 4: Once executed, restart your computer to see the changes and check if the error is resolved.
Method 6: Run a script
If the issue is still persist, then you can try to fix the issue by running a script. Let’s try. But before that you should create a system restore point that could help you to restore your computer in case of damage.
Step 1: Type ‘Create a restore point’ in ‘Windows Search Box’ and open it from results appear
Step 2: Click on ‘Create’ in the opened window, name the restore point and wait till the process is finished
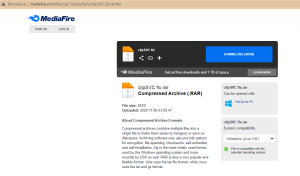
Step 3: Now, open your browser and visit ‘http://www.mediafire.com/file/oup71iopby5kj1e/clipSVC_fix.rar/file’ page to download a REG file in your computer
Step 4: Once downloaded, find and extract it and double-click on it
Step 5: Once the script is executed, repeat ‘Method 3’ again to start Clipsvc service via Command Prompt.
Step 6: Once done, restart your computer and check if the error is resolved.
Conclusion
I am sure this post helped you on How to fix Clipsvc not starting issue in Windows 10 with several easy steps/methods. You can read & follow our instructions to do so. That’s all. For any suggestions or queries, please write on comment box below.


