RSAT or Remote Server Administration tool is an important component using which administrators can manage computers remotely. This feature is available on all Windows versions from Vista to the newly Windows 11. But, you can only use it on the professional or Enterprise editions.
You can install RSAT on Windows 11 through graphical interface as well as by using command line. The first method is useful for less experienced users as it allows them to see each component. For a quick guide, you can install it on Windows 11 from settings by the steps below:
- Go to the Settings and click on Apps,
- Click on Optional Features, and then select View Feature button,
- Type RSAT in the search tab and select all variants you want to install,
- Click Next to continue,
- Wait now for the selected components to install.
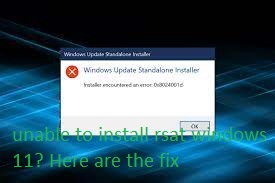
Many have reported problem “unable to install RSAT Windows 11”. This creates an obvious frustration among them. There could be some Windows related issues due to which they are receiving the issue and accordingly they might receive a bunch of errors.
As an instance, the RSAT installer encountered an error 0x8024001d. No matter the cause, below is the bunch of solutions that you should try in this case to get the required solution:
Fixes for cannot install RSAT on Windows 11
Fix 1: Use PowerShell command
- Press Win+ S to open Search menu,
- Type in Terminal on the search filed and hit Enter,
- Right-click on relevant search result and select Run as Administrator,
- If received UAC prompt, click on Yes option,
- Now, paste the below command in the Powershell and hit Enter:
RSAT:Get-WindowsCapability -Name RSAT* -Online | Add-Windows Capability -Online
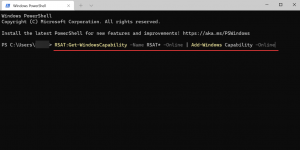
This way, you will be able to install RSAT. The chances are very low that you will find trouble in performing the installation process. Still, if the problem continues, move to our next solution.
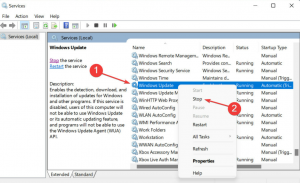
Fix 2: Modify Registry
- On the Windows Search, type Services in the search field and click on the relevant result,
- Go to the Windows Update, right-click on it and select Stop option,
- Now, press Win+ R, type in regedit and hit Enter to open Registry Editor,
- If received UAC prompt, click on Yes option,
- Now, paste the below path in the address bar at the top and hit Enter:
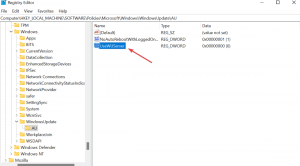
HKEY_LOCAL_MACHINE\SOFTWARE\Policies\Microsoft\Windows\WindowsUpdate\AU
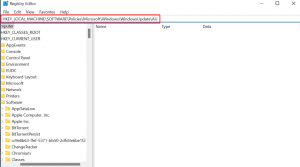
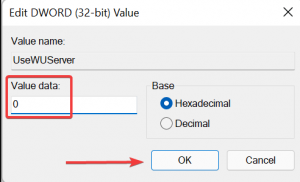
- Double-click on the UseWUServer key the then and enter 0 under the value data and click OK to save it,
- Now, go to the services app again, right-click on Windows Update and select Start,
Restart the computer now for the changes take place and check now if problem unable to install RSAT Windows 11 is now gone.
Fix 3: Make changes to group policy
- Press Win+ R, type in gpedit in the text filed and hit Ok button to enter Local Group Policy Editor,
- Go to the Computer Configuration, double-click on Administrative Templates and select system under it,
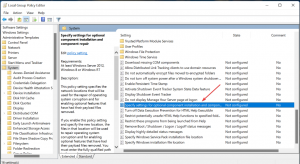
- Double-click on Specify settings for optional components installation and component repair policy on the right,
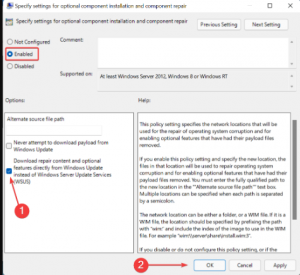
- Then, select the Enabled option and tick the checkbox for Download repair content and optional features directly from Windows Update instead of Windows Server Update Services,
- Click OK one done and restart the device for the best result.
If none of the methods work, we recommend you use PC Repair Tool – an automatic tool that would look for Windows related issues and provide their automatic fix. It is capable of fixing problems related to corrupted system files, EXEs and DLL files error, app-malfunctions, registry errors and even malware infections. Here is its direct download link.
Conclusion
That’s all! We have provided all possible fixes for cannot install rsat on windows 11. Hopefully, these methods are helpful in getting the required fix and now you are able to install RSAT on your Windows OS. Kindly, appreciate our effort in case of finding it helpful for you in anyway.


