What is ‘Bad Image error 0xc0000428’ in Windows 10/11?
In this article, we are going to discuss on “How to fix Bad Image error 0xc0000428 in Windows 10/11”. You will be guided here with easy steps/methods to resolve the issue. Let’s starts the discussion.
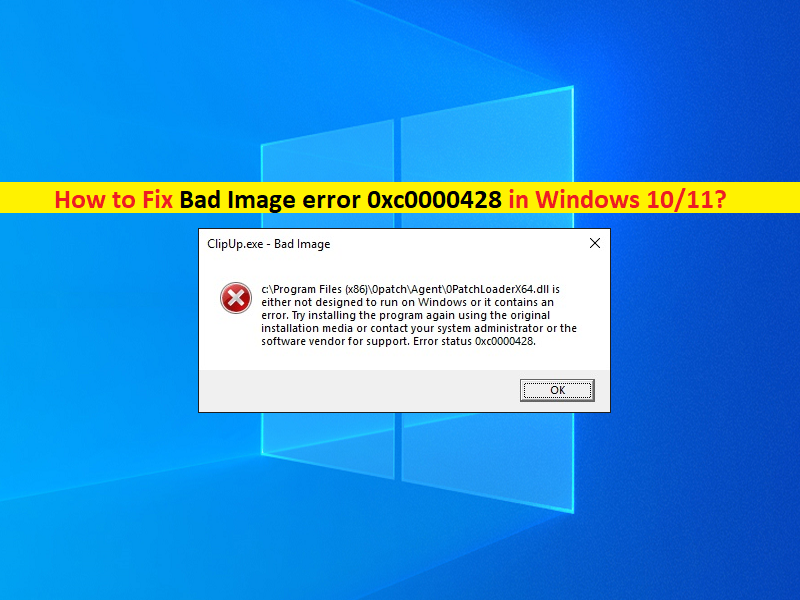
‘Bad Image error 0xc0000428’: It is common Windows Problem considered as Bad Image error. This error is appeared usually when you try to open/launch or an application in your Windows 10/11 computer. This error blocks from running applications or programs in computer for some reasons. This Bad Image error happens if the files and libraries that are needed to run the program are corrupted or damaged. Let’s take a look at error message.
“Bad Image – File is either not designed to run on Windows or it contains an error. Try installing the program again using the original installation media or contact your system administrator or the software vendor for support. Error status 0xc0000428”
The possible reasons behind ‘Bad Image error 0xc0000428’ error can be bad or corrupted system files, corruption in hard disk drive system images or corruption in hard drive itself. In such case, you can try to fix the issue by running SFC scan to repair system files, run DISM scan to repair hard drive system file, and run CHKDSK scan to repair corruption in hard disk drive. Another possible reason behind the issue can be corruption or missing Microsoft Visual C++ Redistributable Package.
You can download and install latest Microsoft Visual C++ Redistributable Package in your Windows 10/11 computer in order to fix the issue. Also, this error can be occurred due to some problematic third-party applications installed in your computer. You can perform Clean Boot in computer to starts your computer with minimal startup items/services and check if it works for you. Let’s go for the solution.
How to fix Bad Image error 0xc0000428 in Windows 10/11?
Method 1: Fix ‘Bad Image error 0xc0000428’ with ‘PC Repair Tool’
‘PC Repair Tool’ is easy & quick way to find and fix BSOD errors, DLL errors, EXE errors, problems with programs/applications, malware or viruses issues, system files or registry issues, and other system issues with just few clicks. You can get this tool through button/link below.
Method 2: Uninstall and reinstall program that is giving error
One possible way to fix the issue is to uninstall the program that is causing error, and then reinstall it in computer.
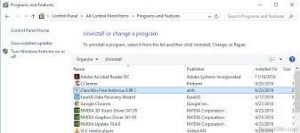
Step 1: Open ‘Control Panel’ in Windows 10 via Windows Search Box and go to ‘Uninstall a program > Programs & Features’
Step 2: Find and select the program that is giving error, and click ‘Uninstall’ and after that, restart your computer
Step 3: After restart, download and install or reinstall the application again and check if the error is resolved.
Method 3: Run SFC scan in Windows 10
You can run SFC scan tool to repair system files in computer and resolve the issue as well.
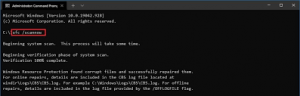
Step 1: Type ‘cmd’ in Windows Search Box and press ‘SHIFT + ENTER’ keys on keyboard to open ‘Command Prompt as Administrator’
Step 2: Type ‘sfc /scannow’ and hit ‘Enter’ key to execute.
Step 3: Once executed, restart your computer to see the changes and check if the error is resolved.
Method 4: Upgrade Microsoft Visual C++ Redistributable Package

This problem can also be occurred due to corruption or missing Microsoft Visual C++ Redistributable Package in computer. You can download and install latest version of this package in computer in order to fix the issue. To do so, open your browser and visit ‘Microsoft Official site’, and download & install Microsoft Visual C++ Redistributable Package. Once installed, restart your computer and check if it works for you.
Method 5: Update Windows 10 OS
Updating Windows 10 OS to latest version can resolve any computer issue. Let’s try.
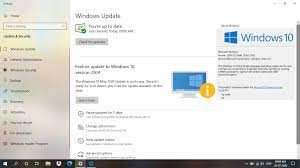
Step 1: Open ‘Settings’ App in Windows 10 via Windows Search Box and go to ‘Update & Security > Windows Update’
Step 2: Click ‘Check for updates’ button, download and install all available updates in computer and once updated, restart your computer and check if the error is resolved.
Method 6: Uninstall problematic Windows Update
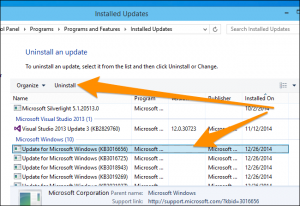
Sometimes, this error is appeared after recent Windows update or some problematic Windows update in computer. You can uninstall problematic updates in computer.
Step 1: Open ‘Settings’ App and go to ‘Update & Security > Windows Update > Update History > Uninstall Updates’
Step 2: Find and right-click on recent update or problematic update, and select ‘Uninstall’ option to uninstall the update. Once done, restart your computer and check if the error is resolved.
Method 7: Perform Clean Boot in Windows 10
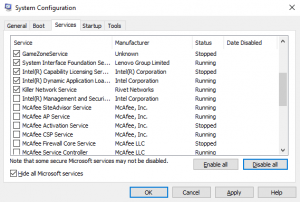
If the issue is still persist, then you can perform clean boot operation in computer offers you to start your computer with minimal startup items/services or third-party apps.
Step 1: Press ‘Windows + R’ keys on keyboard, type ‘msconfig’ in ‘Run’ window and hit ‘Ok’ button to open ‘System Configuration’
Step 2: In the opened window, click ‘Services‘ tab, tick ‘Hide all Microsoft Services’ checkbox, and hit ‘Disable All’ button
Step 3: Finally, click ‘Apply’ and ‘Ok’ button to save the changes, and restart your computer and check if the error is resolved.
Method 8: Perform System Restore
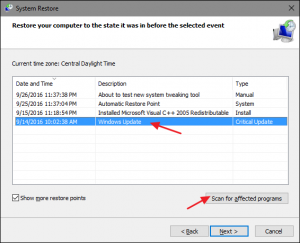
You can restore your computer to restore point according to date & time when there was no issue at all in computer in order to fix the issue.
Step 1: Press ‘Windows + R’ keys on keyboard, type ‘rstrui’ in ‘Run’ window and hit ‘Ok’ button to open ‘System Restore’
Step 2: In the opened window, click ‘Next’, select a restore point according to date & time where everything was in working condition, and click ‘Next > Finish’ to start restoring process. Once done, restart your computer and check if the error is resolved.
Conclusion
I hope this post helped you on How to fix Bad Image error 0xc0000428 in Windows 10/11 with several easy steps/methods. You can read & follow our instructions to do so. That’s all. For any suggestions or queries, please write on comment box below.


