What is ‘AutoIt error’ in Windows 10/11?
In this article, we are going to discuss on How to fix AutoIt error Windows 10/11. You will be guided with easy steps/methods to resolve the issue. Let’s starts the discussion.
‘AutoIt’: AutoIt is freeware programming language for Microsoft Windows OS based computer. It was primarily intended to create automation scripts for Microsoft Windows programs but has since grown to include enhancements in both programming language design and overall functionality. AutoIt Syntax is similar to that found in BASIC family of languages. AutoIt is general purpose, third-generation programming language with classical data model and variant data type that can store several types of data including arrays.
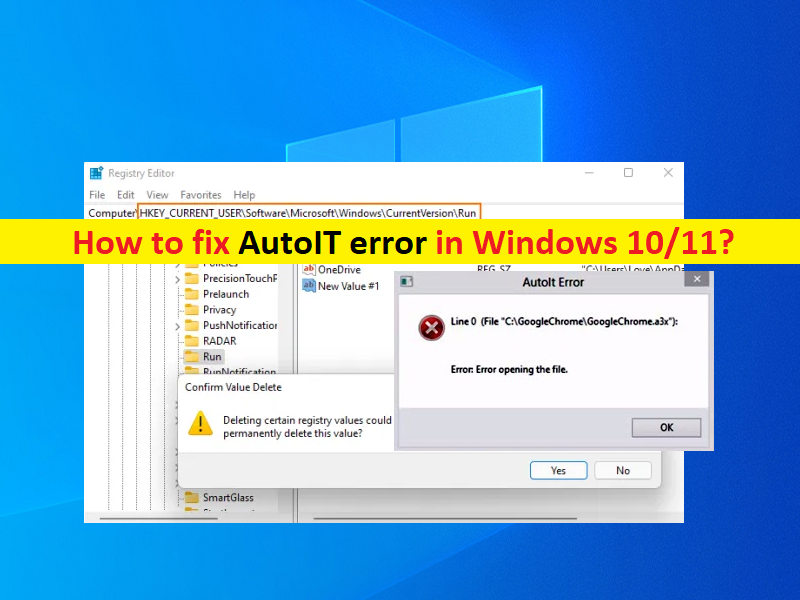
However, several Windows users reported they faced AutoIt error when they tried to start their Windows 10/11 computer. Some users reported the issue is occurred possibly due to corruption in data relating to AutoIt. It could be because files, registry values, and/or folders relating to AutoIt. The error is appeared with path of AutoIt that is causing error. Let’s take a look at error message.
“Line 0 (File “C:\GoogleChrome\GoogleChrome.a3x”):
Error: Error opening the file.”
The possible way to fix the AutoIt error is to delete AutoIt entries from computer completely. Here, you are provided with several easy ways to remove AutoIt from your Windows 10/11 computer in order to fix the AutoIt error. This issue can also be occurred due to some malware or viruses infections in computer so you can run system scan for malware or viruses in computer with some powerful antivirus. Let’s go for the solution.
How to fix AutoIt error Windows 10/11?
Method 1: Fix ‘AutoIt error’ with ‘PC Repair Tool’
‘PC Repair Tool’ is easy & quick way to find and fix BSOD errors, DLL errors, EXE errors, problems with programs/applications, malware or viruses issues, system files or registry issues, and other system issues with just few clicks.
Method 2: Delete AutoIt entries using File Explorer
You can delete AutoIt entries including all files and folders relating to AutoIt from File Explorer in order to fix the issue.
Step 1: Open ‘File Explorer’ and go to ‘C: Drive’ or the drive where you have installed Windows. Or go to Program Files, Windows, System, System32, and more, in order to find suspicious files
Step 2: Find and delete suspicious files including KHATRA.exe, names.txt, svchost.com, sass.exe, Ask.com.exe, Exterminate It!.exe, driver—grap.exe, xerox.exe, etc, from there.
Step 3: Also check if there are folders like cuhu, CIDD_P, and bycool1, present in the user profile, Windows, and System folder. If yes, delete such malicious files/folders from there and once done, restart your computer and check if the issue is resolved.
Method 3: Delete AutoIt strings values using Registry Editor
If there are suspicious strings values like Windows Update, AutorunRemover.exe, GoogleChrome, UnlockerAssistant, USBScan.exe, NBKeyScan, ApnUpdater, SoundMan, ShStatEXE, PTHOSTTR, ShutdownEventCheck, WHITNEY_S2P, GhostStartTrayApp, igfxhkcmd, Adobe ARM, SkyTel, HotKeysCmds, BCSSync, GrooveMonitor, etc., then you need to delete these strings value in order to fix the issue.
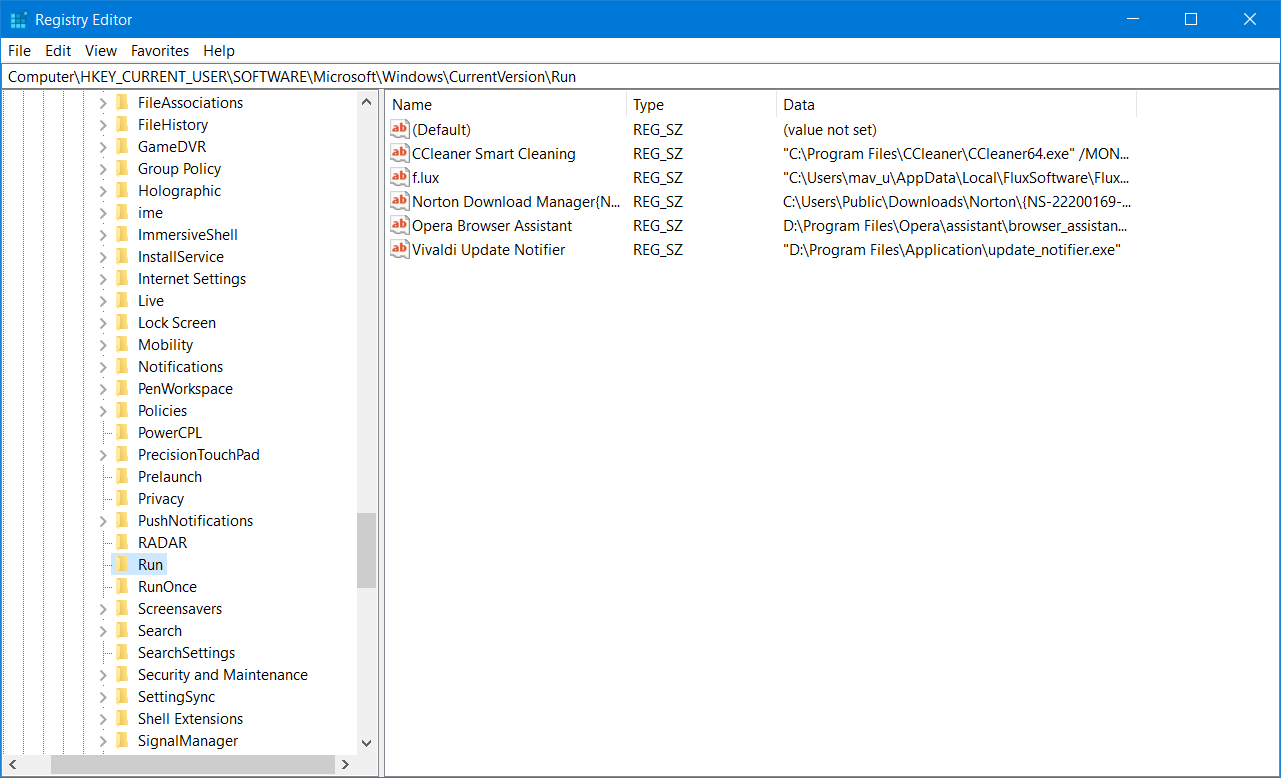
Step 1: Open ‘Registry Editor’ in Windows PC via Windows Search Box and navigate to following path
HKEY_CURRENT_USER\Software\Microsoft\Windows\CurrentVersion\Run
Step 2: Select all those suspicious entries in right-pane, right-click on each of them and select ‘Delete’ to delete them.
Method 4: Remove AutoIt scripts from Windows Startup
You can also try to fix the issue by removing AutoIt scripts from Windows Startup.
Step 1: Download and install ‘Microsoft Autoruns for Windows’ from Microsoft Official site
Step 2: Once installed, open it and click ‘Logon’ tab
Step 3: Look for the references to ‘a3x’ and ‘GoogleChrome’. If you find such references, select them
Step 4: Press ‘Delete’ button and hit ‘Ok’ button to confirm
Step 5: If you are not able to find such entries, switch to ‘Everything’ tab, click ‘Search’ icon at top-left part of its interface to find ‘GoogleChrome’
Step 6: Once you find the item, uncheck the checkboxes selected for that entry. This will disable the Registry entry relating to that item. Once done, restart your computer and check if the issue is resolved.
Method 5: Uninstall AutoIt using Control Panel
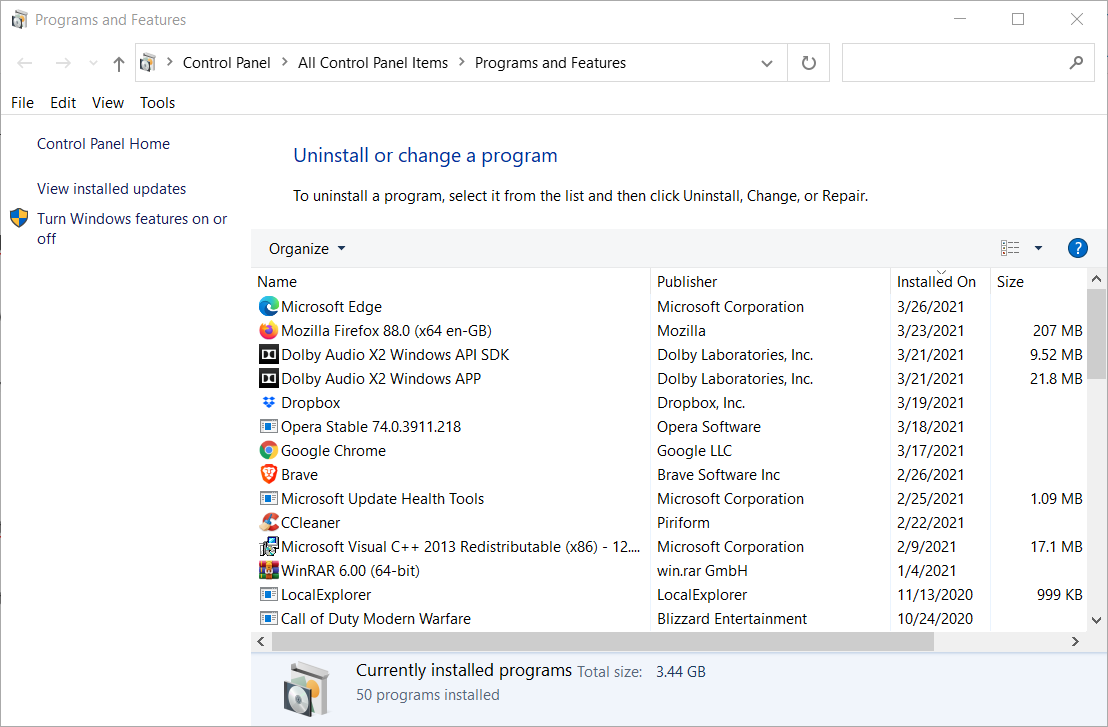
Step 1: Open ‘Control Panel’ in Windows PC and go to ‘Uninstall a Program > Programs & Features’
Step 2: Fins and select ‘AutoIt’, and click ‘Uninstall’ to uninstall it and once uninstalled, restart your computer and check if the issue is resolved.
Conclusion
I am sure this post helped you on How to fix AutoIt error Windows 10/11 with several easy steps/methods. You can read & follow our instructions to do so. That’s all. For any suggestions or queries, please write on comment box below.


