What is ‘Agent Activation Runtime_15831 High CPU And Memory Consumption’ issue in Windows 10/11?
If you are facing Agent Activation Runtime_15831 High CPU And Memory Consumption or Service Host: Agent Activation Runtime high CPU/Memory usage issue in your Windows 10/11 computer, and searching for ways to fix on the web, then you are in right-place for the solution. Here, you are provided with easy steps/methods to resolve the issue. Let’s starts the discussion.
‘Agent Activation Runtime_15831 High CPU And Memory Consumption’ issue:
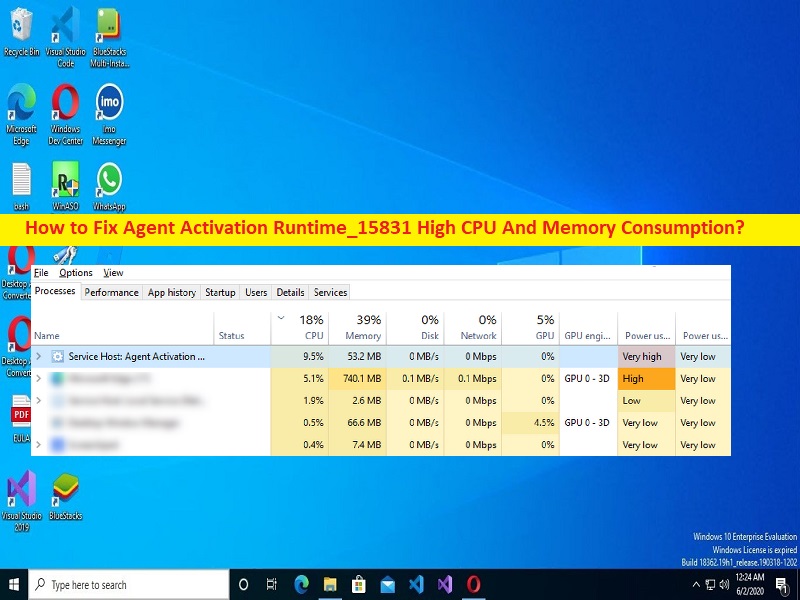
When you open Task Manager app in Windows 10/11 computer in order to check which program/process is draining your computer performances, you may experience Agent Activation Runtime_15831 or Service Host: Agent Activation Runtime is showing higher percentage under CPU/Memory section. This percentage may vary from 70-100% in Task Manager which indicates Agent Activation Runtime process is consuming a lot of system resources and causing system performance slowdown issue.
This issue can be occurred if sound card driver is not properly installed or is corrupt. You should make sure sound card driver is properly installed and is up-to-date to latest & compatible version in computer if you don’t want to face this type of issue. This issue can be occurred due to wrong configuration of Cortana, issue with Windows audio services, malware or viruses infections in computer, corruption in Windows computer, and other issues. Let’s go for the solution.
How to fix Agent Activation Runtime_15831 High CPU And Memory Consumption issue in Windows 10/11?
Method 1: Fix Agent Activation Runtime_15831 High CPU And Memory Consumption with ‘PC Repair Tool’
‘PC Repair Tool’ is quick & easy ways to find and fix BSOD errors, DLL errors, EXE errors, problems with programs/applications, malware or viruses infections in computer, system files or registry issues, and other system issues with just few clicks.
Method 2: Disable and enable Audio service
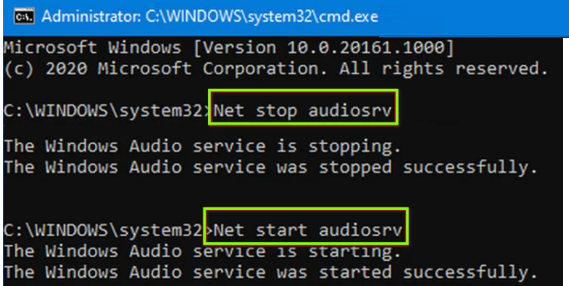
One possible way to fix the issue is to disable audio service and then re-enable it in computer.
Step 1: Type ‘cmd’ in Windows Search Box and press ‘CTRL + SHIFT + ENTER’ keys on keyboard to open ‘Command Prompt as Administrator’
Step 2: Type the following commands and hit ‘Enter’ key after each to execute.
net stop audiosrv
net start audiosrv
Step 3: Once executed, restart your computer and check if the issue is resolved.
Method 3: Logout of Cortana and disable it at Startup in Windows computer
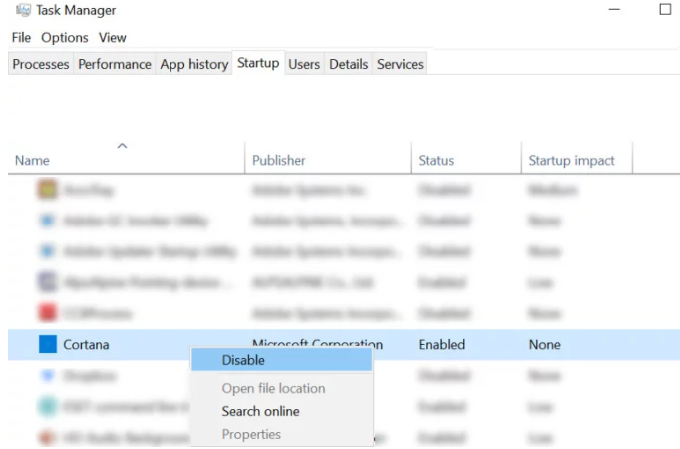
Bad configured Cortana in computer could be a reason behind the issue. You can fix the issue by disabling signing out of Cortana and disable it in Startup in computer.
Step 2: Open ‘Cortana’ app via Windows Search Box, click ‘Three-horizontal dots’ at top-left corner of app and select ‘Sign Out’ and confirm sign out of Cortana
Step 3: Now, right-click ‘Taskbar’, and uncheck ‘Show Cortana button’ option and check if the issue is resolved.
Step 4: If not, press ‘CTRL + SHIFT + ESC’ keys on keyboard to open ‘Task Manager’ app, click ‘Startup’ tab, find and right-click ‘Cortana’ app, and select ‘Disable’ option
Step 5: Now, type ‘Cortana’ in Windows Search Box and right-click on Cortana from results appear, and select ‘App Settings’
Step 6: Under ‘Runs at log-in’, disable Cortana by toggling its switch to OFF position and then restart your computer, and check if the issue is resolved.
Method 4: Uninstall and reinstall sound card driver
Another way to fix the issue is to uninstall sound card driver and then reinstall it in computer.
Step 1: At first, you need to download latest & compatible sound card driver from your sound card manufacturer official site
Step 2: Now, open ‘Device Manager’ app in Windows PC via Windows Search Box and expand ‘Sound, video and game controllers’ category
Step 3: Right-click on your sound card and select ‘Uninstall Driver’ to uninstall it and once done, restart your computer to let Windows install the default sound card driver.
Step 4: If the issue is still persist, you can install the downloaded sound card driver which you download in ‘step 1’, and once installed, check if the issue is resolved.
Download or reinstall sound card driver update in Windows PC [Automatically]
You can also try to update all Windows drivers including sound card driver using Automatic Driver Update Tool. You can get this tool through button/link below.
Method 5: Disable Agent Activation Runtime service
You can also try to fix the issue by disabling Agent Activation Runtime service.
Step 1: Open ‘Services’ app in Windows PC via Windows Search Box
Step 2: Find and double-click ‘Agent Activation Runtime’ service to open its Properties. The service may have different numbers at end like Agent Activation Runtime_15831
Step 3: Select ‘Disabled’ option from ‘Startup Type’ dropdown, and hit ‘Stop’ button under ‘Service Status’ section, and hit ‘Apply > ok’ button to save the changes. Once done, restart your computer and check if the issue is resolved.
Method 6: Fix Agent Activation Runtime_15831 High CPU And Memory Consumption issue using Registry Editor
Step 1: Open ‘Registry Editor’ app in Windows PC via Windows Search Box and go to following path
Computer\HKEY_LOCAL_MACHINE\SYSTEM\CurrentControlSet\Services\
Step 2: Select ‘AarSvc’ registry key, double-click on ‘Start’ value in right pane to edit, set its value data to ‘4’, and hit ‘Ok’ button to save the changes
Step 3: Now, select ‘AarSvc_XXXXX’ Registry key where XXXX are some random letters/numbers. Double-click ‘Start’ value to edit, set its value data to ‘4’ and hit ‘Ok’ button to save the changes. Once done, restart your computer and check if the issue is resolved.
Conclusion
I am sure this post helped you on How to fix Agent Activation Runtime_15831 High CPU And Memory Consumption in Windows 10/11 with easy ways. You can read & follow our instructions to do so. That’s all. For any suggestions or queries, please write on comment box below.


