Tips to Enable Hardware Acceleration Windows 10/11:
In this article, we are going to discuss on How to Enable Hardware Acceleration Windows 10/11. You will be guided with easy steps/methods to do so. Let’s starts the discussion.
What is ‘Hardware Acceleration’ feature in Windows 10/11?
‘Hardware Acceleration’: Hardware Acceleration is the use of computer hardware designed to platform specific functions more efficiently when compared to software running on a general-purpose central processing unit (CPU). Any transformation of data that can be calculated in software running on generic CPU can also be calculated in custom-made hardware, or in some mix of both.
Hardware Acceleration is the process that accelerates the performance of your system by using hardware instead of only software. Hardware Acceleration helps in smooth rendering of graphics. Hence, at times, you will find it loosely named graphic acceleration as well. When you give your computer a tasks, it first goes to processor and then to hardware. This hardware mainly the sound or graphics card and your processor receive the information sequentially.
What does Hardware Acceleration do?
Hardware Acceleration feature is designed to improves the speed of your computer in doing specific operations. It is process through which your computer offloads certain tasks to specialized hardware. For example, Photoshop is one of most graphics intensive tools and hence it puts a lot of pleasure on your CPU. When you use such an application on computer, your computer will first throw it to software before sending it to hardware.
The main purpose of Hardware Acceleration is to enhance the application processing through hardware. The use of Hardware Acceleration in your computer various different purposes including Graphic-intensive works using GPU or graphics processing unit, A Digital Signal processor helps in better digital signal processing, Sound processing using the sound card, AI accelerator for Artificial Intelligence, Various computing tasks using FGPA (Field-Programmable Gate Arrays), SoC (Systems-on-Chip), ASICs (Application-Specific Integrated Circuits).
How to Enable Hardware Acceleration Windows 10/11?
Method 1: Turn ON Hardware Acceleration on Windows 10
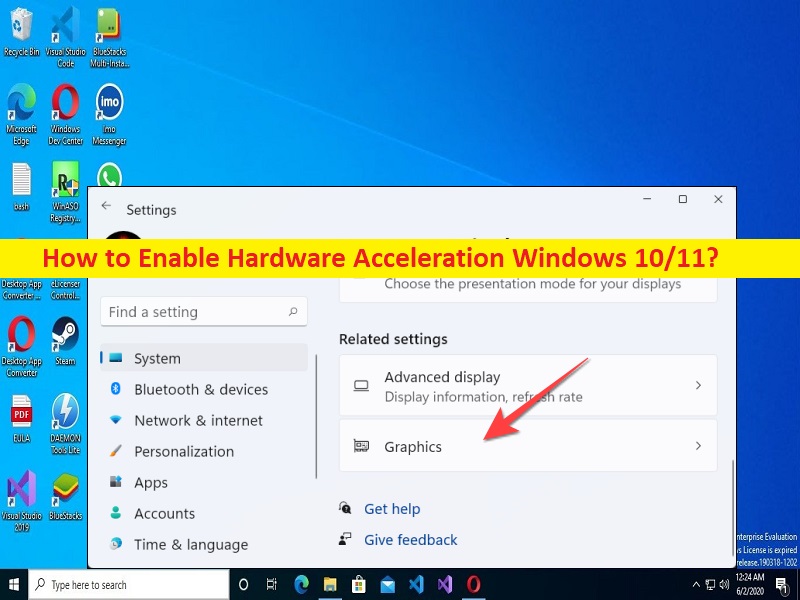
Step 1: Open ‘Settings’ app in Windows PC via Windows Search Box, and go to ‘System > Display’
Step 2: Click ‘Graphics Settings’. If hardware-accelerated GPU scheduling is available for your device, you will find an option here. Turn it ON
Step 3: Once done, restart your computer and check if it works for you.
Method 2: Turn ON Hardware Acceleration on Windows 11
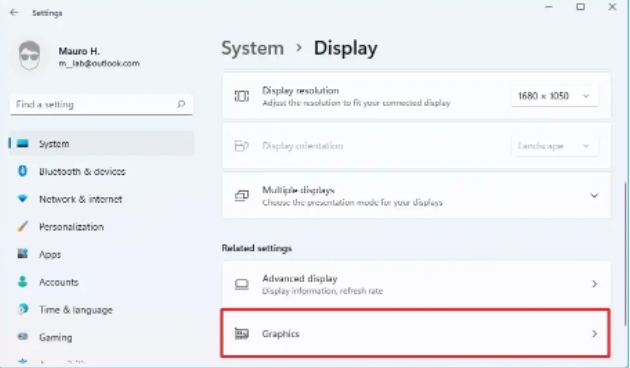
Step 1: Open ‘Settings’ app and go to ‘System > Display settings’
Step 2: Scroll down to find and click ‘Graphics’. If hardware acceleration is supported on your device, you should find an option ‘Change default graphics settings’ and click on it, and you should find the option to enable hardware-accelerated GPU scheduling. Restart your computer and check if it works.
Method 3: How to enable Hardware Acceleration using Registry?
To enable hardware-accelerated GPU scheduling with registry, follow the steps below.
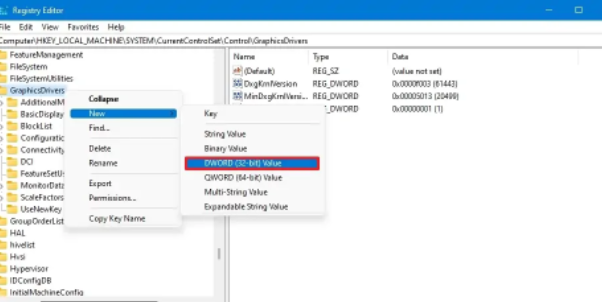
Step 1: Open ‘Registry Editor’ app in Windows PC via Windows Search Box and go to following path
HKEY_LOCAL_MACHINE\SYSTEM\CurrentControlSet\Control\GraphicsDrivers
Step 2: Right-click ‘GraphicsDrivers’ and select ‘New > DWORD (32-bit) value’ and name the value to ‘HwSchMode’. Double-click on this newly created key to edit, set its value from ‘0’ to ‘2’ and hit ‘Ok’ button to save the changes and once done, restart your computer and check if the issue is resolved.
How to disable Hardware Acceleration on Windows 10/11?
Step 1: Open ‘Settings’ app and go to ‘System > Display > Graphics Settings’
Step 2: Click ‘Change Default graphics settings’ and toggle off ‘Hardware-accelerated GPU scheduling’ switch and once done, check if it works.
Fix Windows PC issues with ‘PC Repair Tool’:
‘PC Repair Tool’ is easy & quick way to find and fix BSOD errors, DLL errors, EXE errors, problems with programs/applications, malware or viruses infections in computer, and other system issues with just few clicks.
Conclusion
I hope this post helped you on How to Enable Hardware Acceleration Windows 10/11. You can read & follow our instructions to do so. That’s all. For any suggestions or queries, please write on comment box below.


